📋 Requirements & Prerequisites
Autotaskclick is built for IPTV resellers who already make sales or just want to start this business. Before you begin, ensure you have the following:
What Autotaskclick Provides:
- Complete WordPress plugin for automation
- Professional reseller dashboard with analytics
- Automated order delivery to customer email
- Payment threshold protection (anti-ban system)
- Country-based panel routing
- Email templates and reminder system
- 24/7 support via live chat
Once you have all prerequisites, proceed to the Plugin Upload & Activation section to begin the setup process.
🔌 Plugin Upload & Activation
After signing up with us, you will receive an email containing the plugin ZIP file download link.
📥 Installation Steps
- Download the plugin ZIP from the email you received after signup
- Log in to your WordPress admin dashboard
- Go to Plugins → Add New → Upload Plugin
- Upload the ZIP file and click Activate
- No additional plugins required — we don't need SMTP or email plugins. Our system handles all email sending automatically.
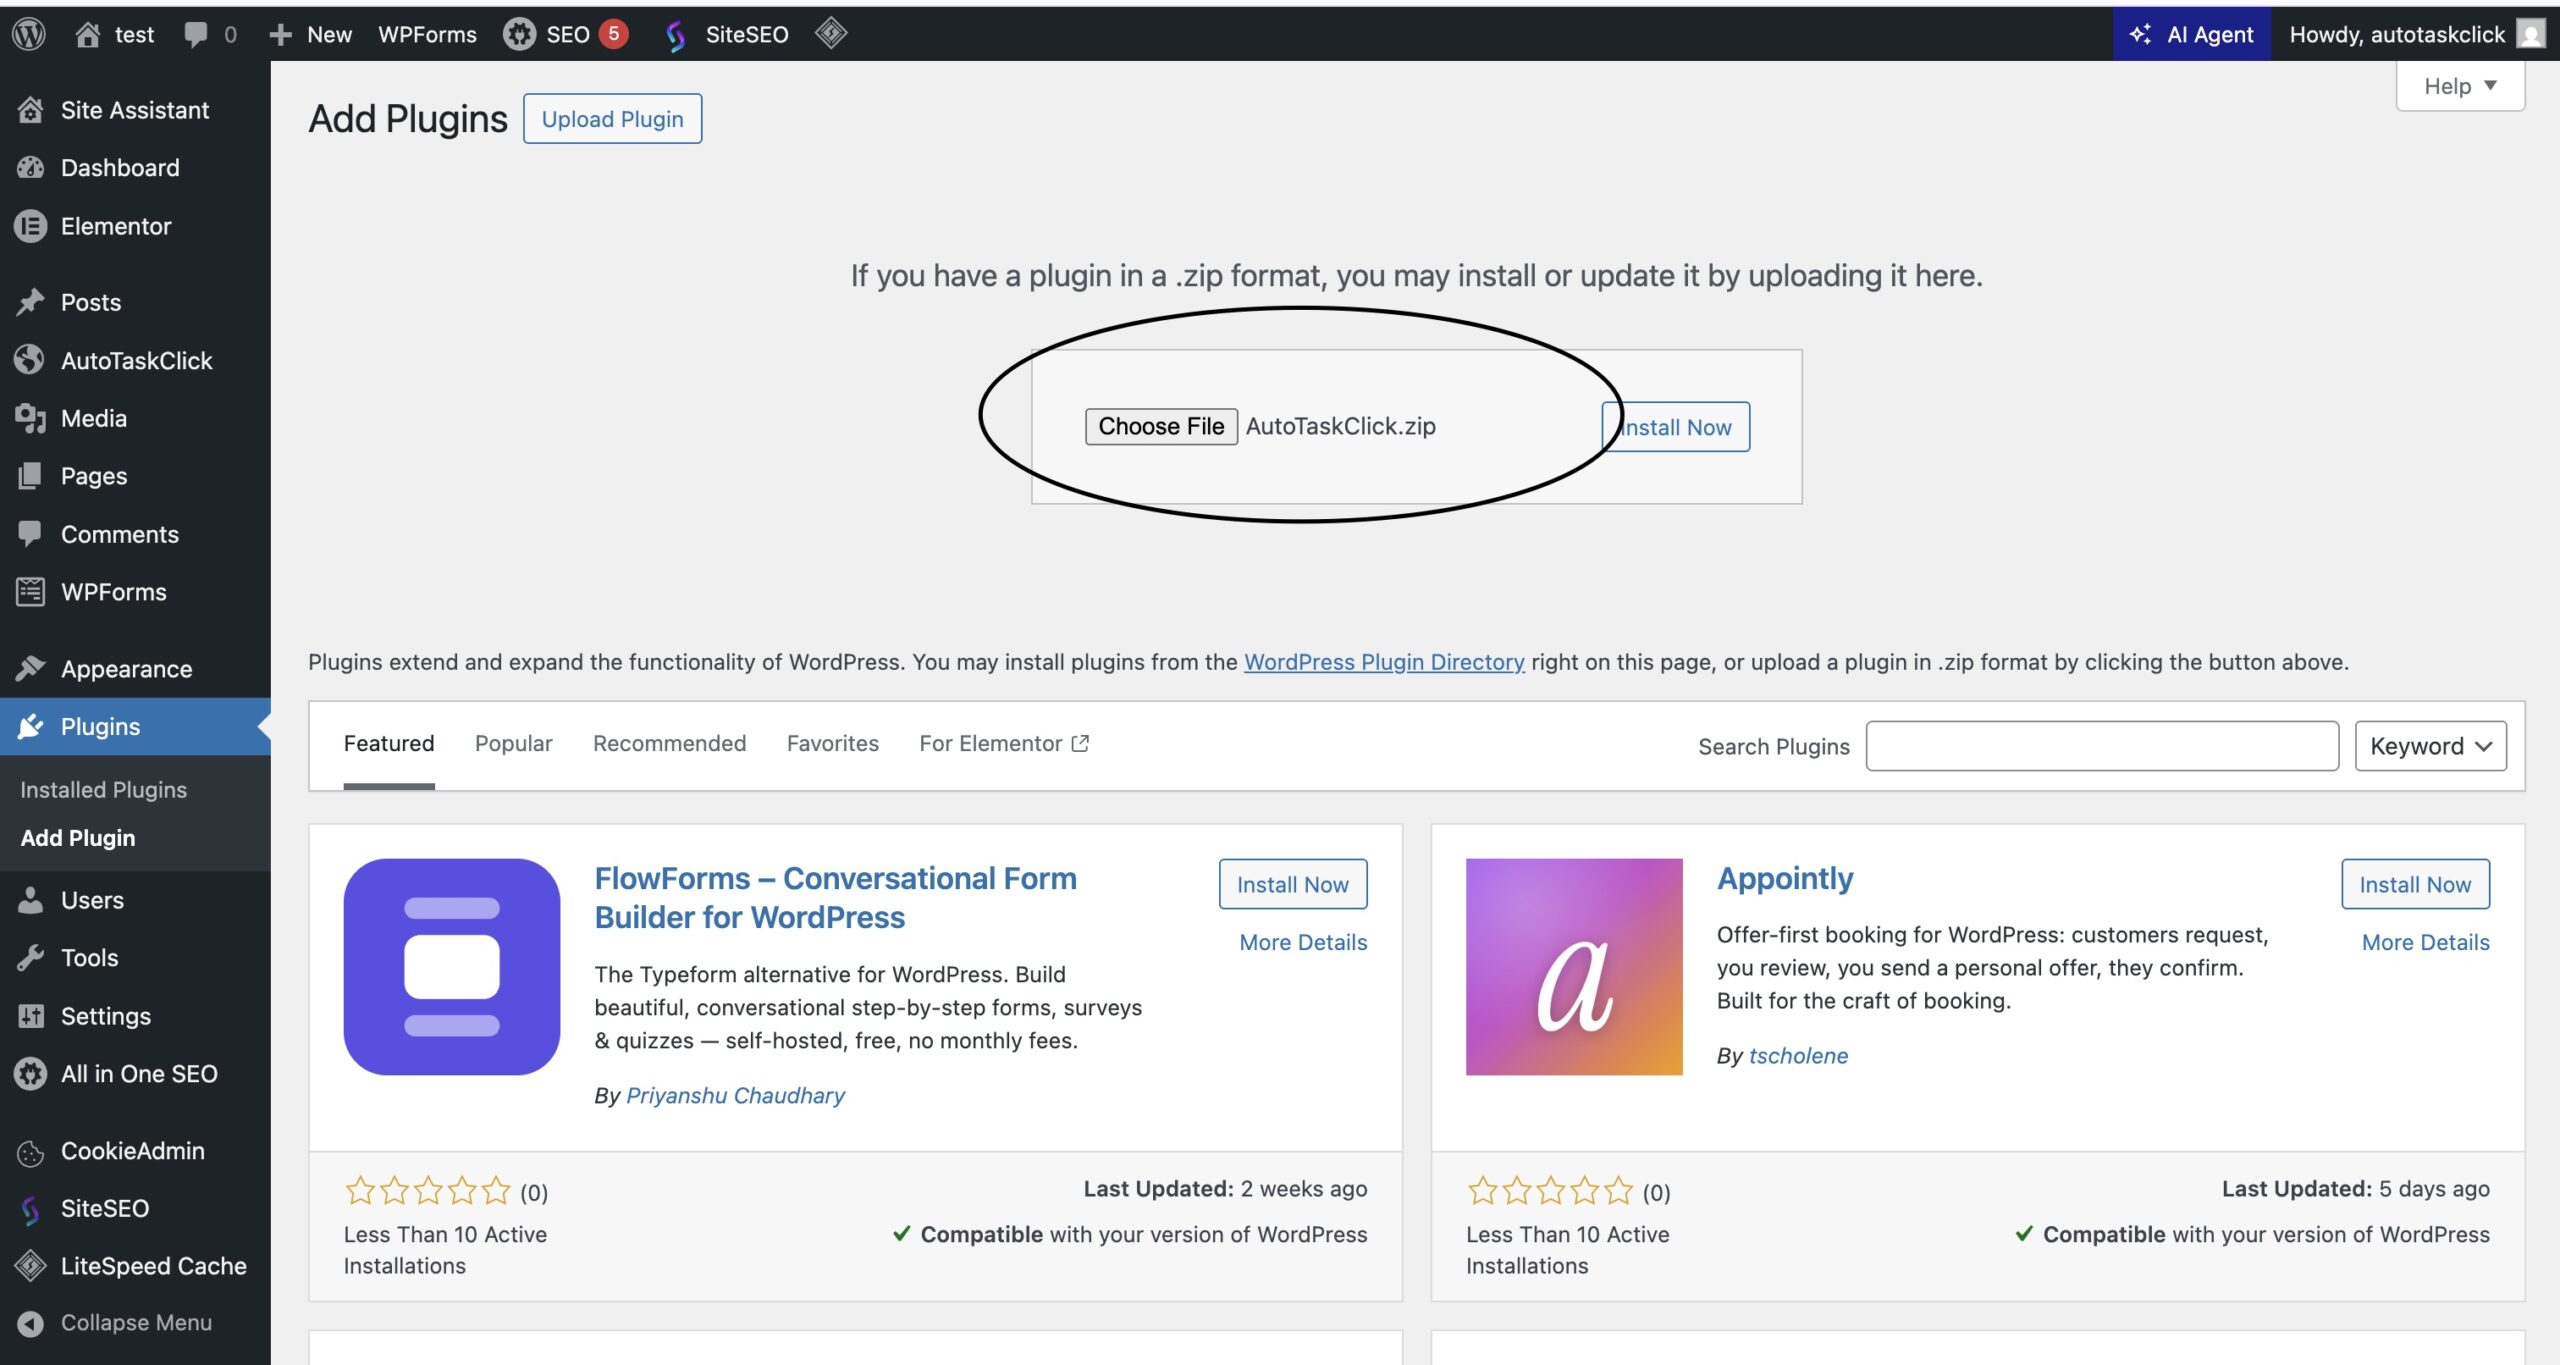
📸 Figure 1: WordPress Plugin upload screen with Autotaskclick ZIP file selected
🌍 Finding the Plugin in WordPress Admin
After activation, look for the 🌐 Earth Icon in your WordPress admin sidebar. Click it to access the plugin.
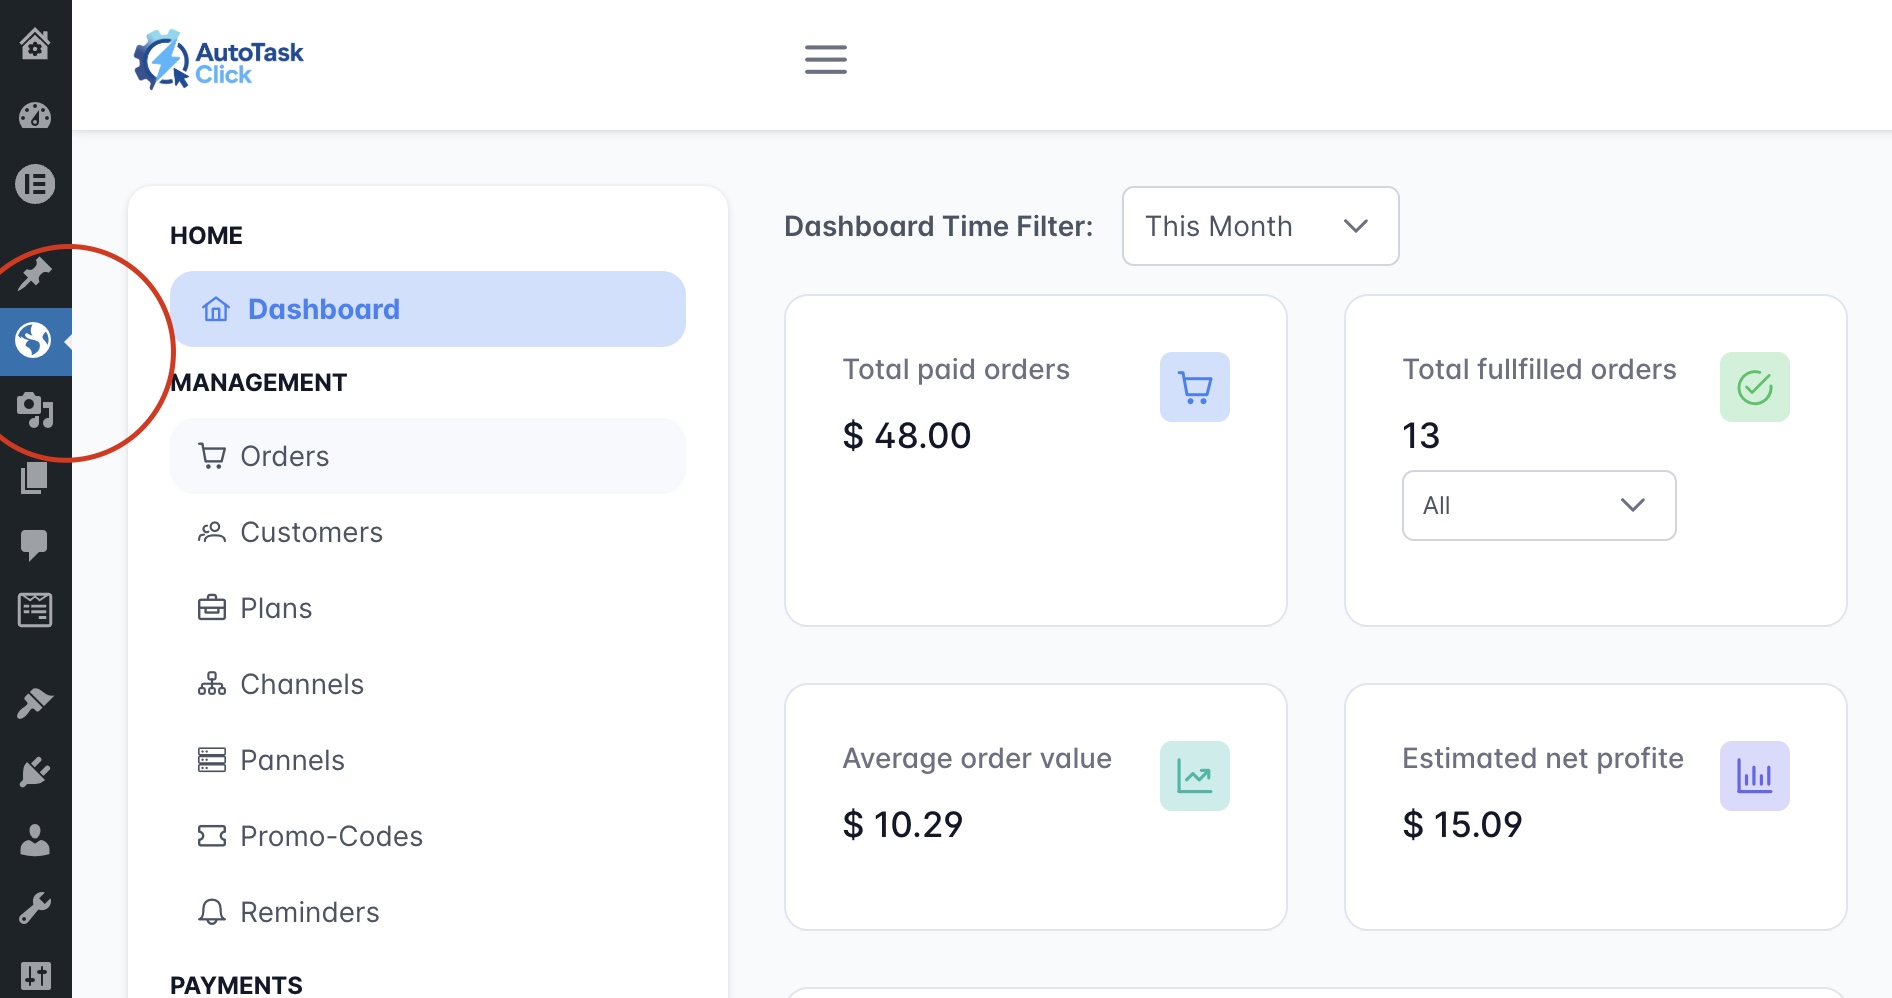
🖼️ Figure 2: WordPress admin sidebar showing the Earth icon for Autotaskclick
🔐 Login to the Plugin
Clicking the Earth icon opens a login form. Enter the same email and password you used during signup.
✉️ Email Configuration
Once you activate the plugin and log in, go to Settings → Email Configuration.
You have three options: Shop Email, Help Email, and Support Email
(you can use the same email for all three options).
📧 Configuration Requirements
- Name: appears on the email sent message — it's better to type your brand name, not your personal name
- Host: you can keep
smtp.gmail.comif you're using Gmail - Port: keep
587 - Email & Passkey: use your email address and a Google App Passkey (not your regular password)
- BCC Emails: add extra email addresses to forward all outgoing messages (comma separated)
🔑 How to Get a Gmail App Passkey
- Make sure 2-Step Verification is ON → https://myaccount.google.com/security
- Create app and copy password → https://myaccount.google.com/apppasswords
Example format:
xxxx xxxx xxxx xxxxCopy the entire passkey exactly as shown (including the spaces) and paste it into the Passkey field.
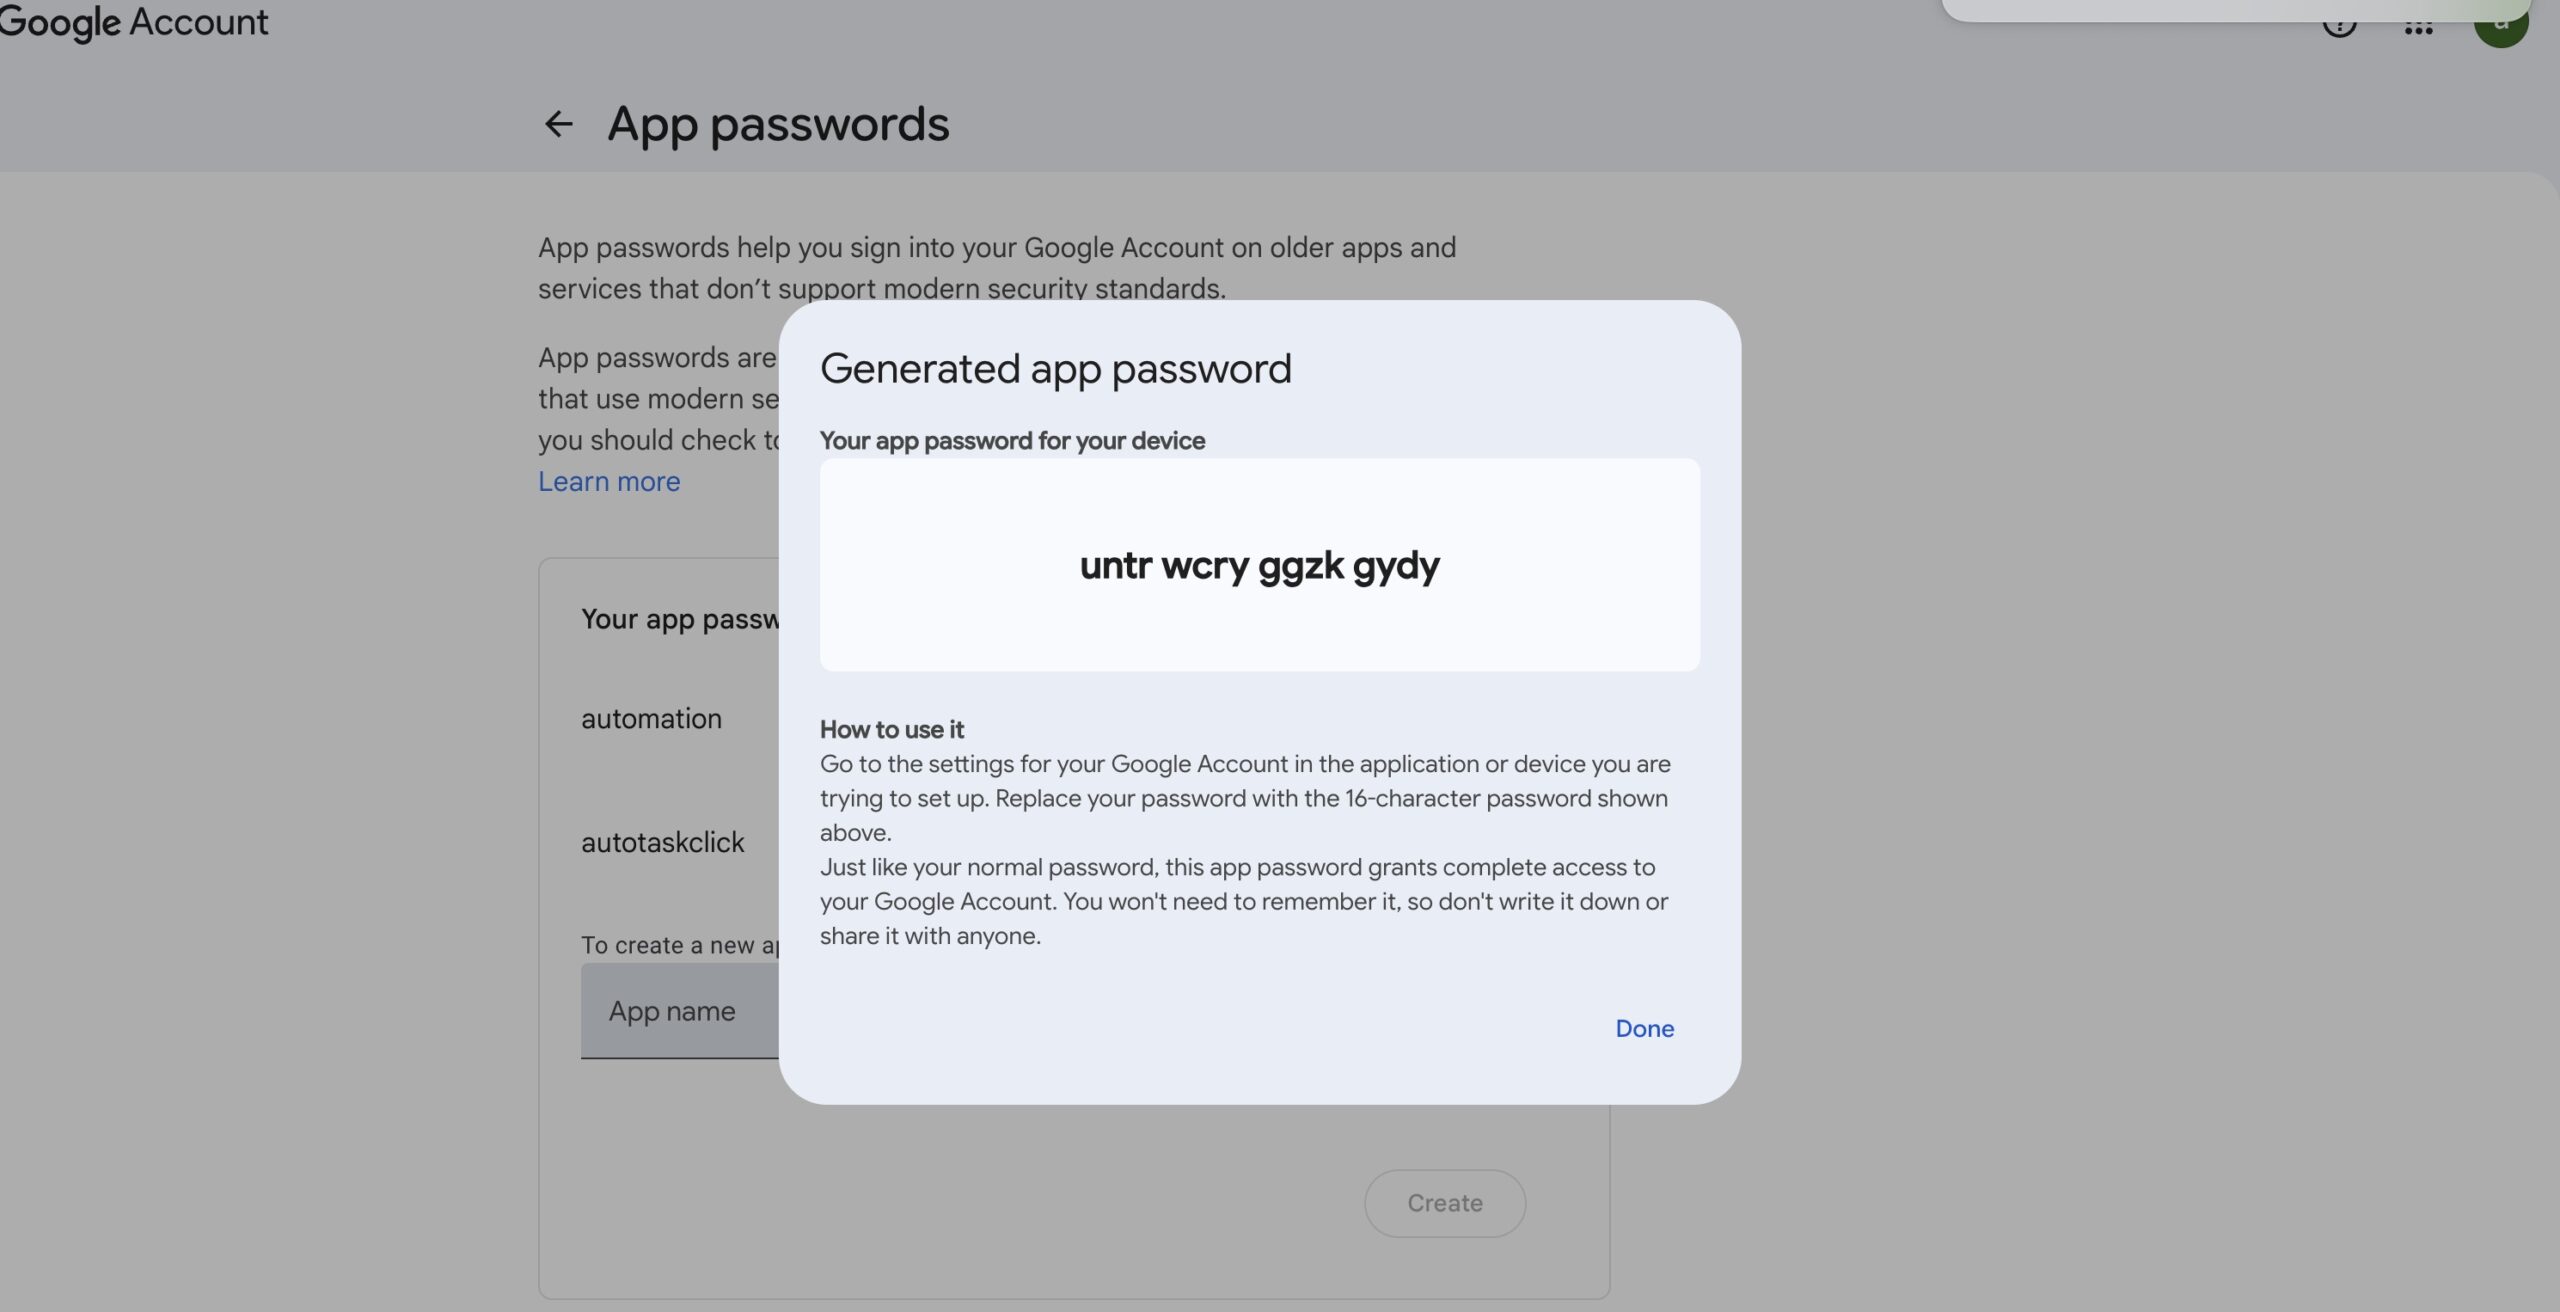
📸 Figure 3: Google AppPasswords creation screen – select "Mail" and "Other (Custom name)"
📨 BCC (Blind Carbon Copy)
The BCC Emails field allows you to specify additional email addresses that will receive a copy of every outgoing message. This is useful for:
- Keeping a backup of all customer communications
- Including team members in the loop
- Debugging and monitoring email delivery
Format: Enter multiple email addresses separated by commas (e.g., admin@yourdomain.com, manager@yourdomain.com).
📬 The Three Email Options
| Email Option | Purpose |
|---|---|
| Shop Email | Used for order confirmations and transactional emails |
| Support Email | Customers reply here for support inquiries |
| Help Email | Internal notifications and system alerts |
- Your 2-Step Verification is enabled on your Google account
- The App Passkey was copied correctly (16 characters with spaces between each 4 characters)
- The host and port are set to
smtp.gmail.comand587 - You clicked "Save Changes" before testing
🌐 Host & Page Configuration
After completing the email configuration, navigate to Settings → General / Pages to set up your branding and page assignments. This step ensures your customers see your brand identity and are redirected to the correct pages.
⚙️ Configuration Fields
- Brand Name: Your business name (displayed on all emails and forms) — use your brand name, not a personal name
- Logo URL: Direct link to your brand logo (PNG or JPG format recommended)
- Login Page: Select the WordPress page where your login form will appear
- Thank You Page: Select the page customers see after successful checkout
- Checkout Page: Select the page where your checkout shortcode is placed
🏷️ Brand Name
The Brand Name appears in:
- Email headers and footers
- Login and signup forms
- Customer order confirmations
- Invoice and receipt templates
🖼️ Logo URL
The logo appears on login forms, signup forms, and email templates. To set it up:
- Upload your logo image to your WordPress Media Library
- Click on the image and copy the File URL
- Paste that URL into the Logo URL field
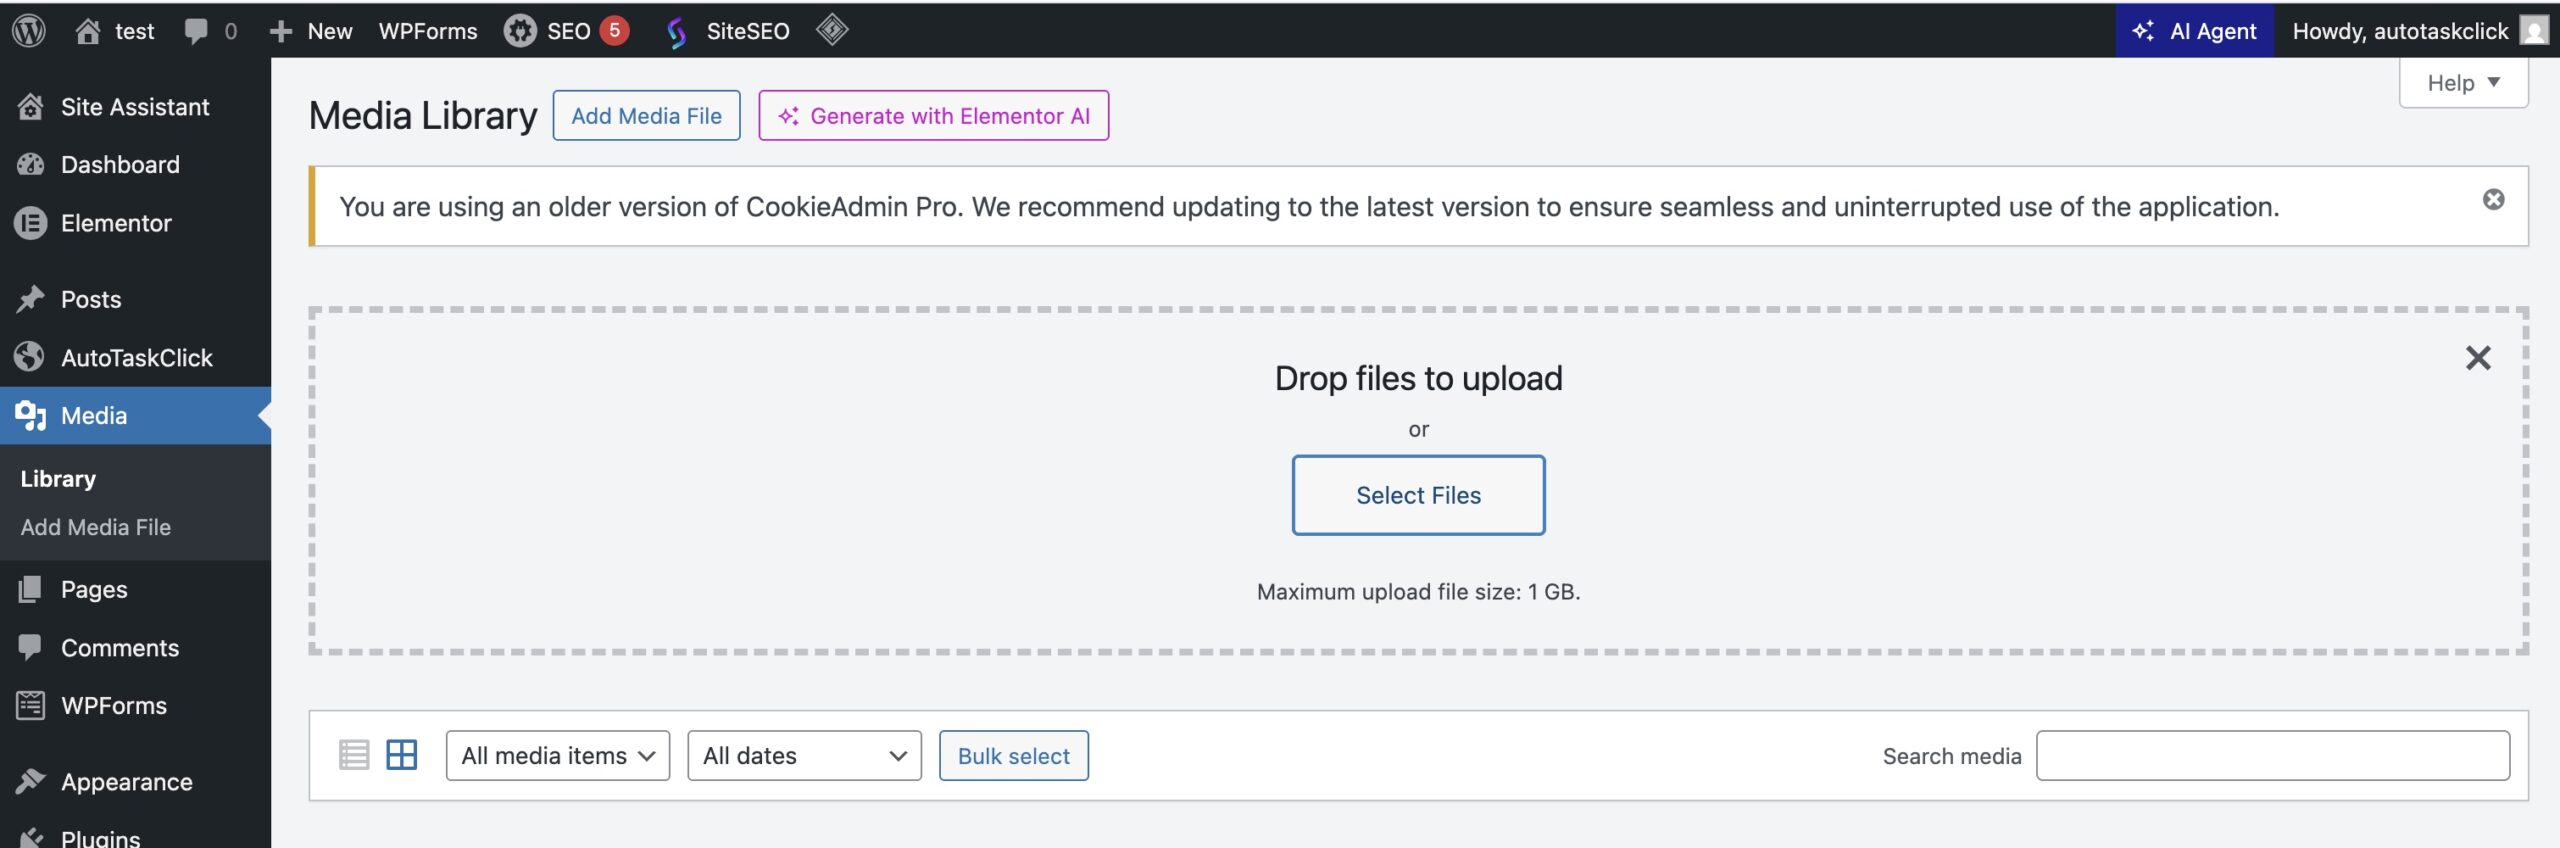
🖼️ Figure 4: WordPress Media Library to uploaded logo image
📄 Page Assignments
You need to create WordPress pages first, then assign them in the plugin settings:
| Page Type | Required Shortcode | Purpose |
|---|---|---|
| Login Page | [your store login] | Customer login area |
| Thank You Page | No shortcode needed | Confirmation after successful purchase |
| Checkout Page | [your checkout form] | Order placement and payment |
📝 How to Create the Required Pages
- Go to WordPress Dashboard → Pages → Add New
- Title: Enter a title (e.g., "Login", "Checkout", "Thank You")
- Content: Paste the corresponding shortcode into the page editor
- Click Publish to save the page
- Return to the plugin Host & Pages settings and select the pages from the dropdown menus
- Click Save Changes to apply the assignments
🖼️ Figure 5: Host & Pages settings – brand name, logo URL, and page dropdowns
- Logo not showing? Make sure the URL is direct and publicly accessible (not a localhost path)
- Pages not appearing in dropdown? Publish the pages first, then refresh the plugin settings page
- Shortcode not working? Verify you're using the exact shortcode:
[your store login]or[your checkout form]
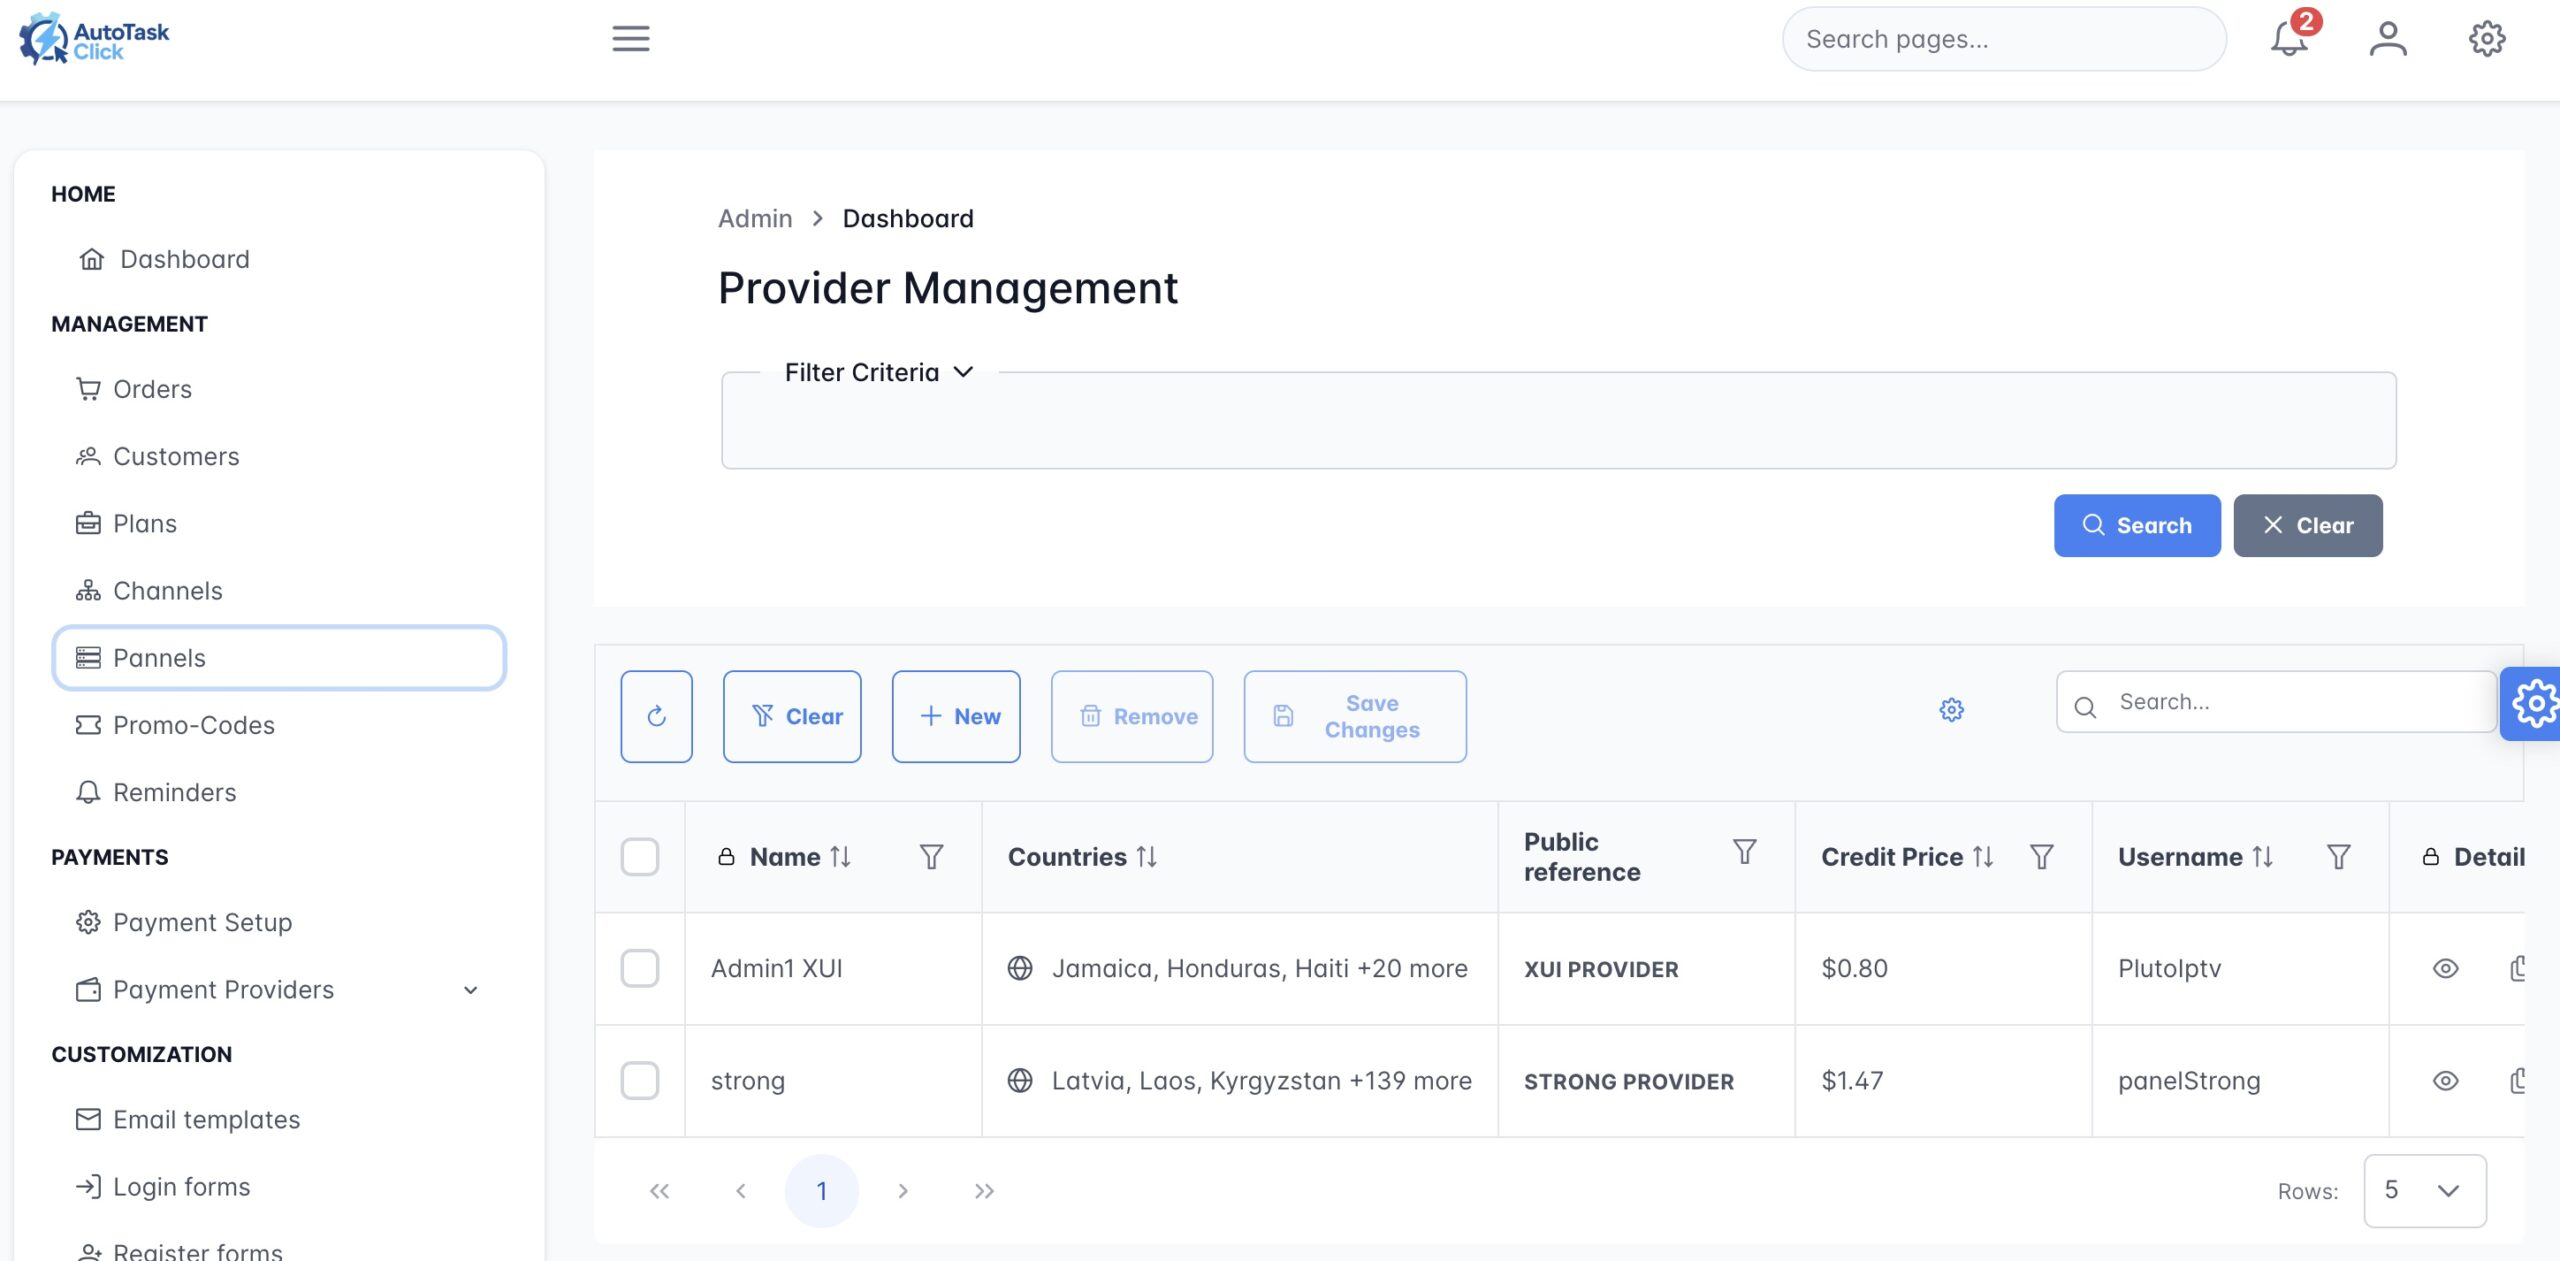
🔌 Panels Linking (Country & Plan Routing)
Go to sidebar Panels → Add New Panel to connect your IPTV panels. All your informations are secured — the tool only has access to send orders to your panel, nothing else. No API required — just standard login credentials.
🗺️ Routing Rules (Critical)
- Select country or countries for each panel — e.g., Strong 4K → US clients, Kemo → European clients
- Select packages (plans) that belong to each panel — e.g., Strong 4K handles "12 months 1 connection" plans
- Panel URL / Server address — the URL you use to access your panel
- Login credentials — username and password for the panel (no API needed)
⚙️ Panel Configuration Fields
| Field | Description | Example |
|---|---|---|
| Panel Name | A label to identify this panel in your dashboard | Strong 4K, Kemo Panel, Crystal Panel |
| Panel URL | The web address where your panel is hosted | https://yourpanel.com |
| Username | Your panel login username | reseller_username |
| Password | Your panel login password | ········ |
| Assigned Countries | Select one or more countries for routing | United States, Canada, United Kingdom |
| Assigned Plans | Select which plans this panel should handle | 12 Months, 6 Months, 3 Months (1 connection) |
📍 Routing Example
| Panel Name | Assigned Countries | Assigned Plans |
|---|---|---|
| Strong 4K | United States, Canada | 12 Months, 6 Months, 3 Months (1 connection) |
| Kemo Panel | Germany, France, United Kingdom, Spain, Italy | 3 Months, 1 Month |
| Crystal Panel | Australia, New Zealand | 12 Months, 6 Months, 3 Months, 1 Month |
🔄 How Automatic Routing Works
- Customer places an order on your website
- System detects the customer's country (based on IP address)
- System checks which panel is assigned to that country
- System verifies the selected plan is available on that panel
- System automatically creates the subscription on the correct panel
- Customer receives credentials via email automatically
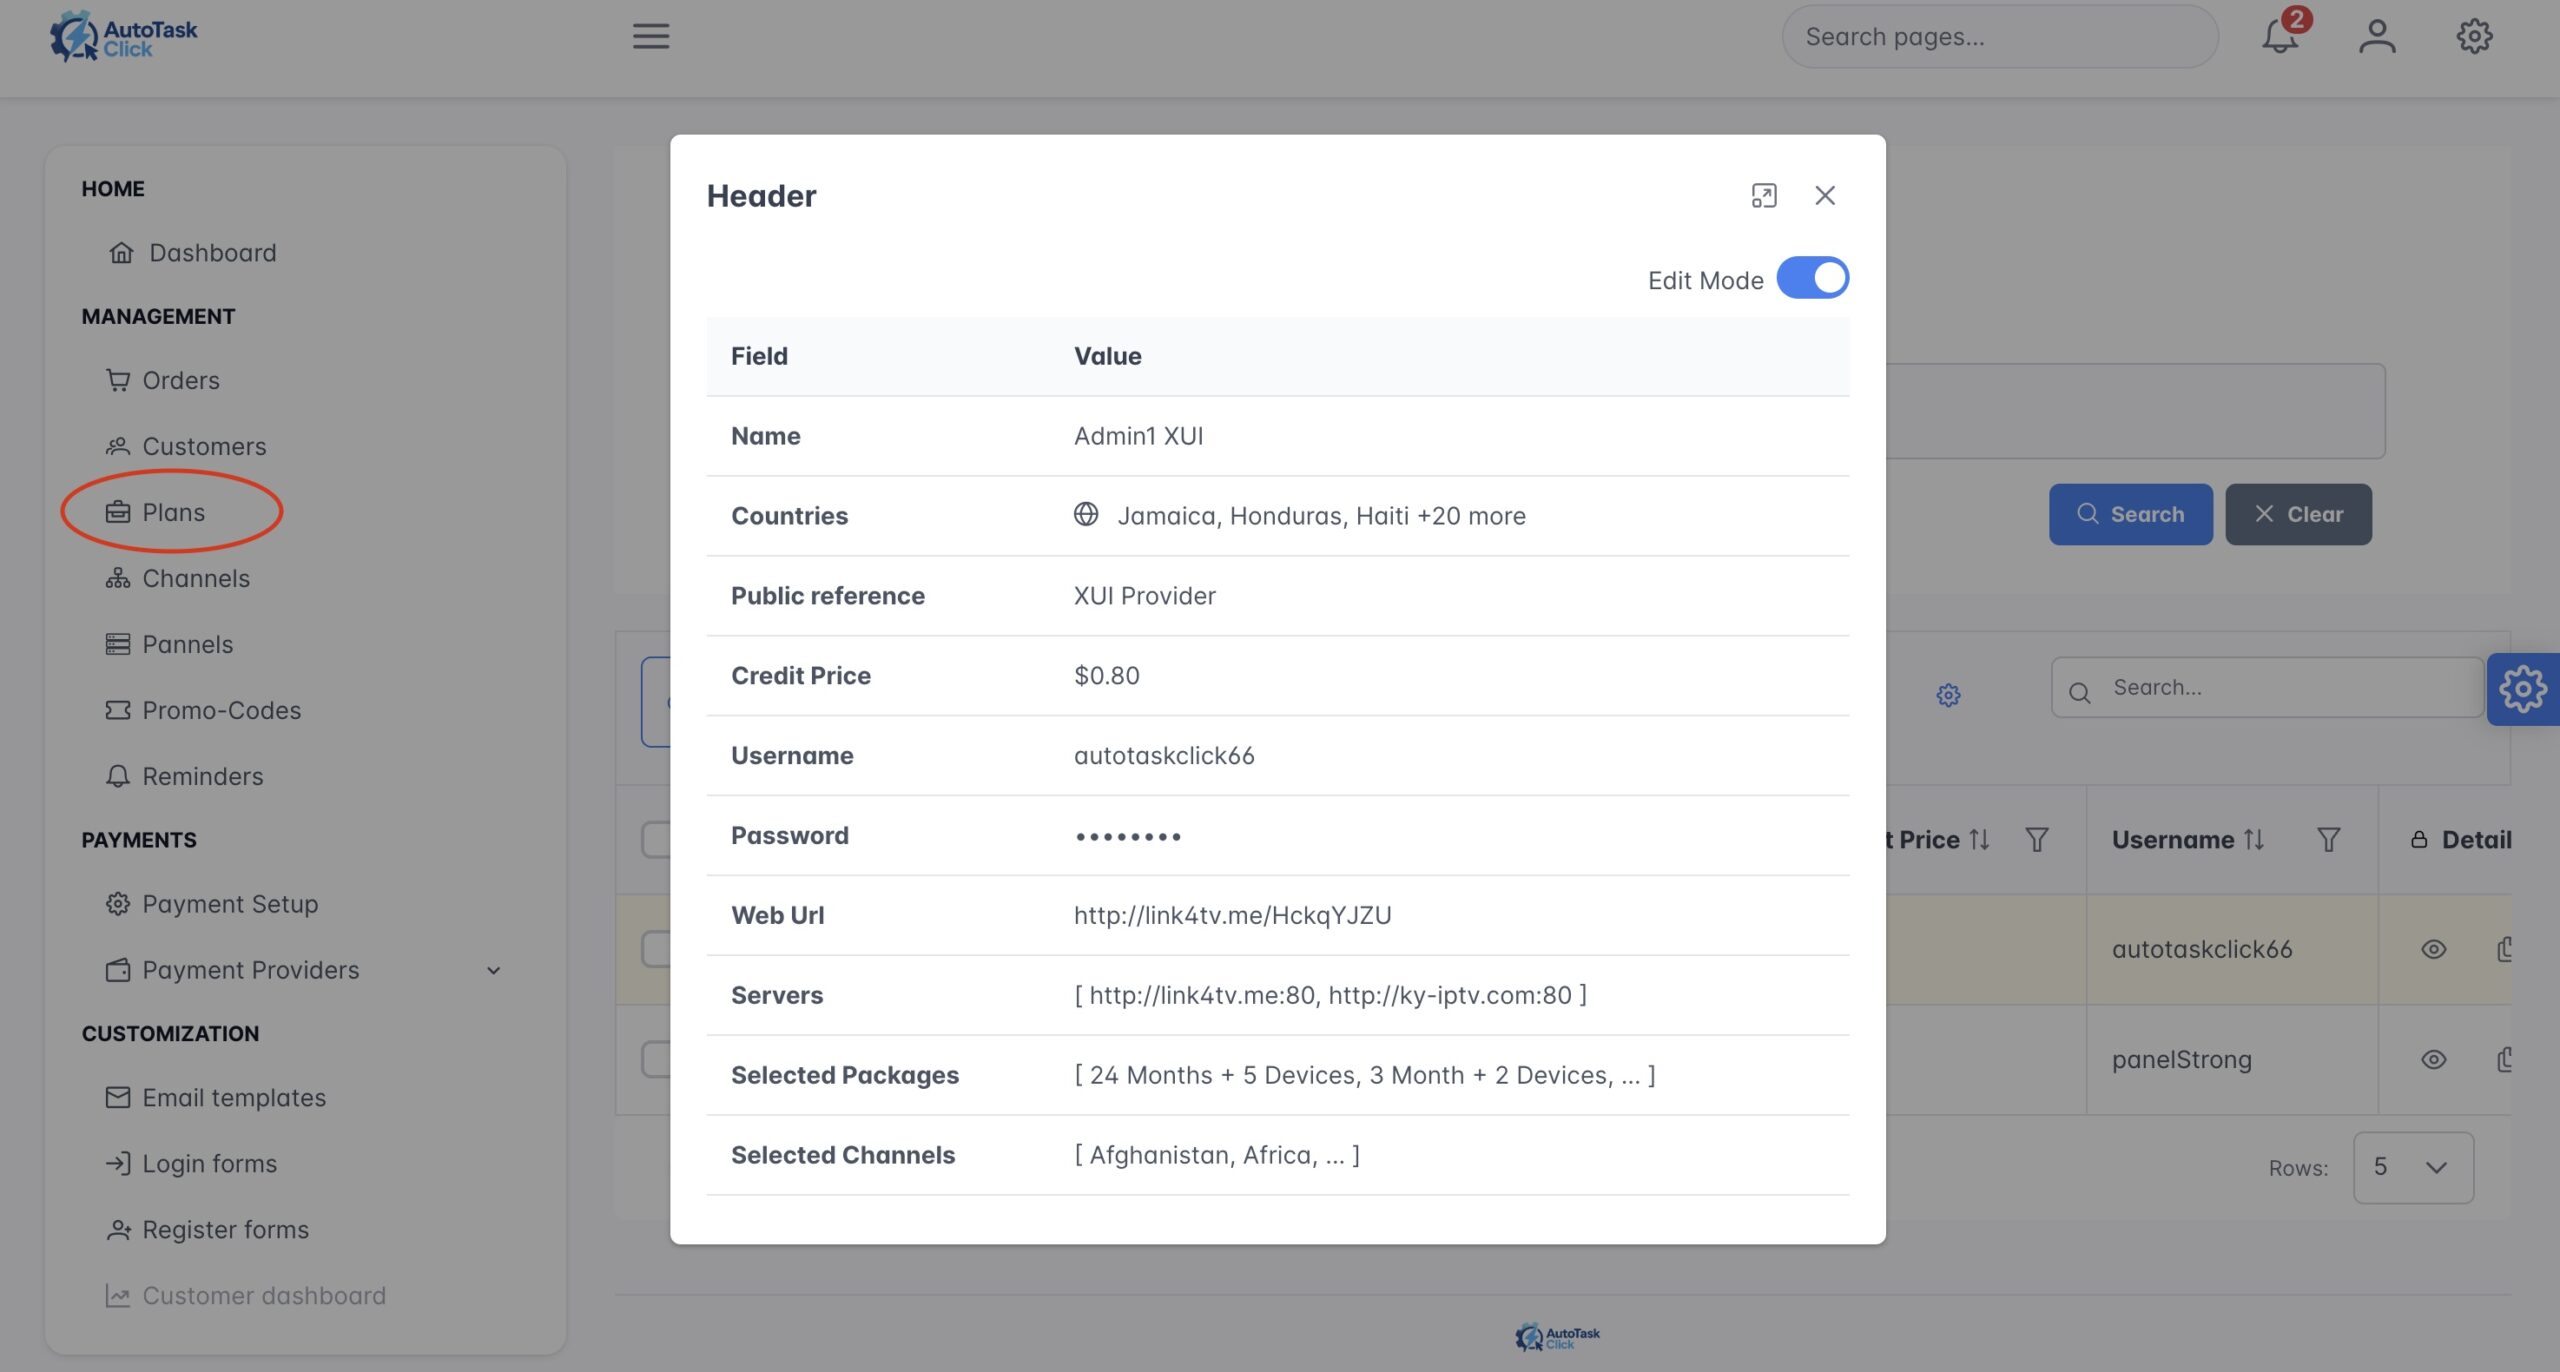
📸 Figure 6: Add Panel form with country selector, plan mapping, and credentials
🔐 Multiple Accounts per Panel
You can add multiple accounts for the same panel. This is useful when:
- You have multiple reseller accounts on the same panel
- You want to distribute load across different accounts
- You need backup accounts in case one reaches its limit
💰 Credit Cost & Profit Calculation
For each panel, you can add the credit cost per plan. This allows the system to automatically calculate your estimated profit in the dashboard.
| Plan | Selling Price | Panel Credit Cost | Your Profit |
|---|---|---|---|
| 12 Months | $89.00 | $45.00 | $44.00 |
| 3 Months | $35.00 | $18.00 | $17.00 |
| 1 Month | $15.00 | $8.00 | $7.00 |
🔧 Testing Panel Connection
After adding a panel, the system will automatically test the connection. Look for:
- Green checkmark — Connection successful, panel is ready
- Red cross — Connection failed, check your URL and credentials
⚠️ Troubleshooting
- Verify the panel URL is correct (including http:// or https://)
- Check that your username and password are correct
- Make sure your panel allows API/remote access
- Try logging into the panel manually in a browser to confirm credentials work
- Ensure each country is assigned to at least one panel
- Ensure each plan is assigned to the panel that supports it
- Check that the panel connection status shows "Connected"
💳 Payment Setup & Threshold Protection
Link your available payment options (PayPal, Stripe, Airwallex, Whop, Crypto, etc.). Most payment options require API codes for integration. For PayPal, we require a Merchant ID (Business account) or you can use Friends & Family with a personal account.
🏦 Supported Payment Providers
Stripe, Whop, Square, Braintree
PayPal, Wise, Skrill, Neteller
Bitcoin, USDT, Ethereum, Litecoin
Manual bank transfers with auto-confirmation
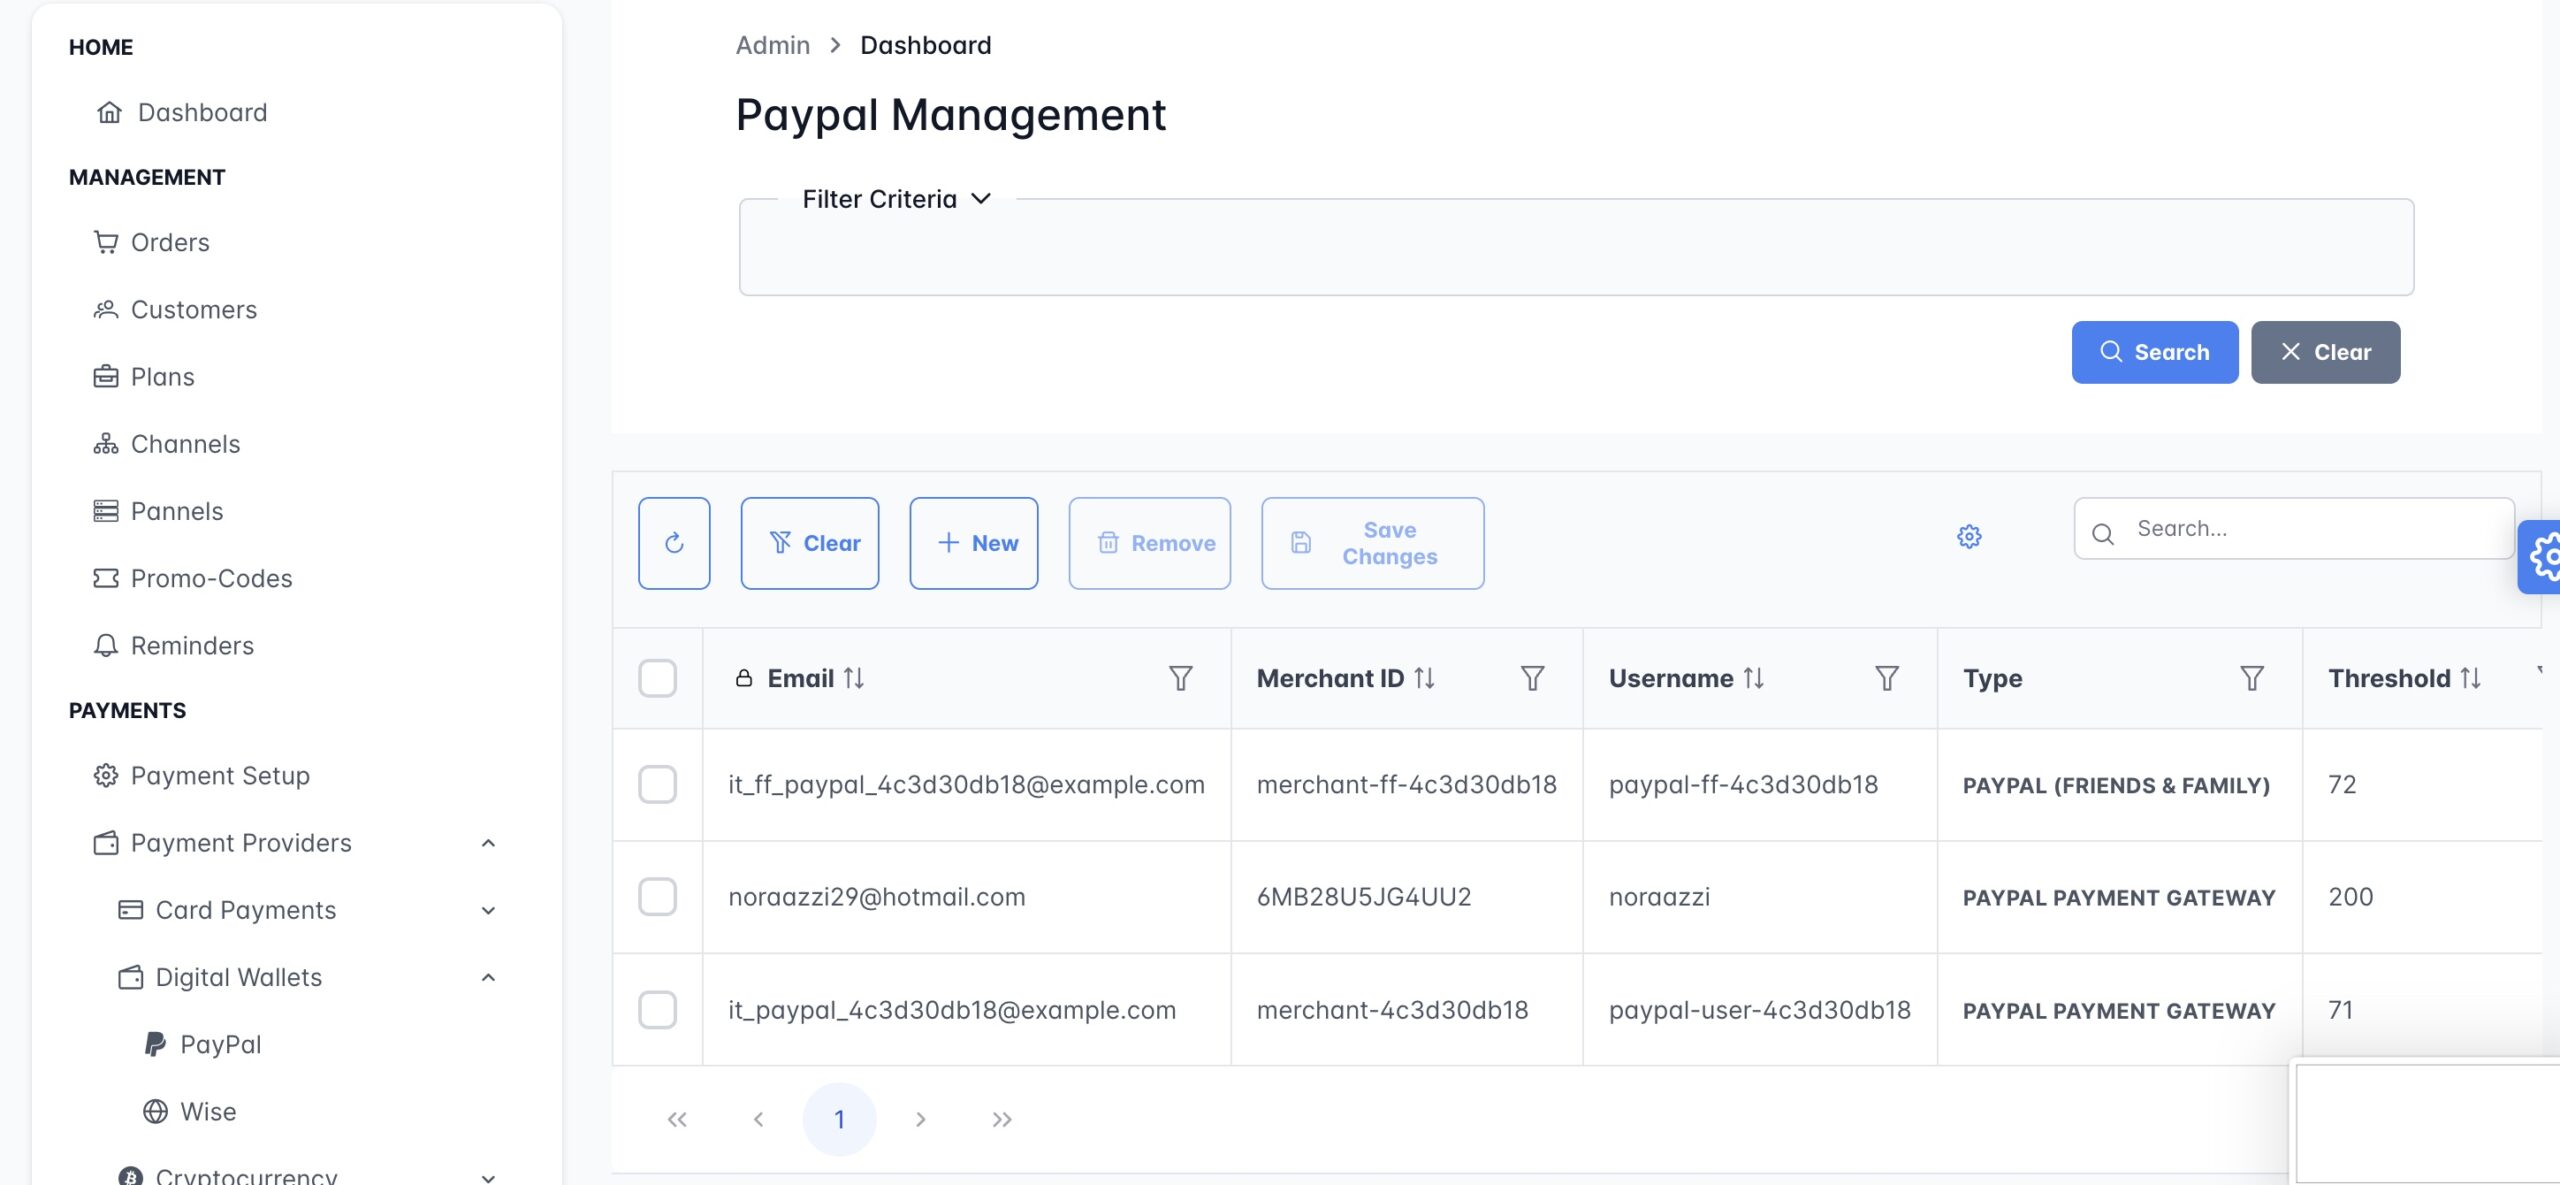
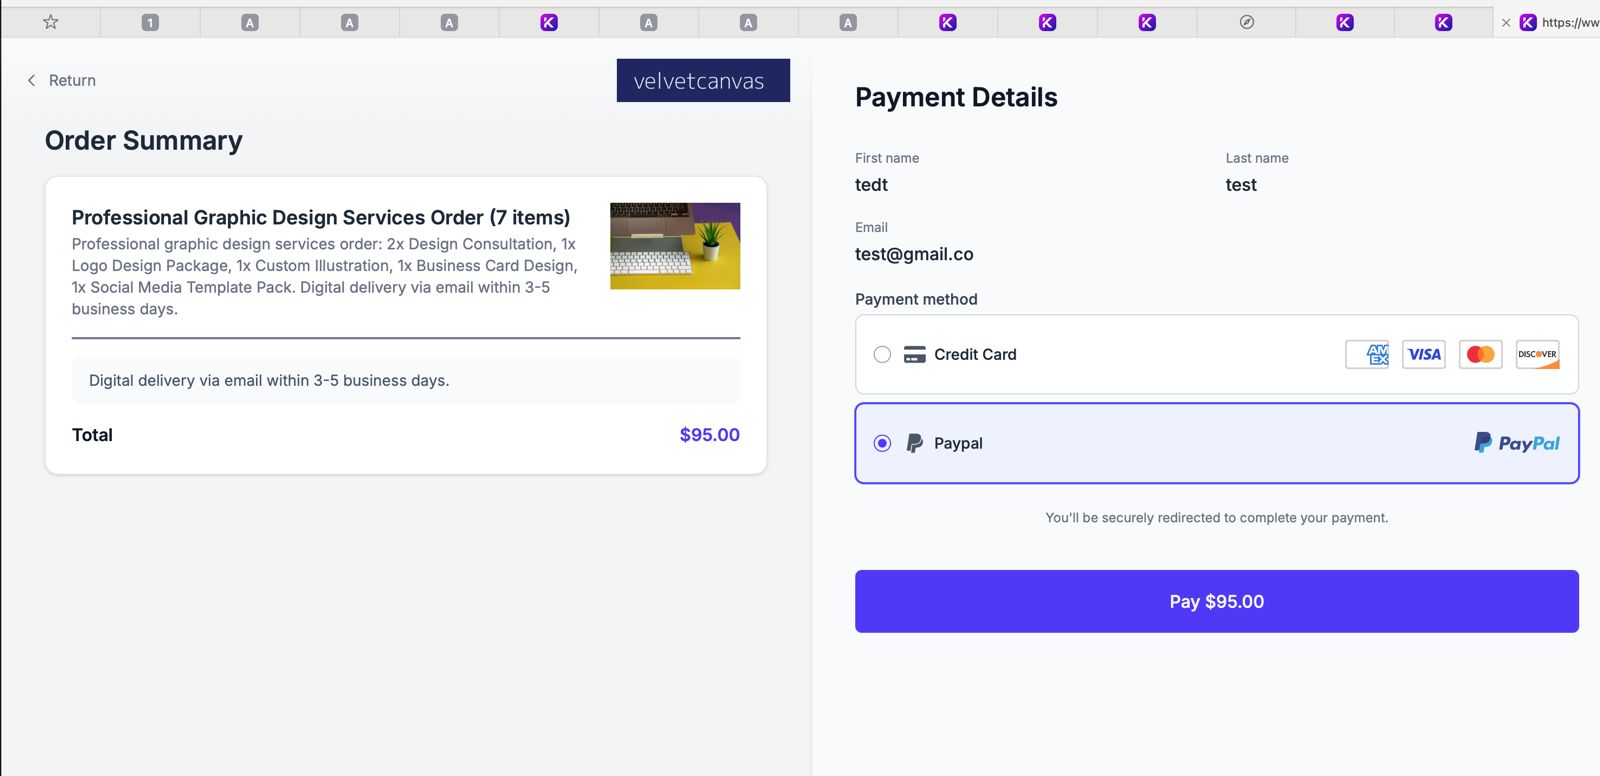
💙 PayPal Configuration
Option 1: Normal PayPal Checkout (Business Account)
- Requires a PayPal Business account
- Standard API integration with webhooks
- We require your Merchant ID (found in PayPal account settings)
- Supports both sandbox (testing) and live modes
Option 2: Friends & Family (Personal Account)
- Use a personal PayPal account to receive payments as Friends & Family
- No holds, no disputes, no limitations — ideal for IPTV businesses
- System generates a unique payment link with the plan's exact price
- Customer clicks and pays via Friends & Family
- System tracks payment completion via email notifications
- Upon confirmation, subscription credentials are sent automatically
💳 Credit Card / Stripe Configuration
To accept credit card payments via Stripe:
- Create a Stripe account at stripe.com
- Navigate to Developers → API Keys
- Copy your Publishable Key and Secret Key
- Paste them into the plugin payment settings
- Set up the webhook endpoint (provided in the plugin)
- Enable webhook signing secret for security
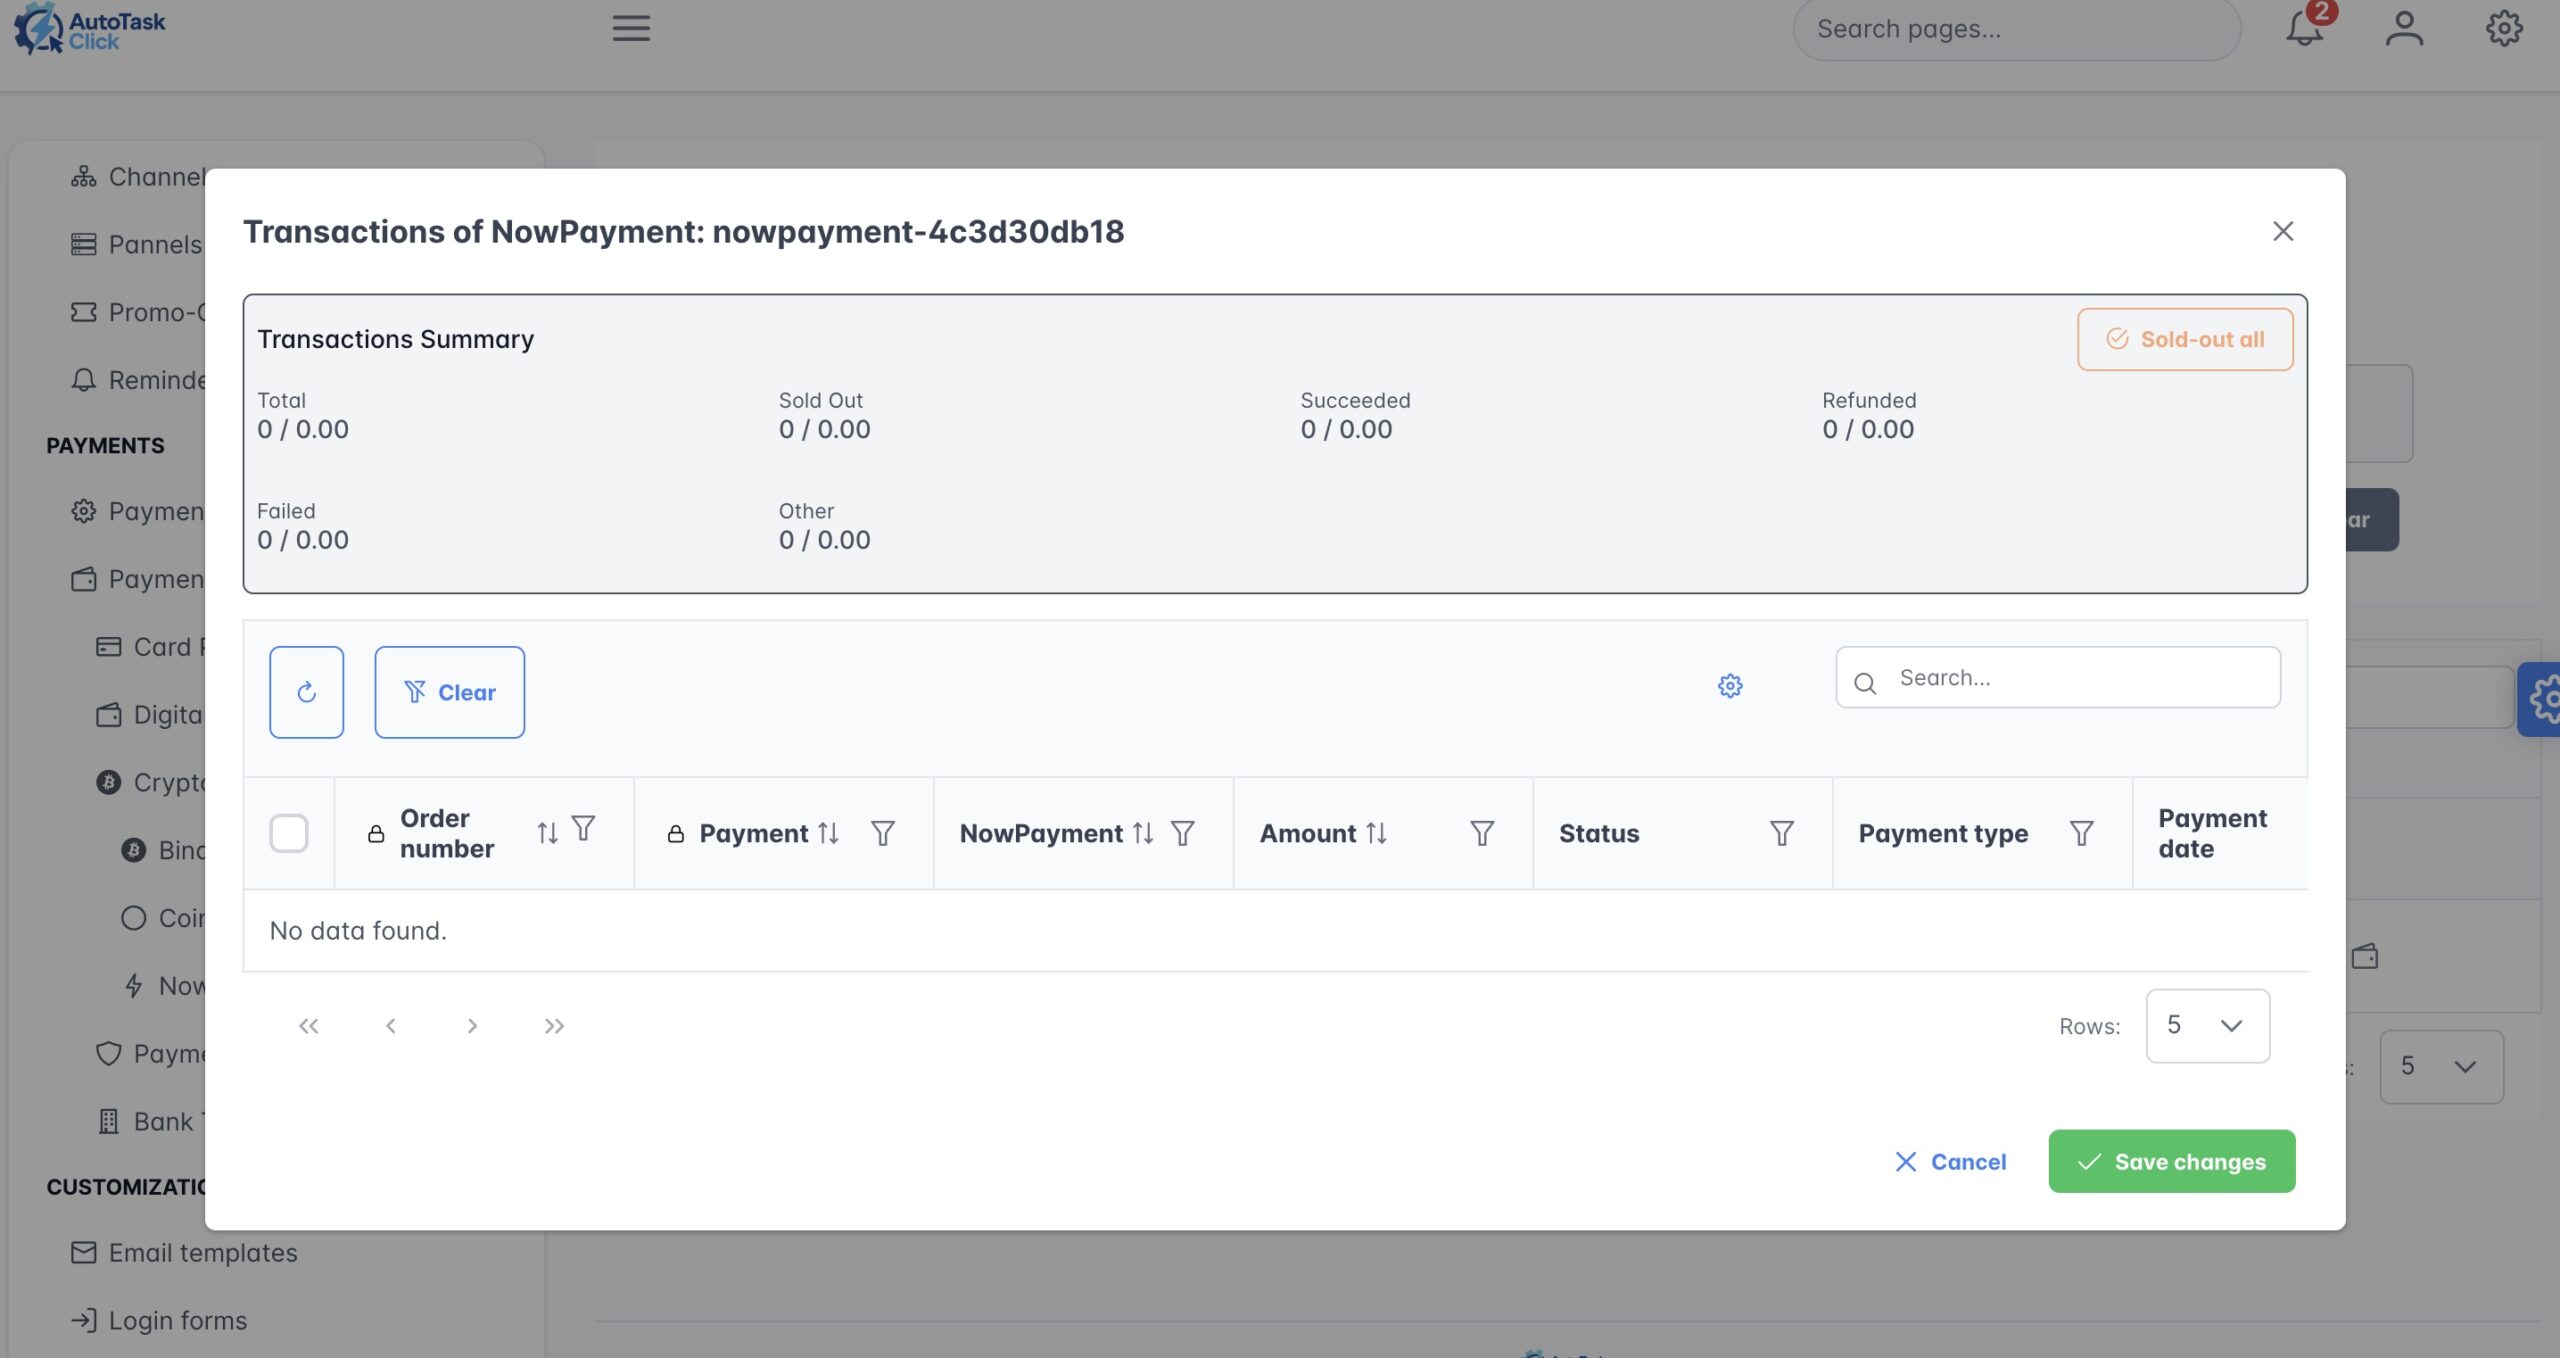
₿ Cryptocurrency Configuration
Accept Bitcoin, USDT, Ethereum, and other cryptocurrencies via:
- Coinbase Commerce — Easy integration, supports multiple coins
- NOWPayments — Wide cryptocurrency support
- Binance Pay — Popular for crypto users
🛡️ Threshold System (Anti-Ban Protection)
The threshold system is designed to protect your payment accounts from being banned or frozen. Set a threshold amount for each payment account. When reached, the system automatically stops receiving payments and switches to a backup account.
| Account Name | Threshold Amount | Current Balance | Status |
|---|---|---|---|
| PayPal Business #1 | $5,000 | $4,200 | 🟢 Active |
| PayPal Friends & Family #2 | $2,000 | $2,000 | 🔴 Threshold Reached |
| Stripe Account #1 | $10,000 | $3,500 | 🟢 Active |
⚙️ How the Threshold System Works
- Set a threshold amount for each payment account (e.g., $5,000)
- System tracks the current balance of each account
- When balance reaches the threshold, the system automatically marks the account as unavailable
- System automatically switches to a backup account for new payments
- You receive a notification when an account reaches its threshold
- After withdrawing funds, click Mark as Sold Out to reactivate the account
💰 Mark as Sold Out (Wallet Icon)
After you withdraw funds from an account that reached its threshold:
- Go to the account settings in the payment configuration page
- Look for the wallet icon in the top-right corner of the account card
- Click it and select Mark as Sold Out
- Confirm the action — the system will reactivate the account to receive payments again
- The balance counter will reset to zero
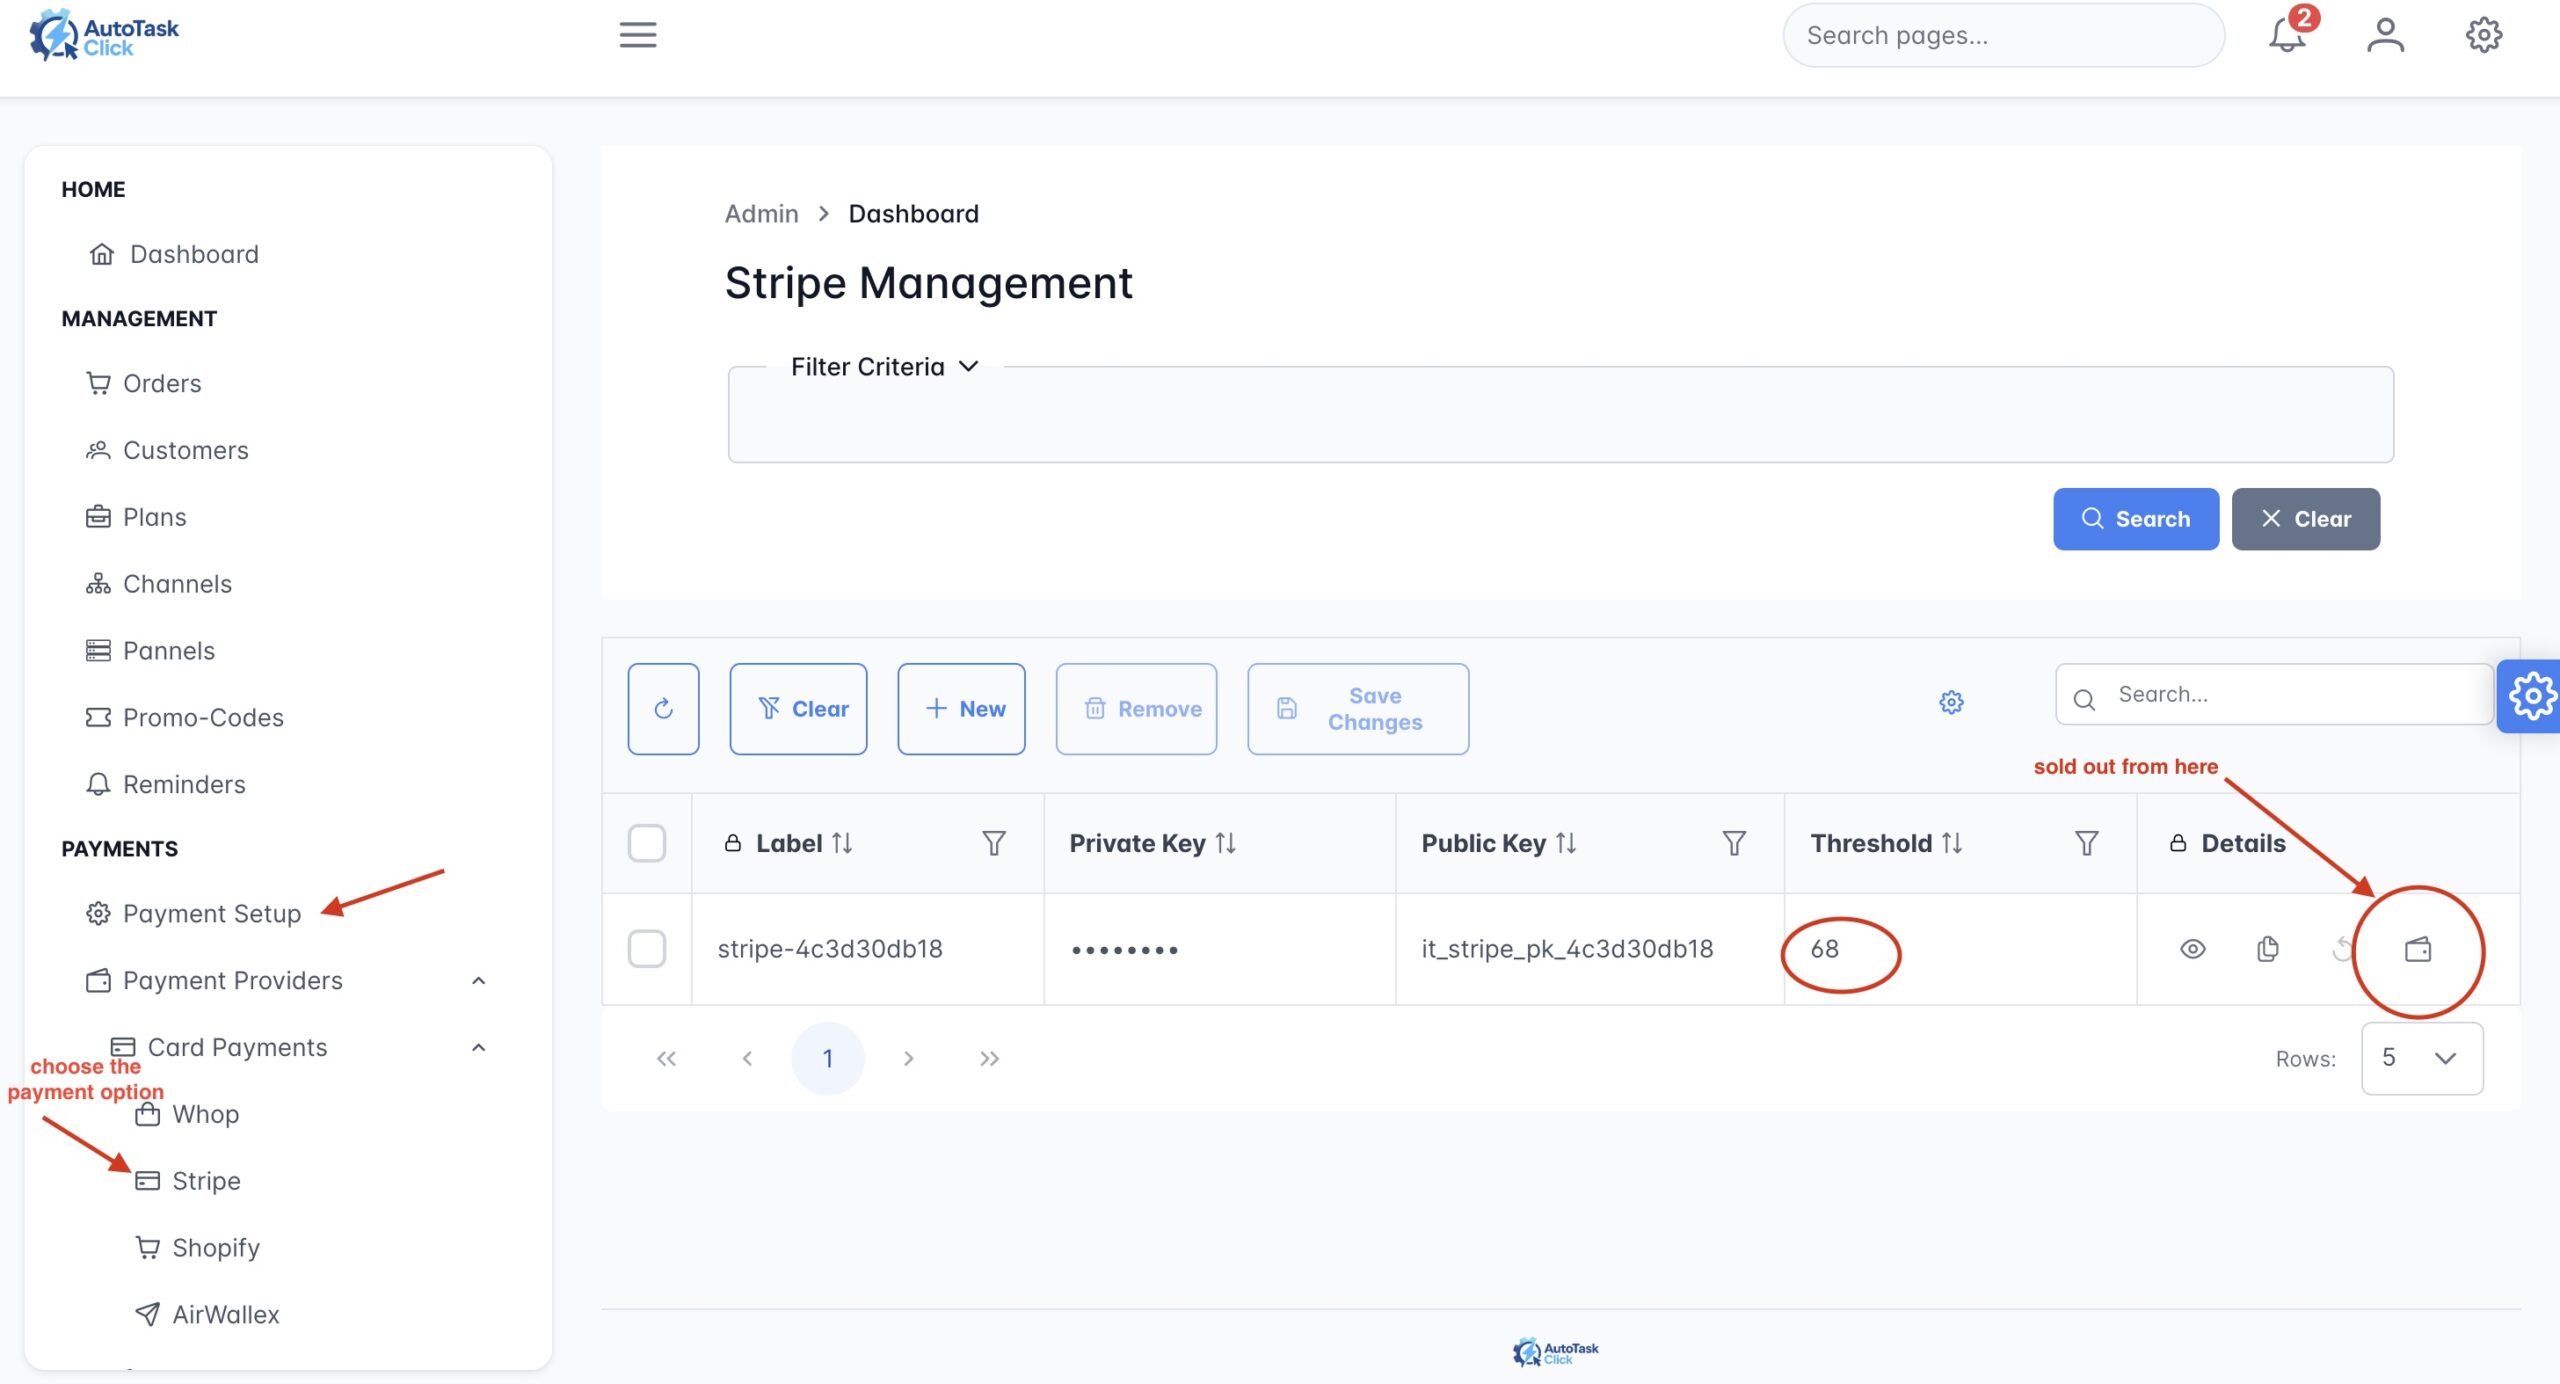
🖼️Figure 7: Payment account settings showing: threshold field, API key fields, and wallet icon
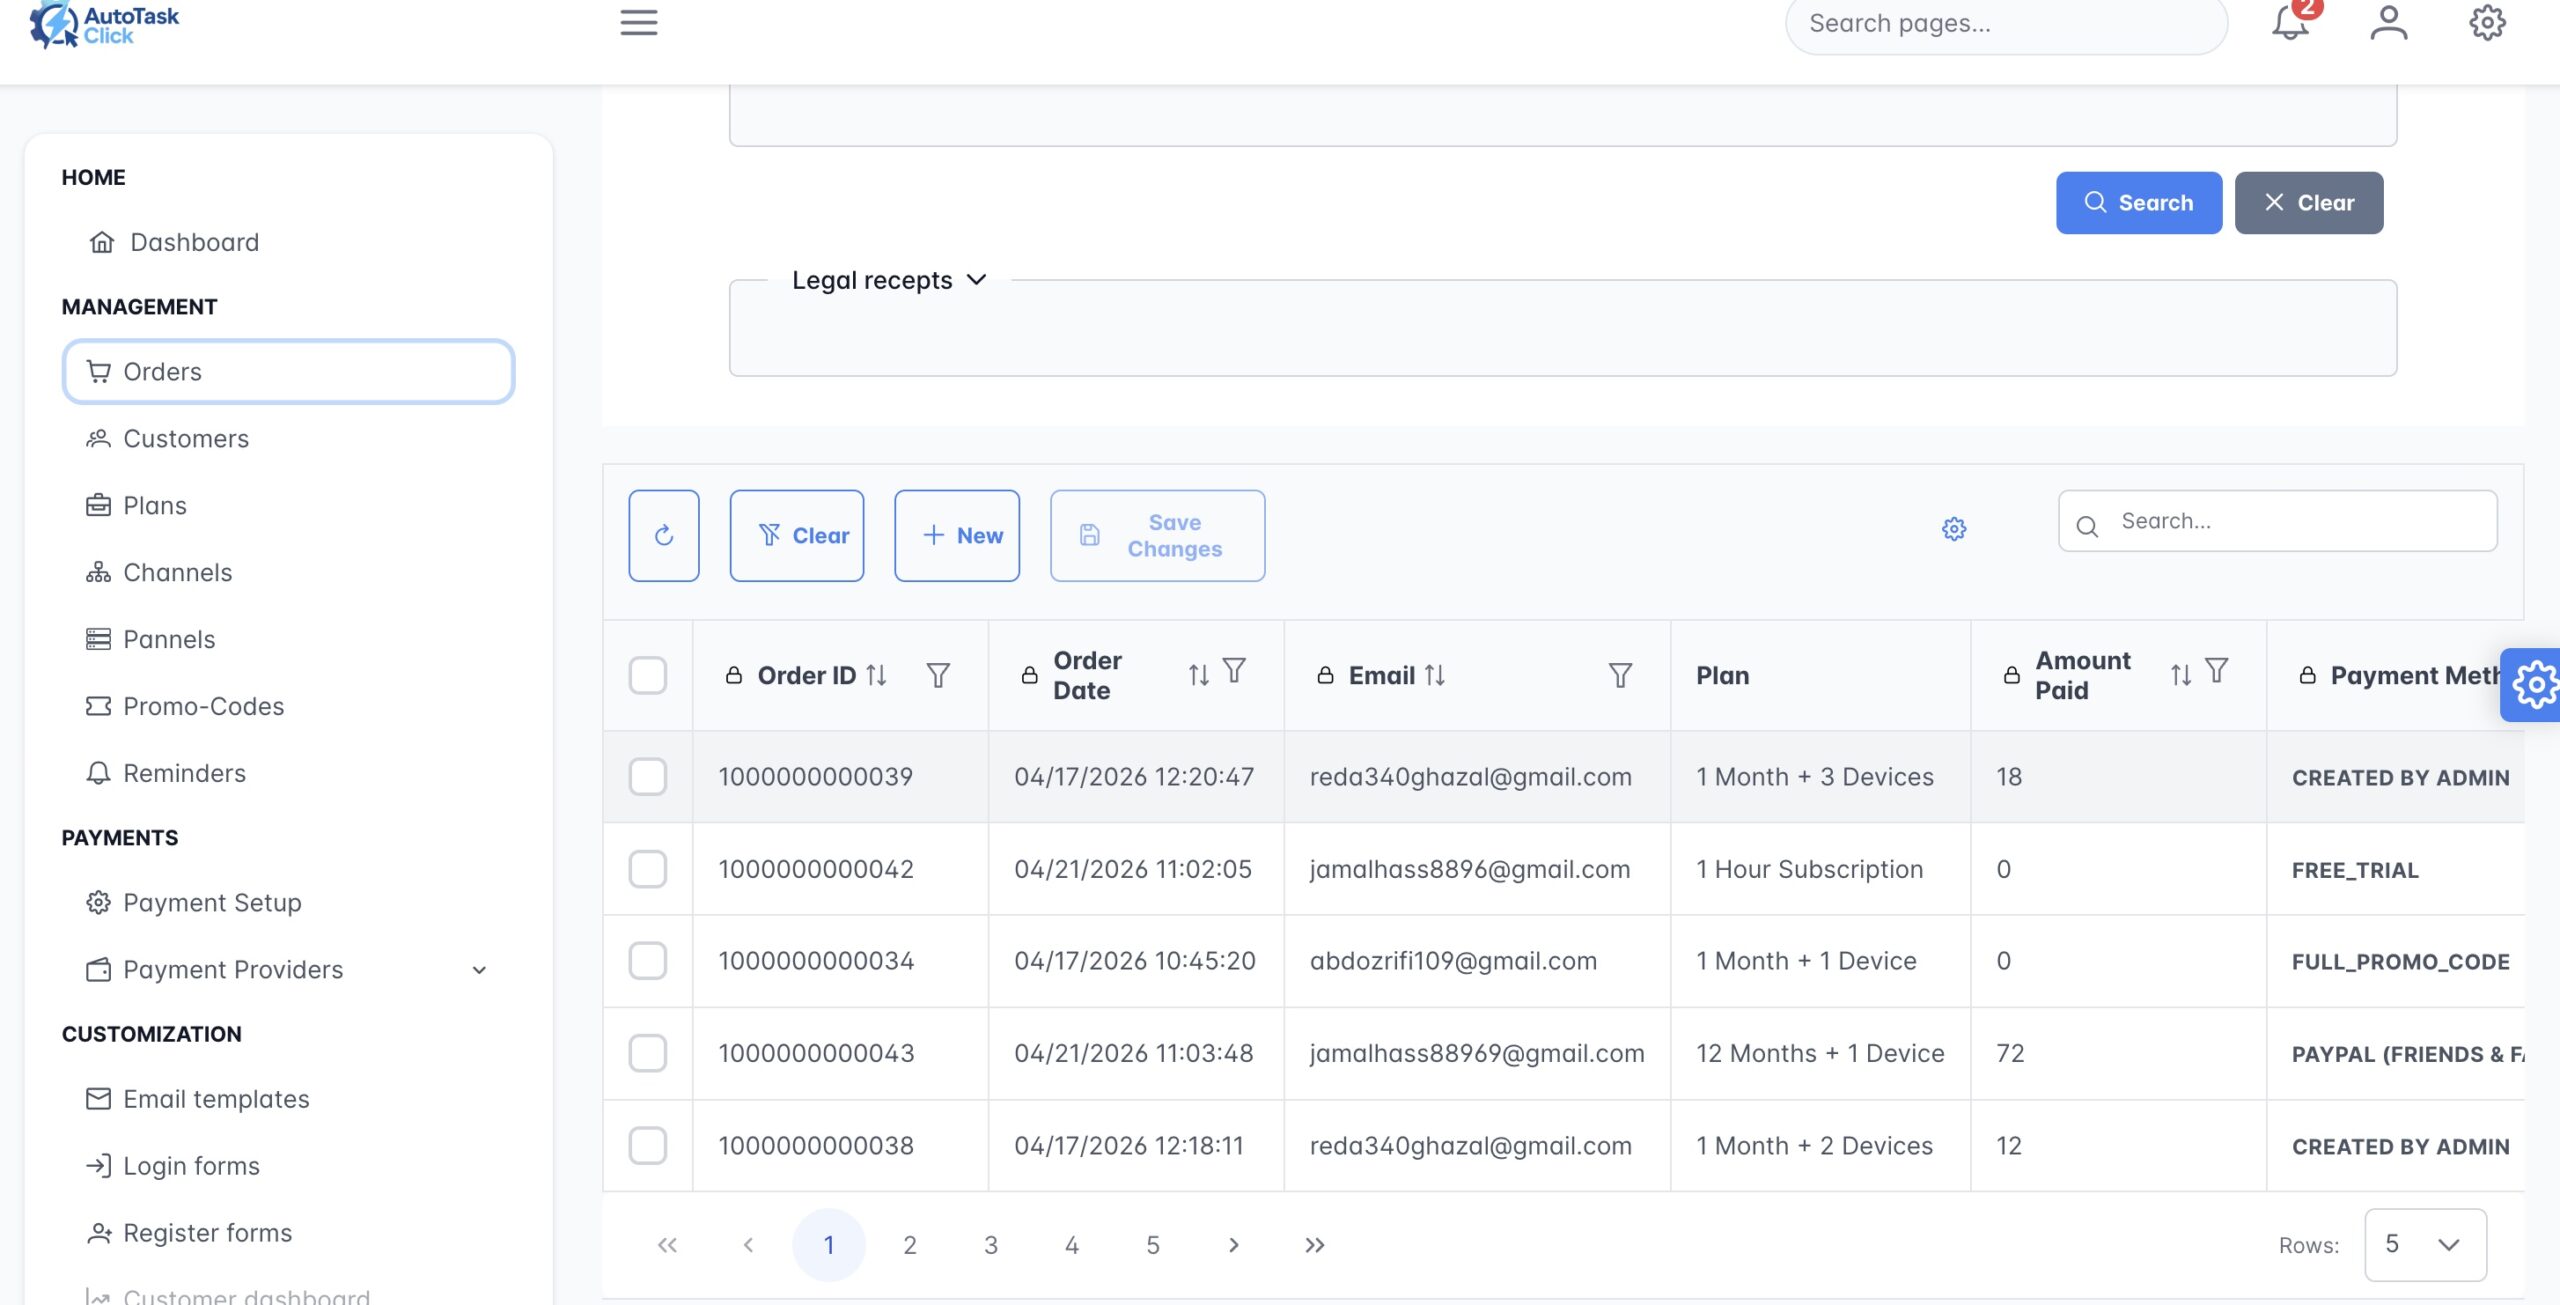
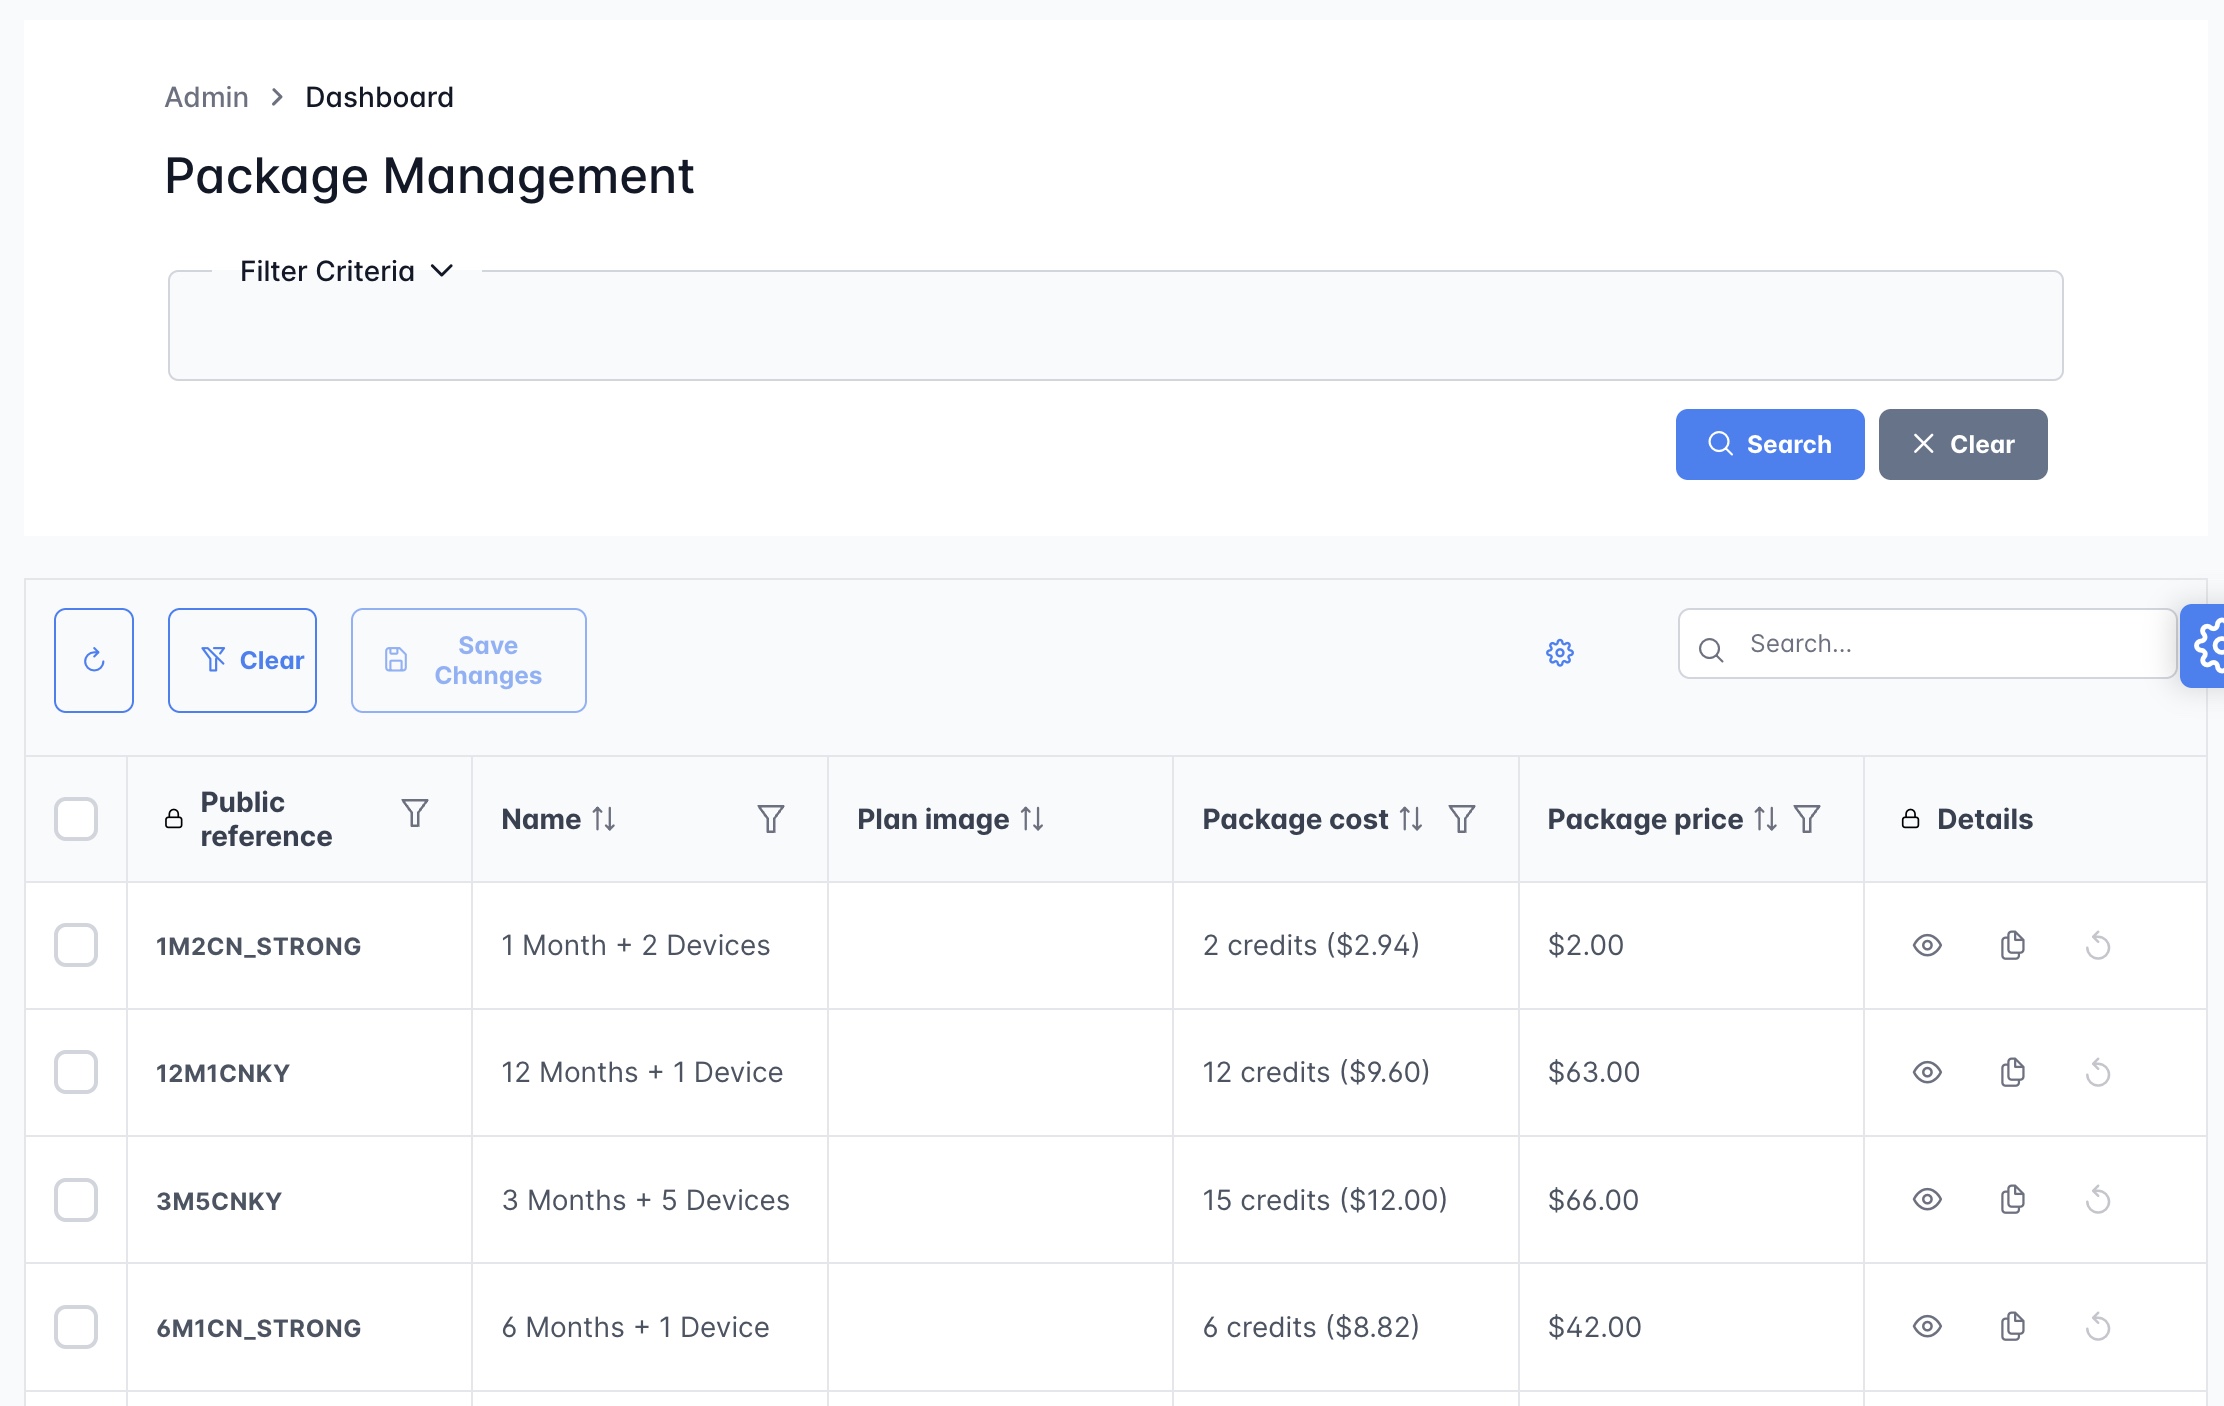
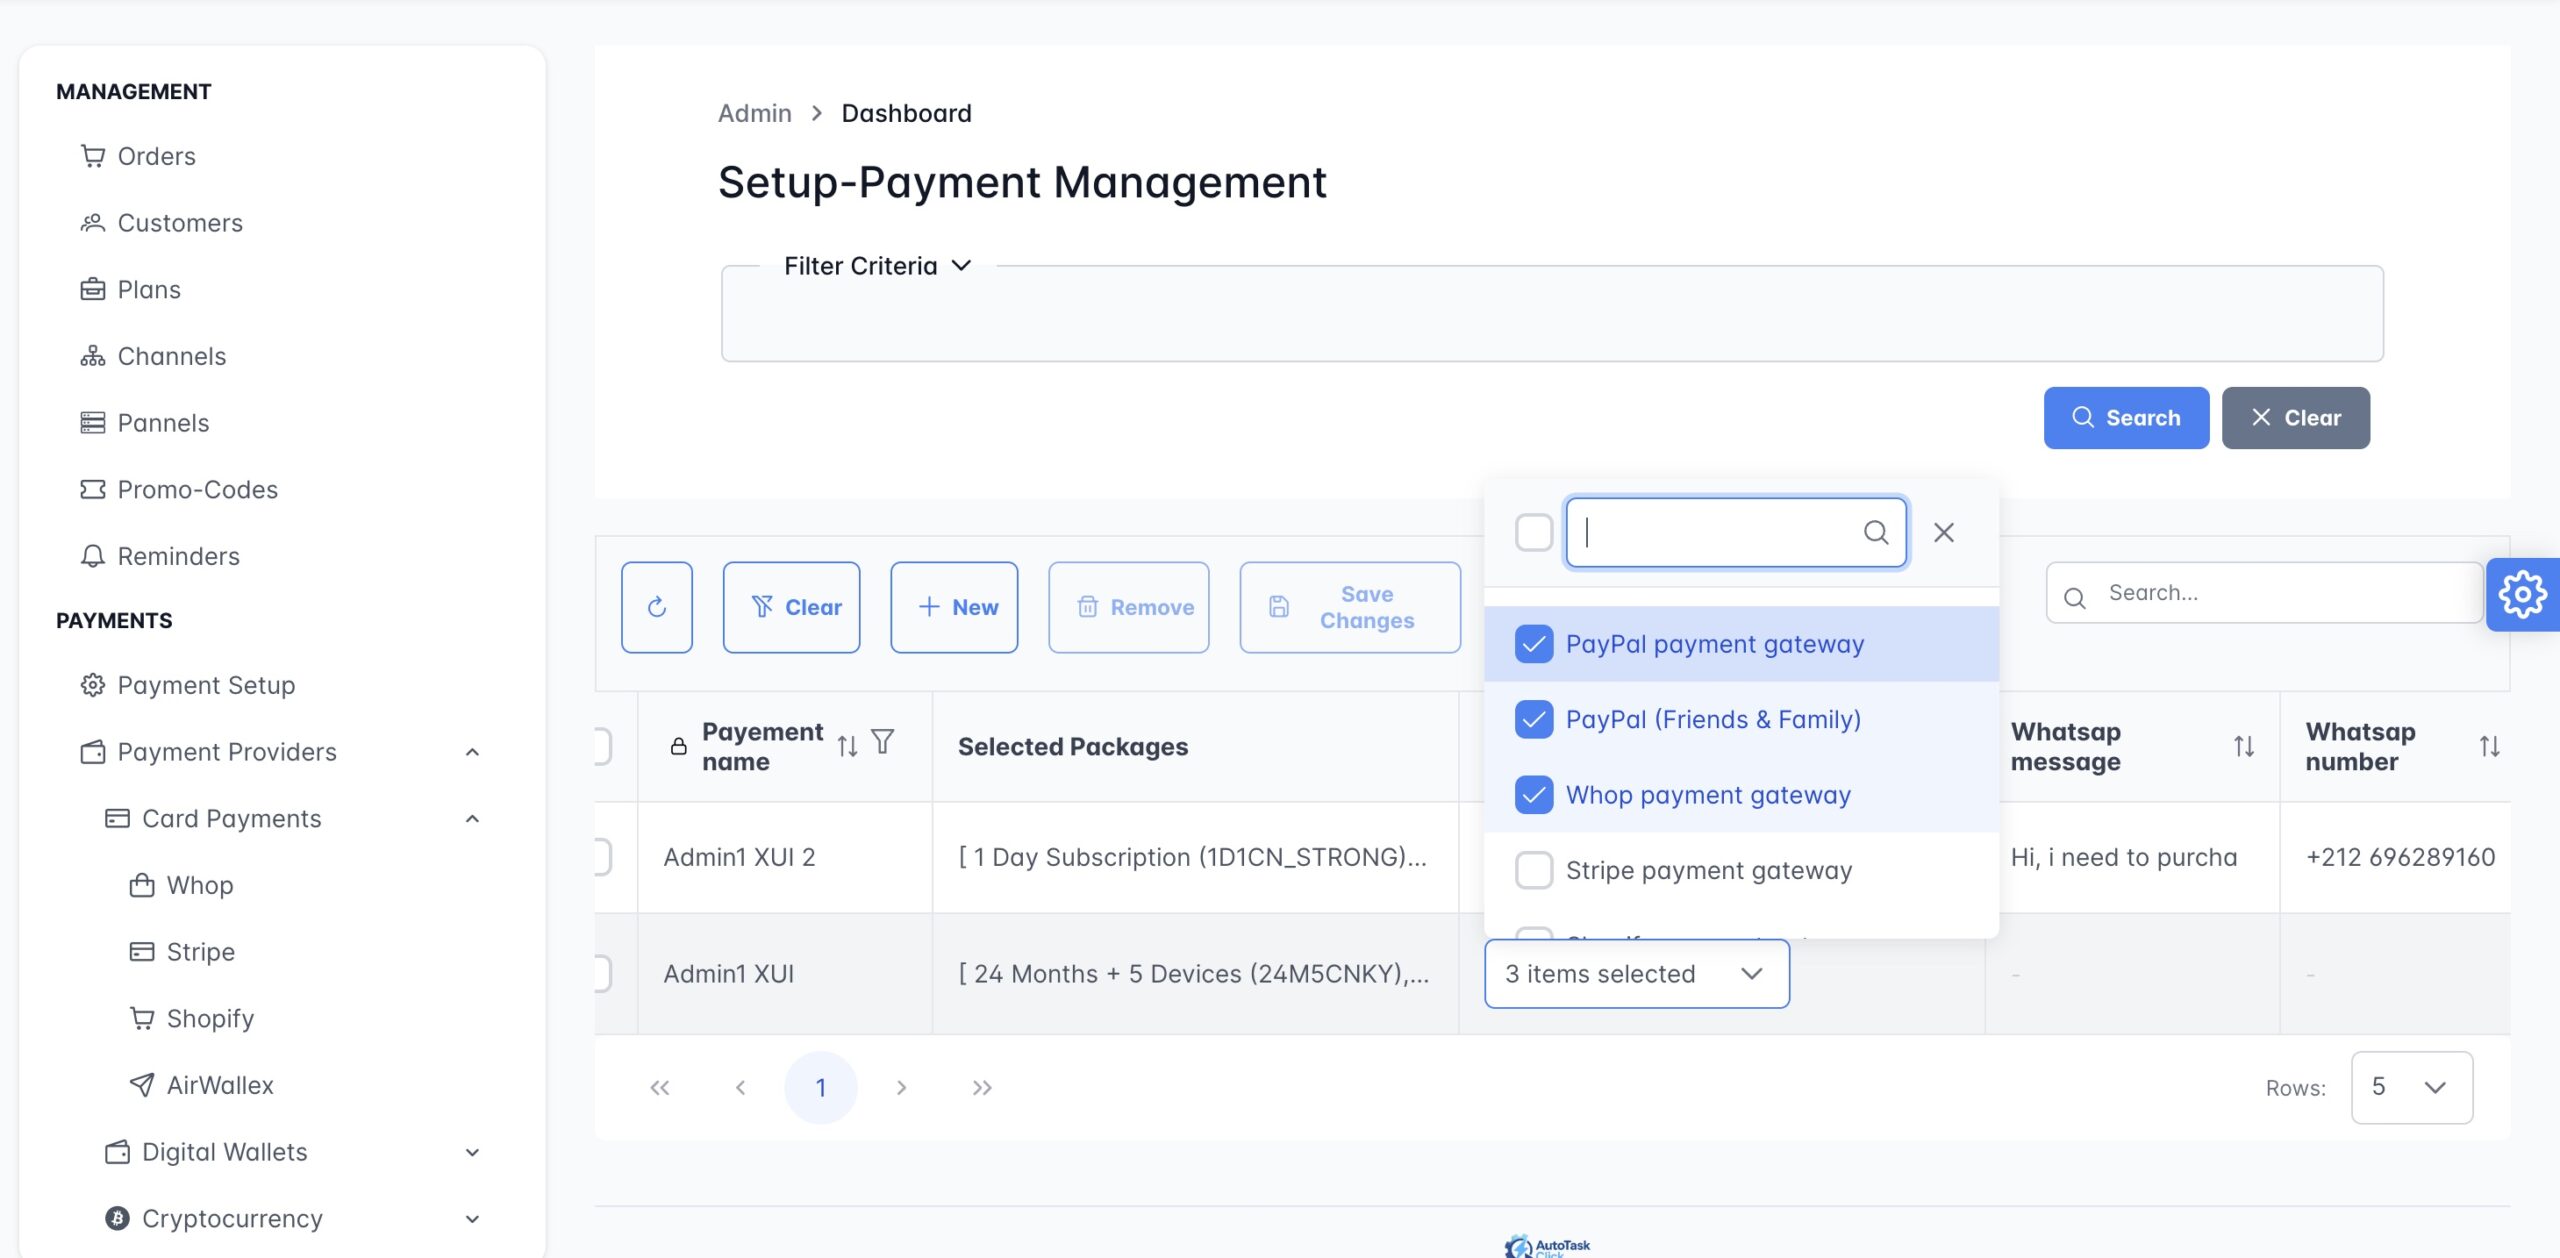
📋 Setup-Payment Management (Per Plan)
After linking accounts, go to Payment Management → assign which payment methods appear for each plan. You will find the plans separated by panels.
| Panel / Plan | Assigned Payment Methods |
|---|---|
| Strong4K – 3 months / 1 connection | PayPal Friends & Family Account A, Stripe |
| Kemo – 12 months | Stripe + Crypto + PayPal Business |
| Crystal – 1 Month | PayPal Business #2, Bank Transfer, Crypto |
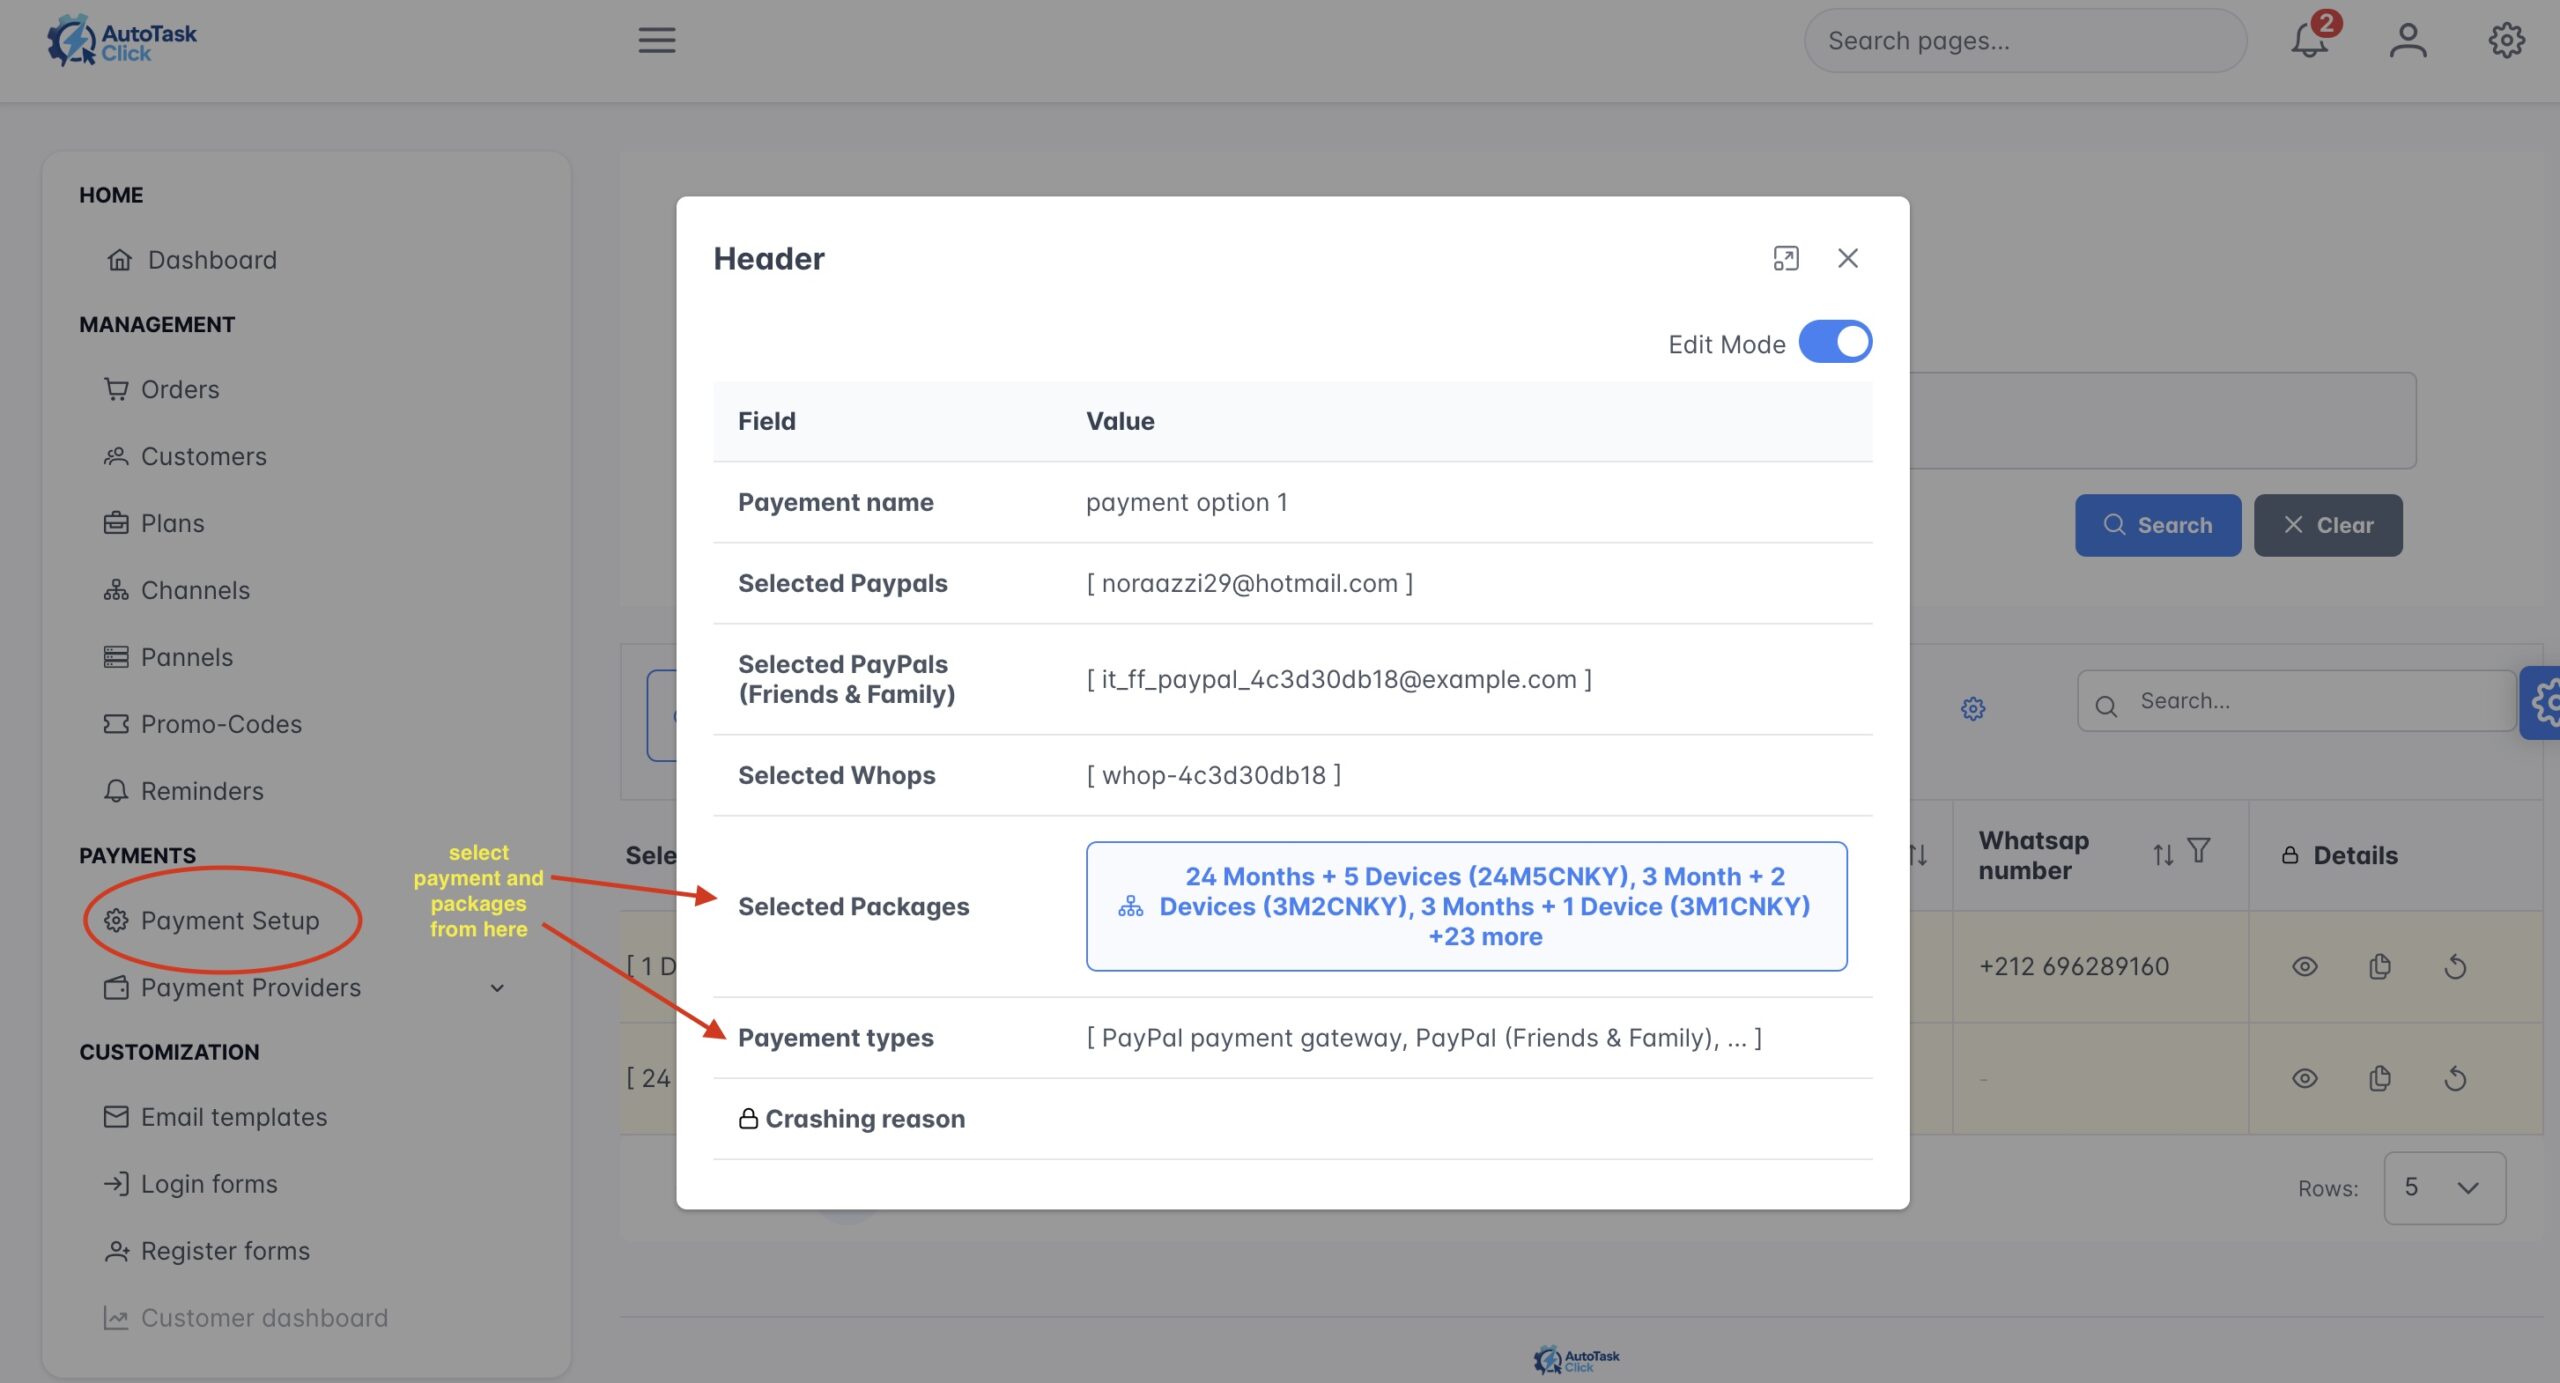
🖼️Figure 8: Payment Management – plans grouped by panel with payment method selection
📱 WhatsApp Fallback Number
Set a WhatsApp number that customers will see if all payment methods fail. This ensures you never lose a client — they can contact you directly via WhatsApp to complete the payment manually.
+1234567890 — Include the country code (e.g., +1 for US/Canada)
🌍 Country-Based Payment Protection
To avoid spy from competitors, you can set different payment options and WhatsApp numbers for different countries.
- Customers from the US see PayPal US accounts
- Customers from Europe see different payment methods
- Competitors from other regions see fake or limited payment options
- Protects your real payment accounts from being flagged or reported
⚠️ Troubleshooting
- Check that the payment account is properly connected (no red error icon)
- Verify the payment method is assigned to the specific plan
- Check if the threshold has been reached for that account
- Make sure API keys are correct and webhooks are configured
- Ensure you're using a personal PayPal account (not Business)
- Check that email notifications are properly configured
- Verify the payment link generation is working
- Verify the webhook URL is correct in your Stripe dashboard
- Make sure the webhook signing secret is properly configured
- Check that the webhook is set to receive all relevant events
- Test the webhook endpoint using Stripe's test feature
📄 Shortcodes & 3 Embed Methods (Final Step)
After completing all previous steps (Email Configuration, Host & Pages, Panels Linking, and Payment Setup), you are ready to integrate checkout and login forms on your website. We provide 3 different methods to embed forms on your WordPress site.
🔐 Available Shortcodes
Inside the plugin dropdown (after clicking the Earth icon), go to Shortcodes to find three ready-to-use shortcodes:
[your checkout form]
Displays the payment and order form
[your store login]
Displays customer login form
[your store signup]
Displays customer registration form
🎯 Important Note for Elementor Users
📝 Method 1: Using Shortcodes (WordPress Classic Editor)
- Create a new WordPress page (e.g., "Checkout", "Login", "My Account")
- In the page editor, paste the desired shortcode (e.g.,
[your checkout form]) - Publish the page
- The shortcode will automatically display a dropdown of your available plans (configured in your dashboard)
🔗 Method 2: Direct Public URLs
Every form has a unique public URL that you can use anywhere — no WordPress shortcode needed.
- Copy the public link from the Shortcodes section in the plugin
- Use it on any website, social media, email, or anywhere else
- Example format:
https://yourdomain.com/?autotaskclick_checkout=1
📜 Method 3: Script Embed (For Any Website)
This method works on any website, not just WordPress. Perfect for embedding forms on custom HTML sites or landing pages.
- In the Shortcodes section, generate your unique embed script
- Copy the generated script code
- On your page, add an HTML widget (Elementor) or paste directly into your HTML code
- The form will appear exactly where you placed the script
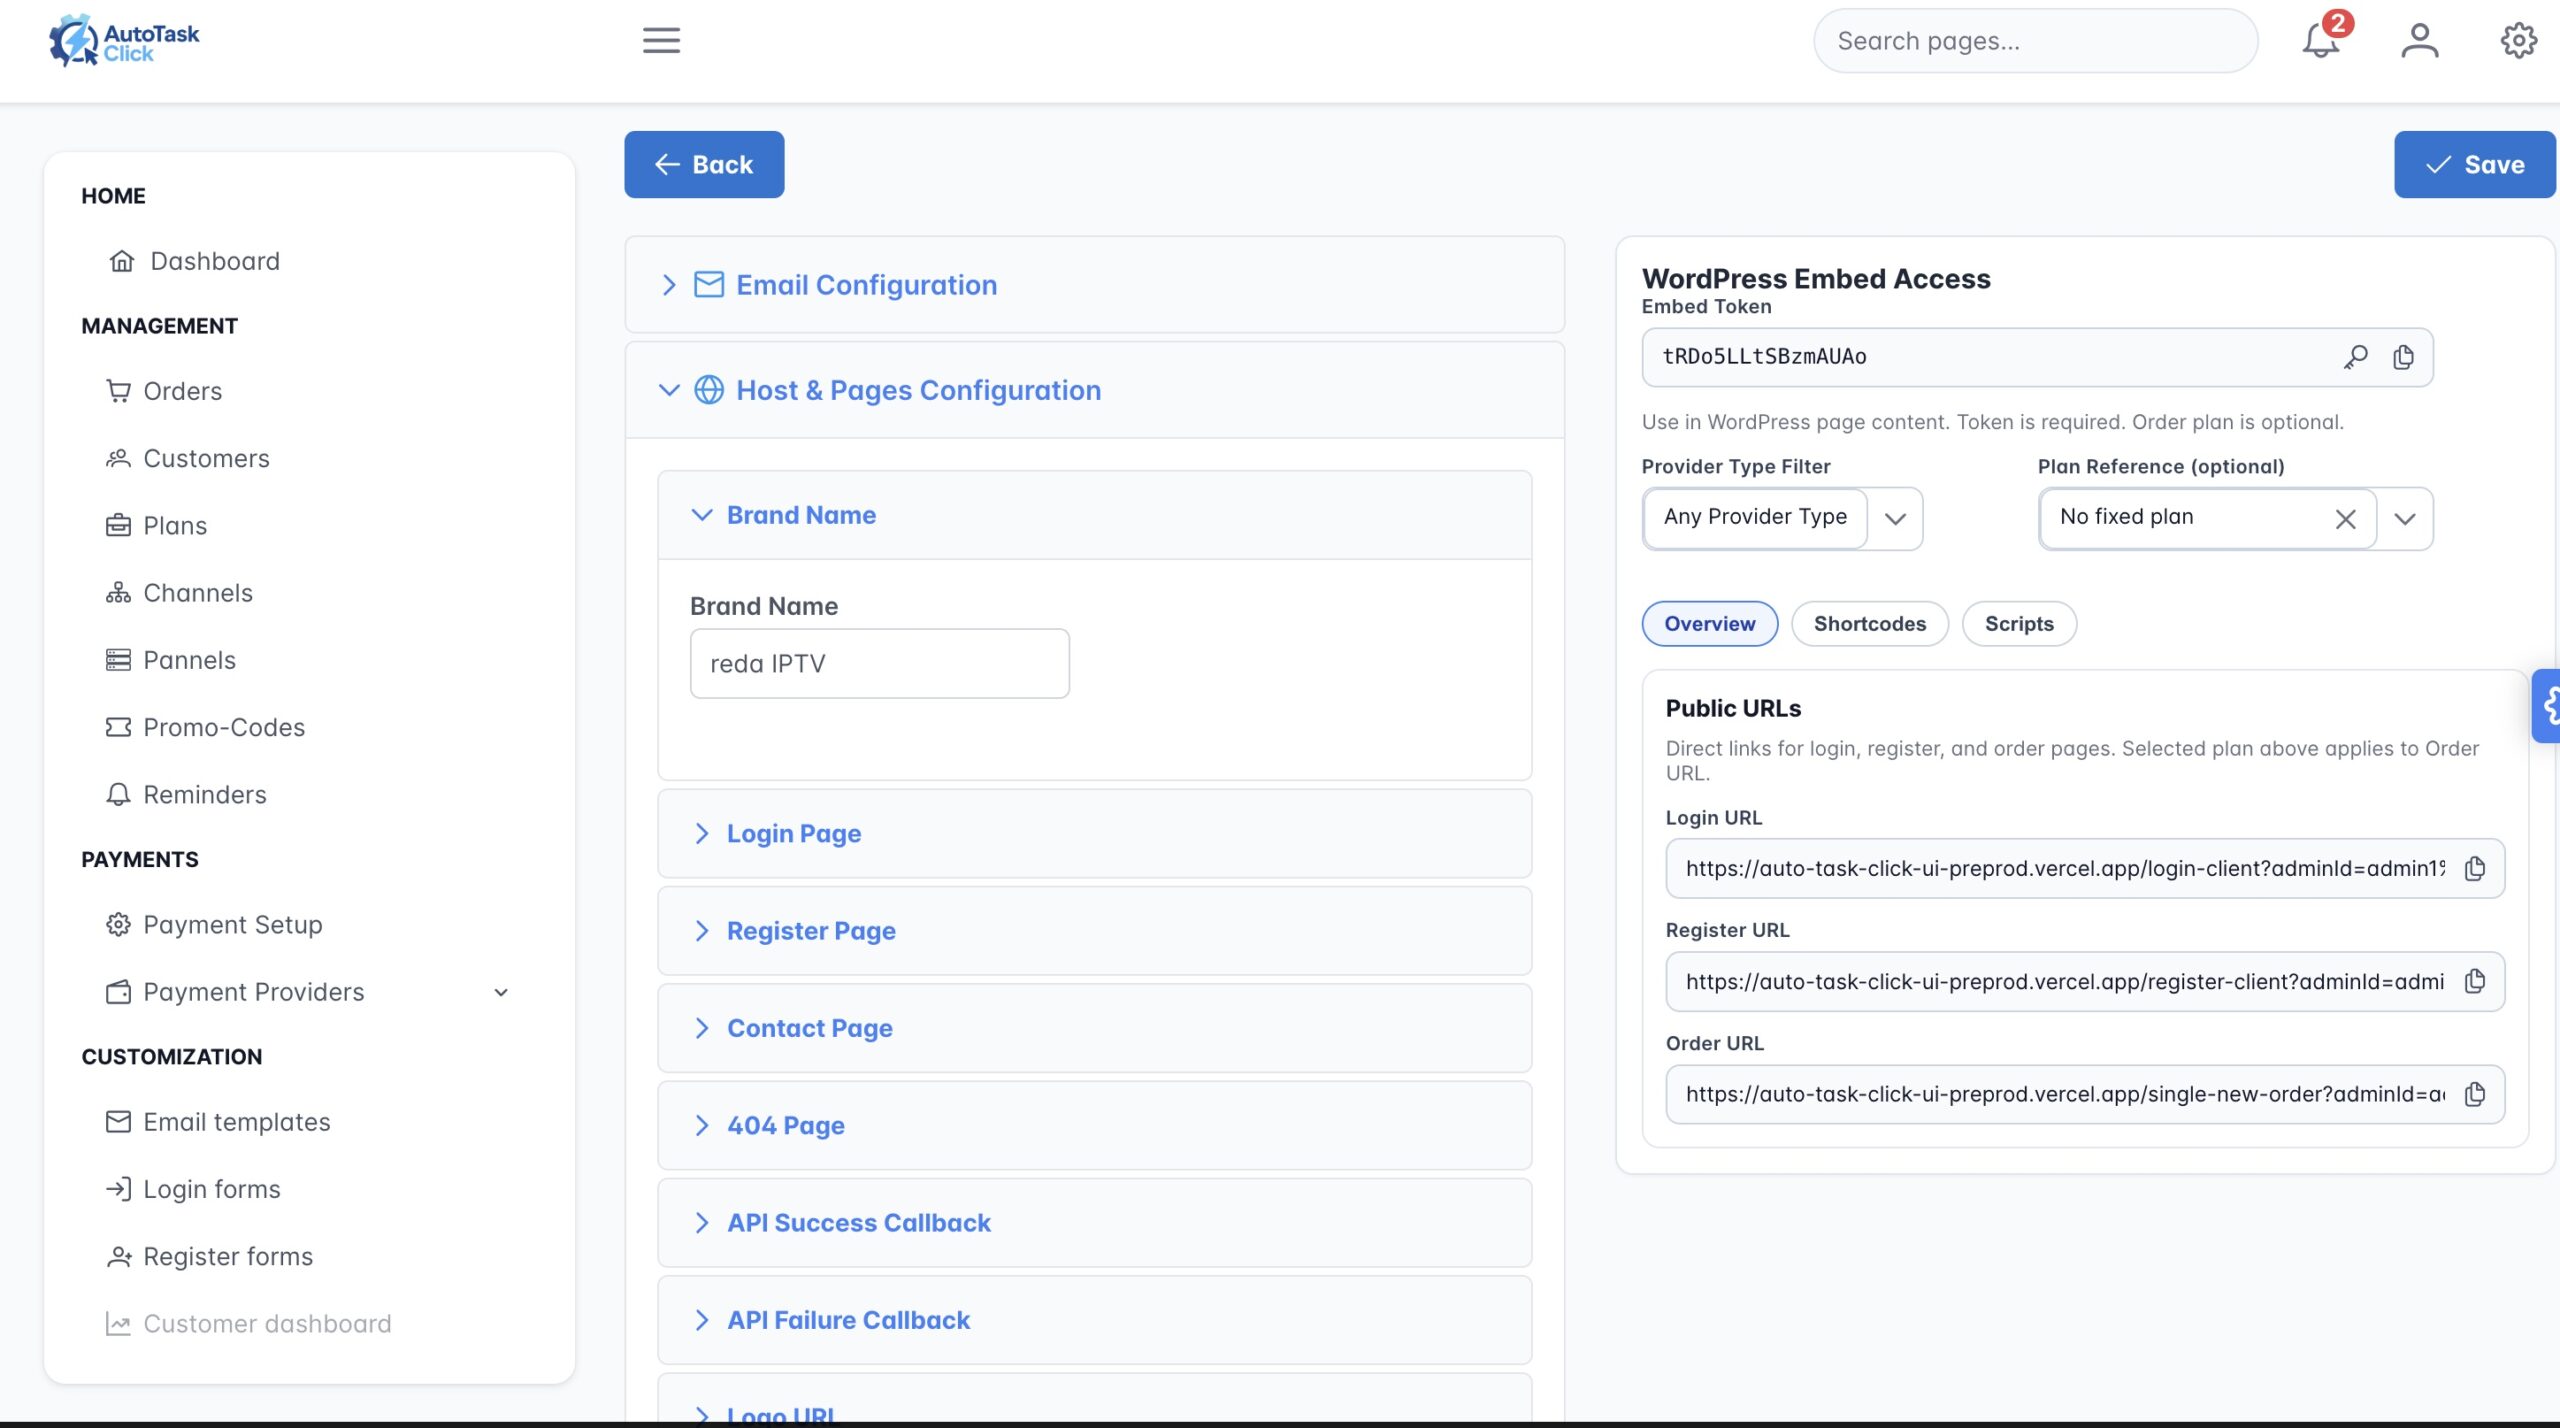
🔐 Unique Embed Token
Inside the Shortcodes section, you will find your unique Embed Token. After generating it, the token will be integrated on every link you use (public URLs, shortcodes, and scripts). This token ensures that only your authorized websites can display the forms.
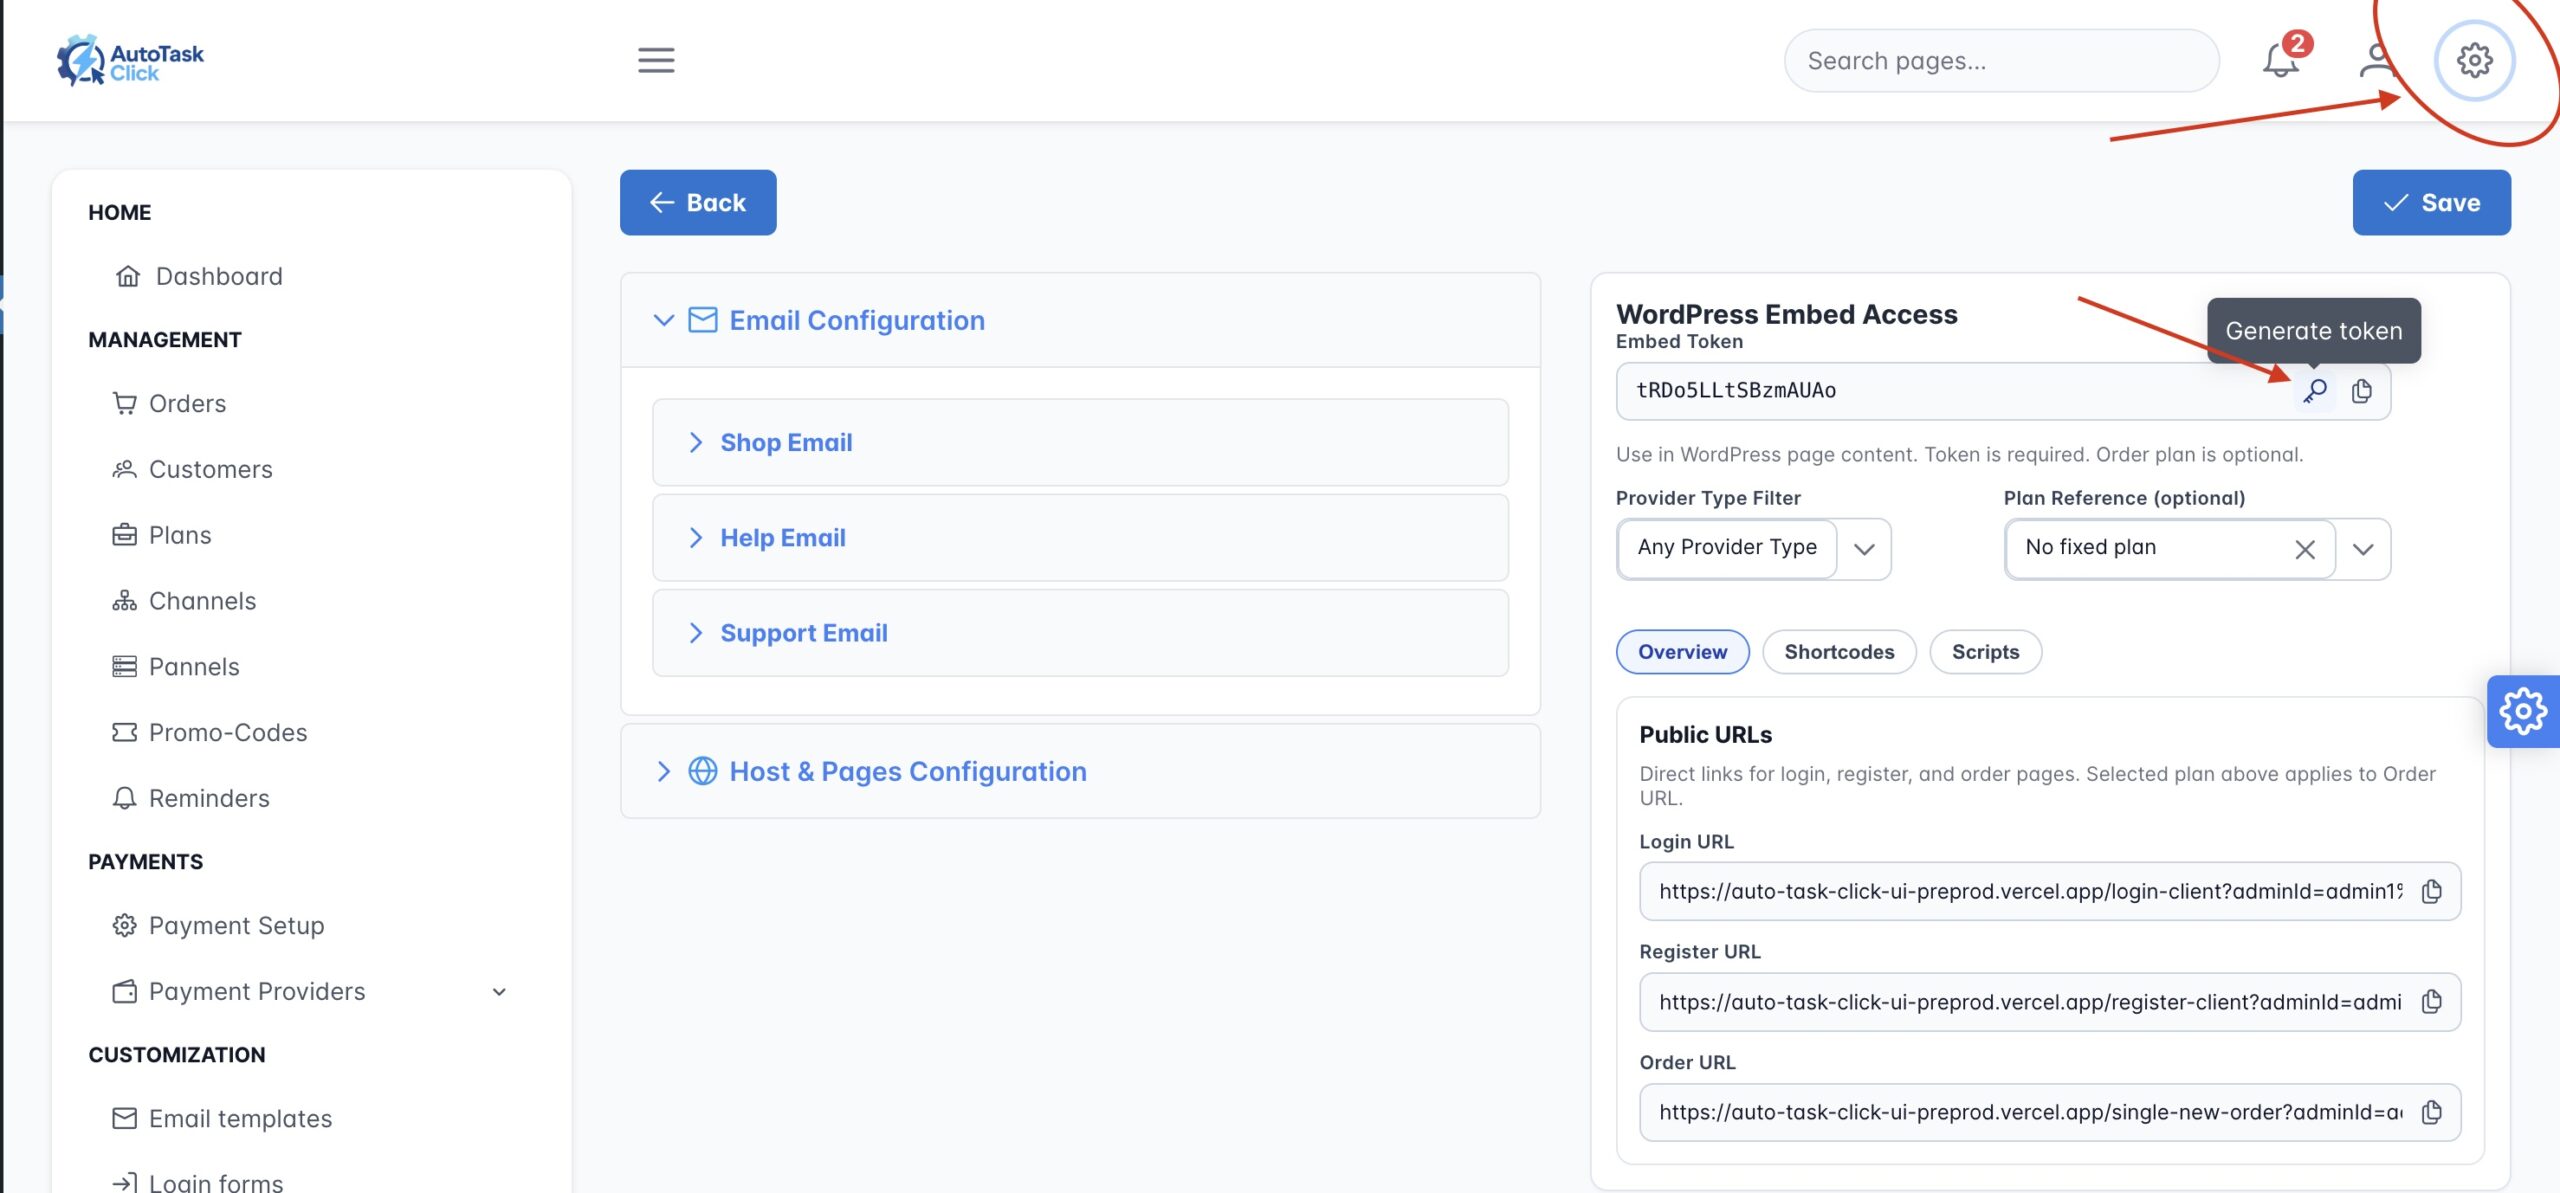
📸 Figure 9: Embed Token generator with Provider Type and Plan Reference dropdowns
🎛️ Preselect a Specific Plan (Dropdowns)
When generating your embed code (whether shortcode, public URL, or script), you will find 2 dropdowns:
| Dropdown | Purpose |
|---|---|
| Provider Type | Select which panel/provider this form should use |
| Plan Reference | Select which plan should be preselected by default on the checkout form |
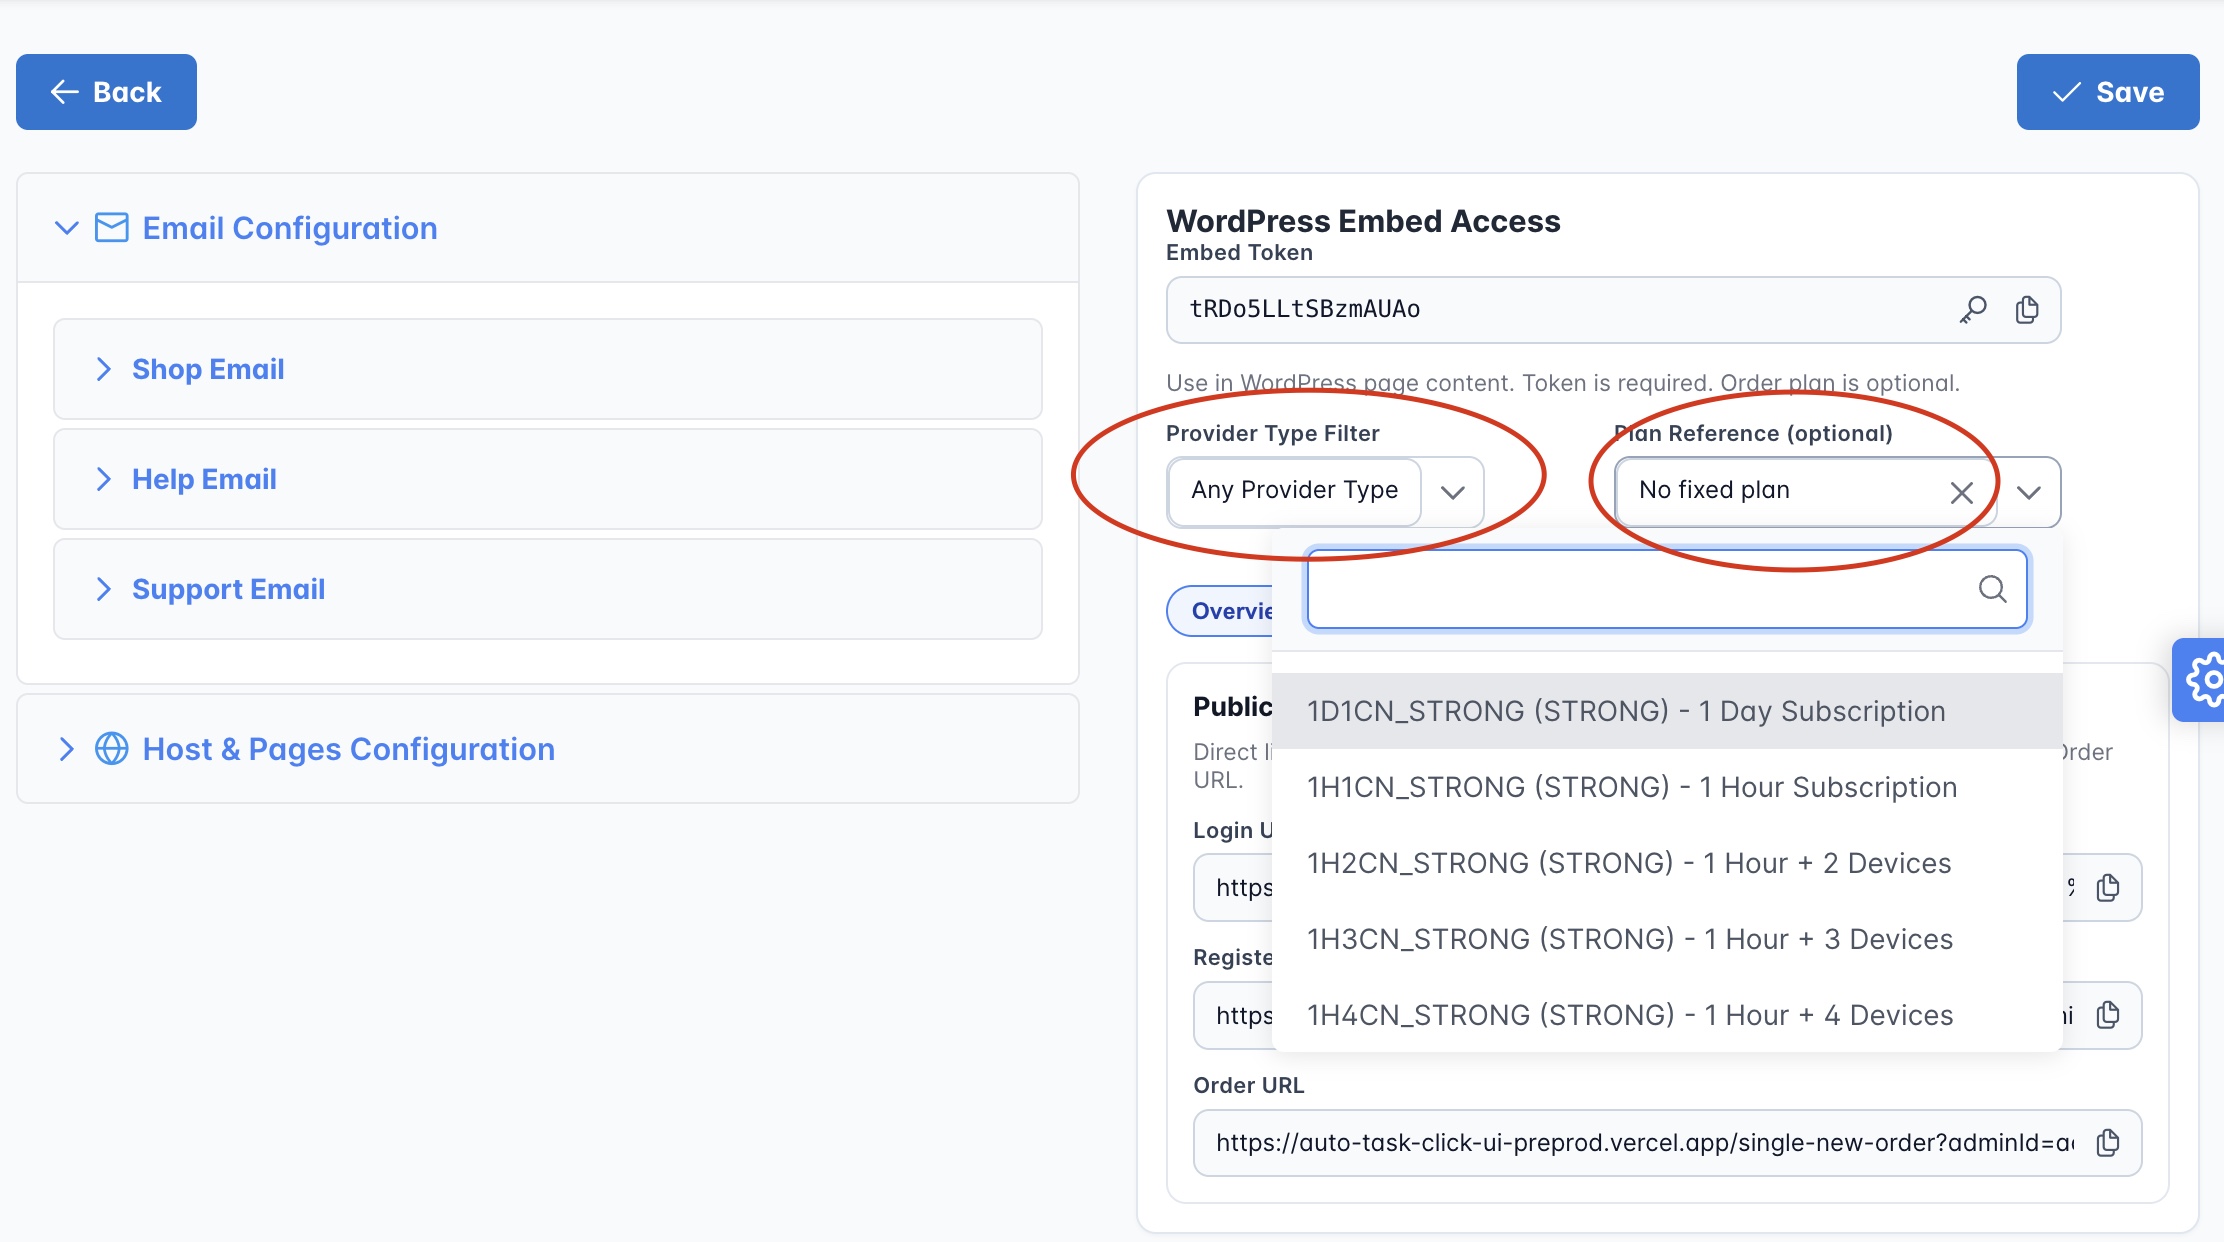
📸 Figure 10: Embed Token generator showing Provider Type and Plan Reference dropdowns
🖌️ How to Add Shortcode in Elementor
- Edit your page with Elementor
- Drag a Shortcode widget onto your page
- In the Shortcode field, paste
[your short code] - Update/Publish the page
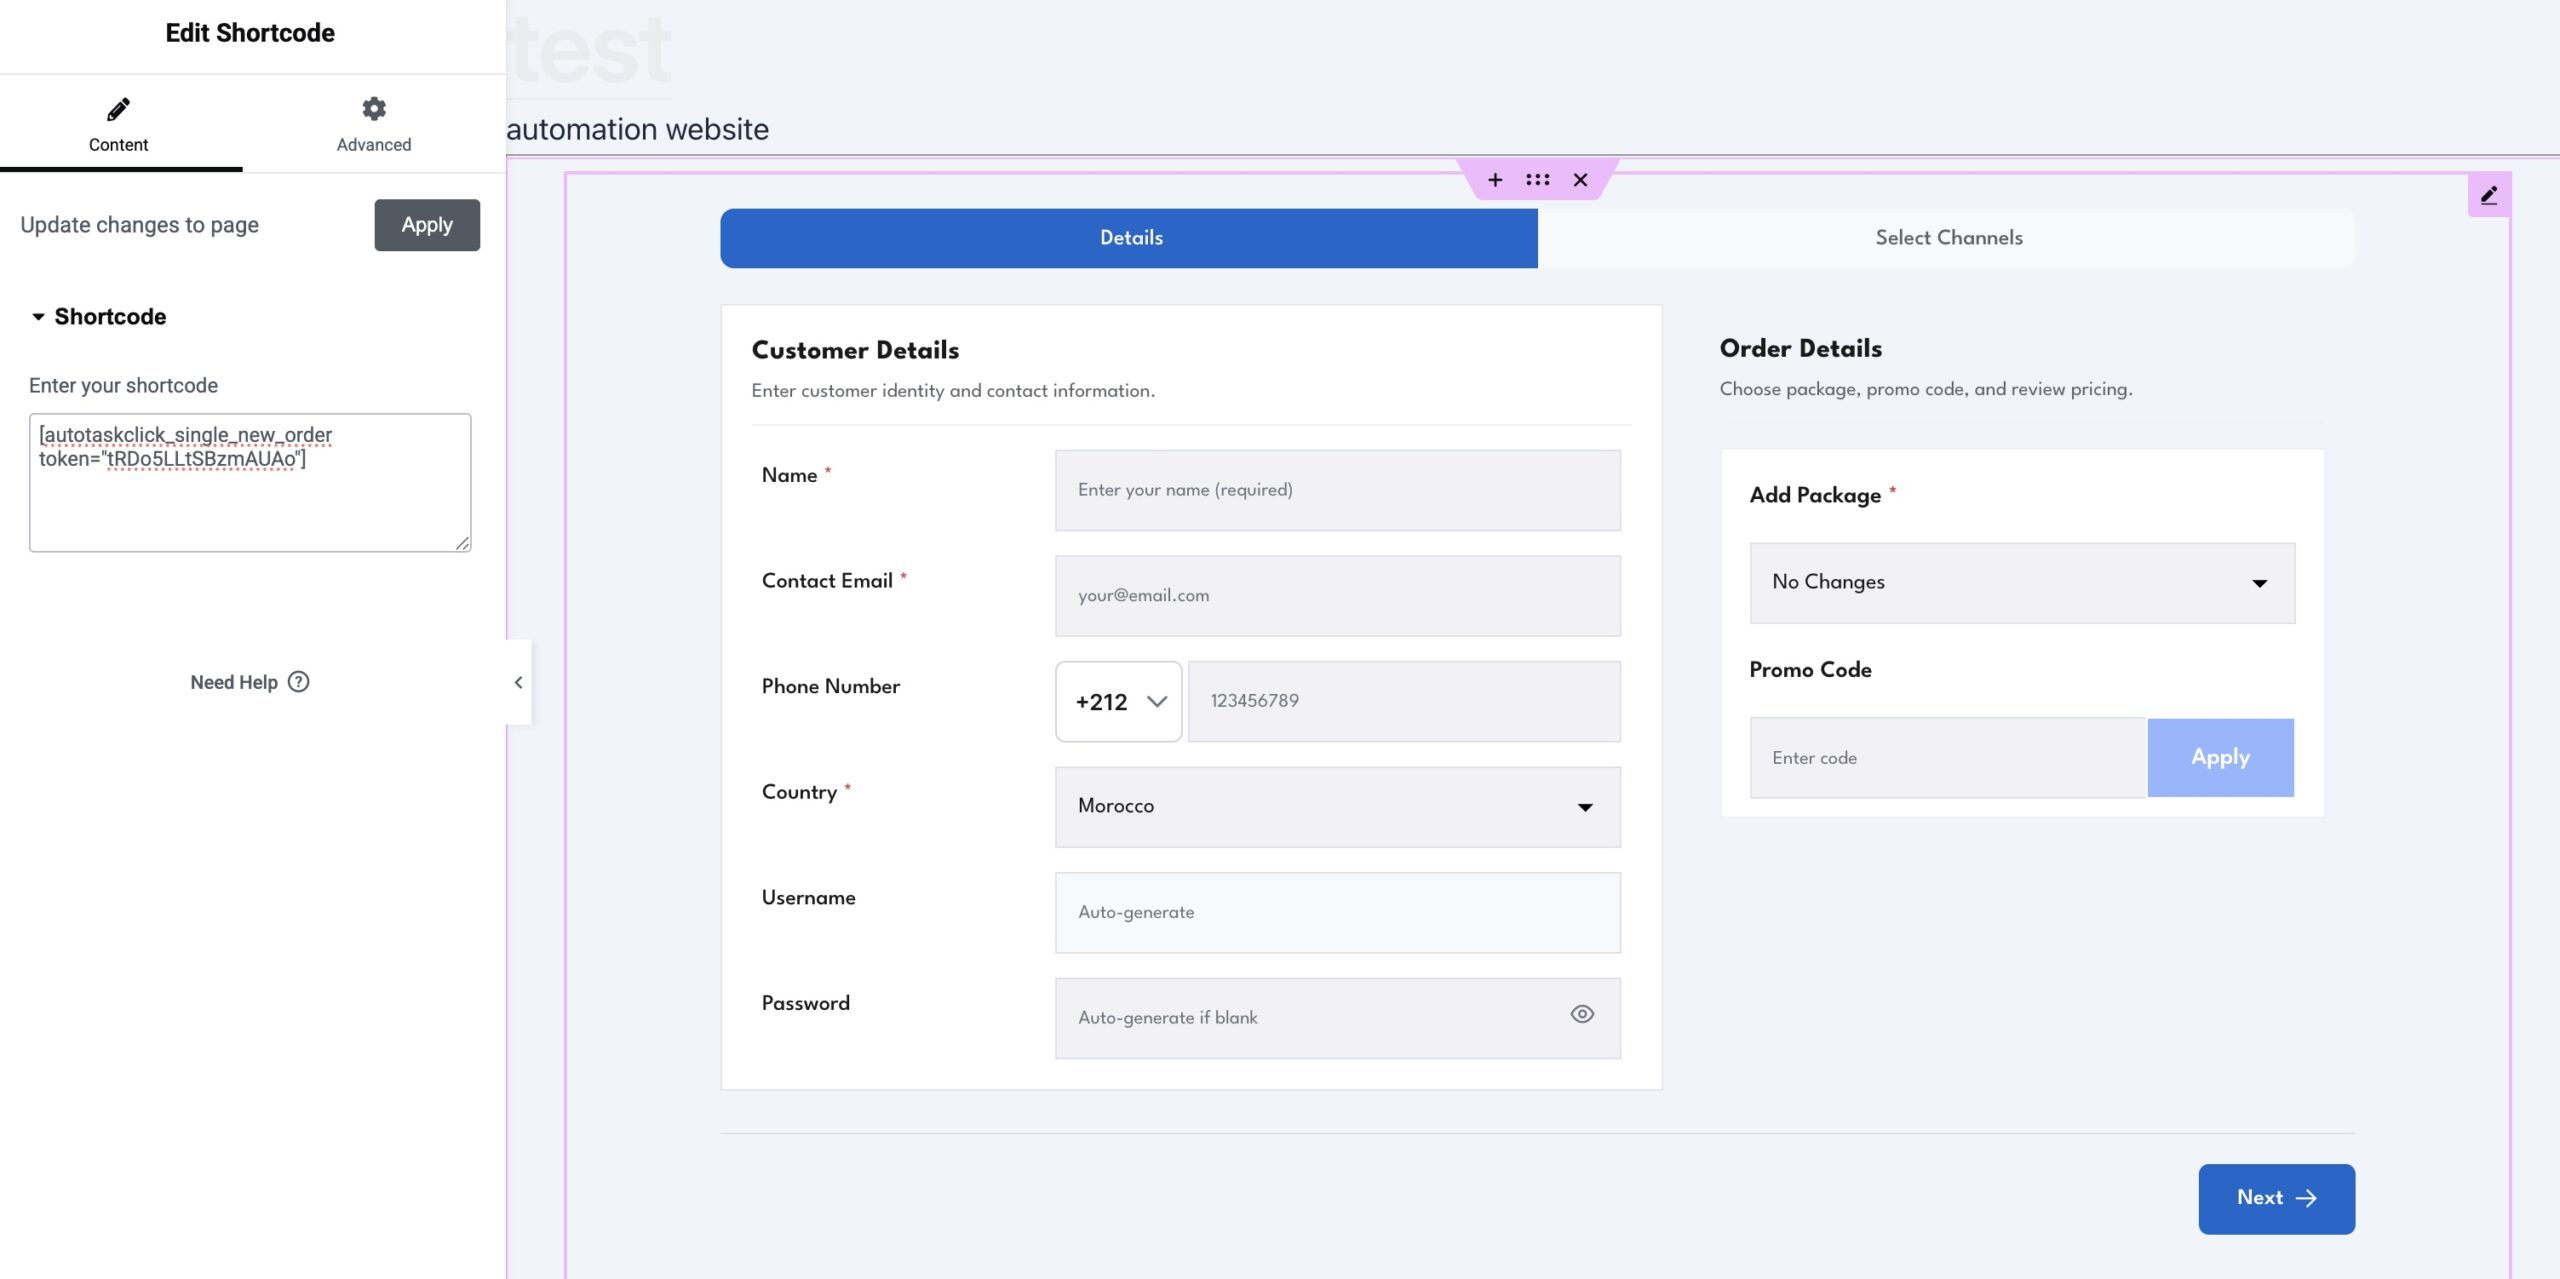
📸 Figure 11: Elementor editor showing the Shortcode widget with the checkout shortcode pasted
🔗 External Link Option
The third option in the plugin dropdown provides an external link that redirects to our main Autotaskclick website for additional resources, updates, and support documentation.
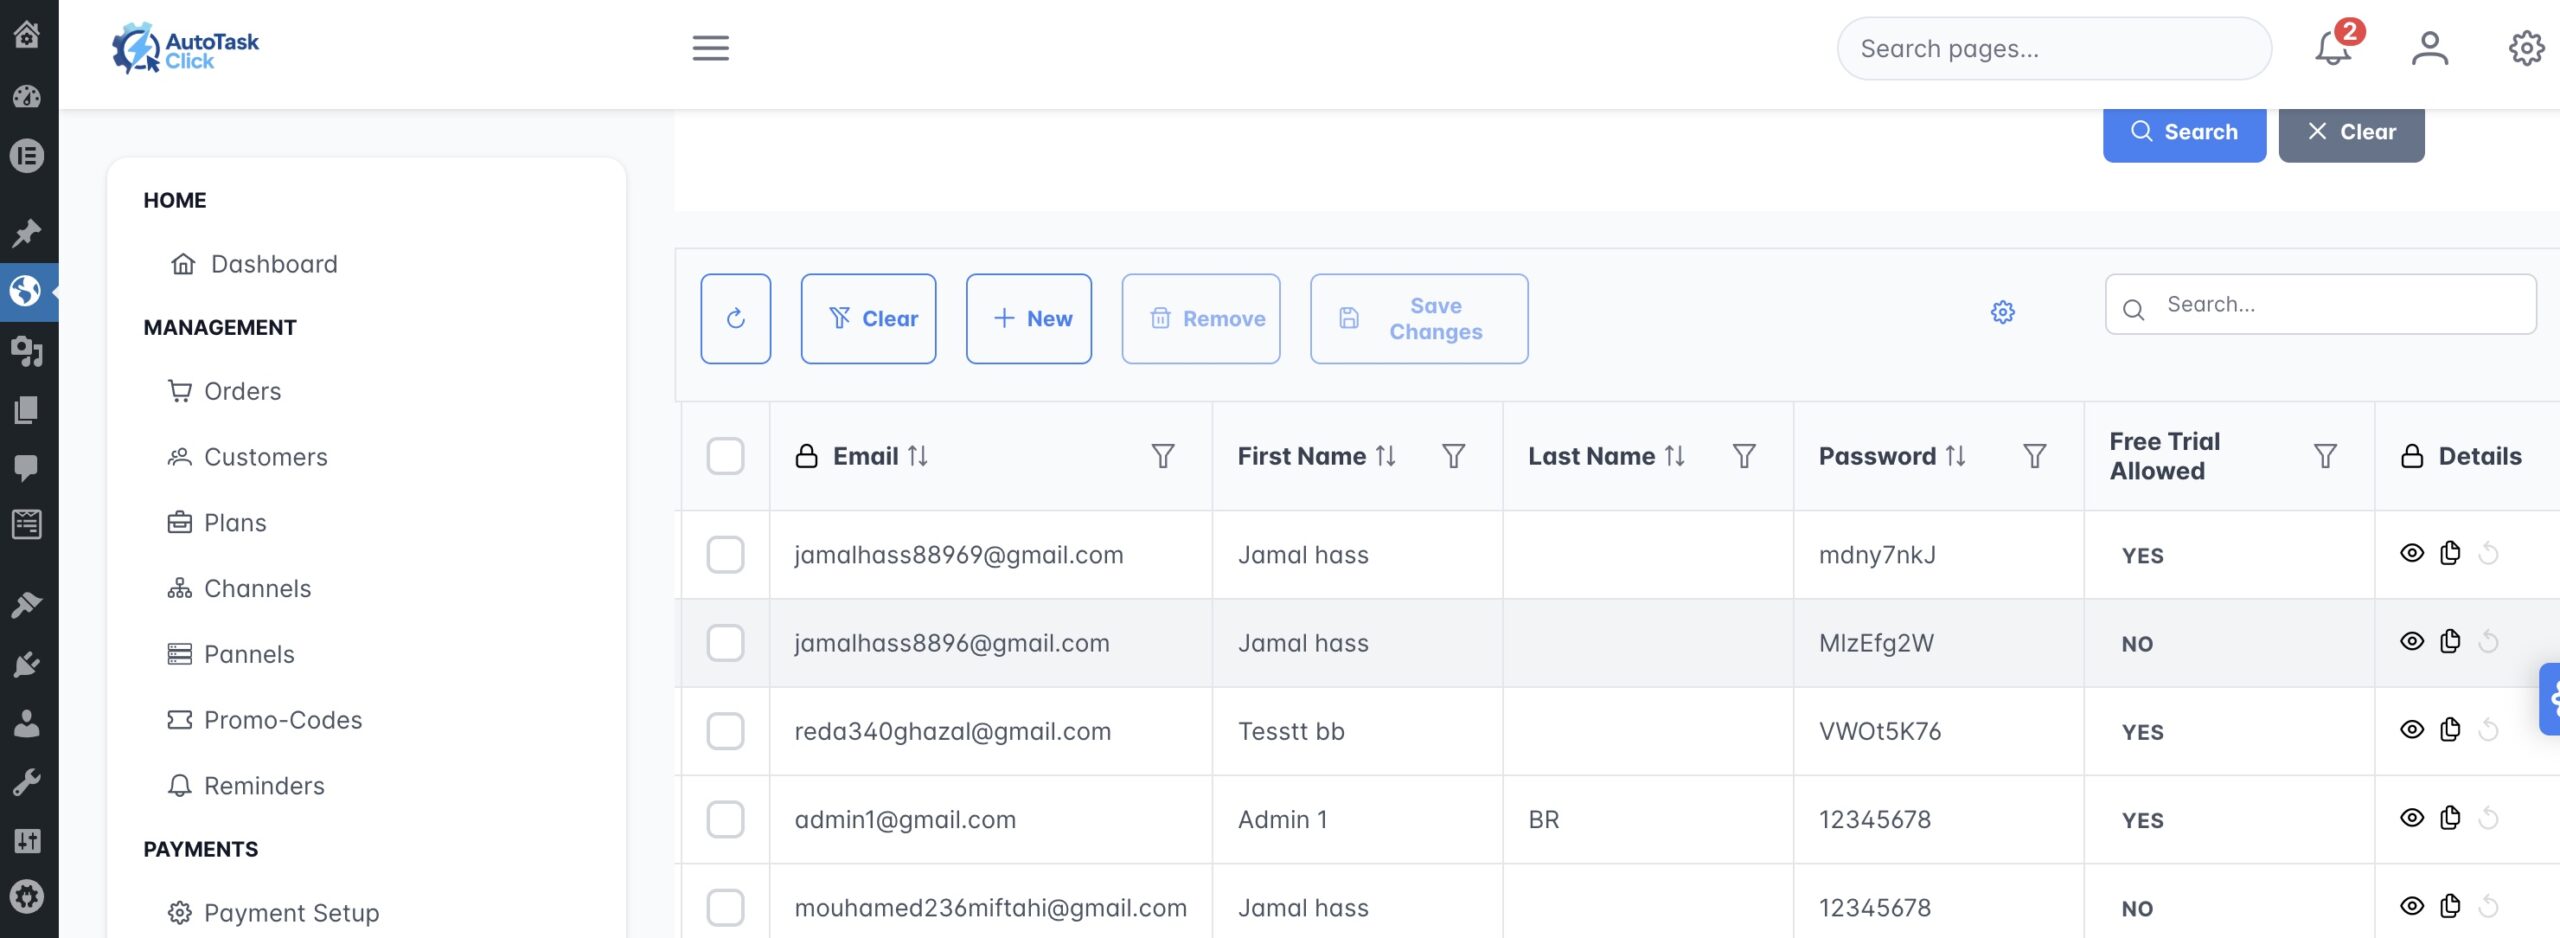
Orders will be delivered automatically to your client's email. You can now customize email templates, login/signup forms, create promo codes, and manage channels from the dashboard.
📌 What's Next?
After completing the setup, you can explore these additional features:
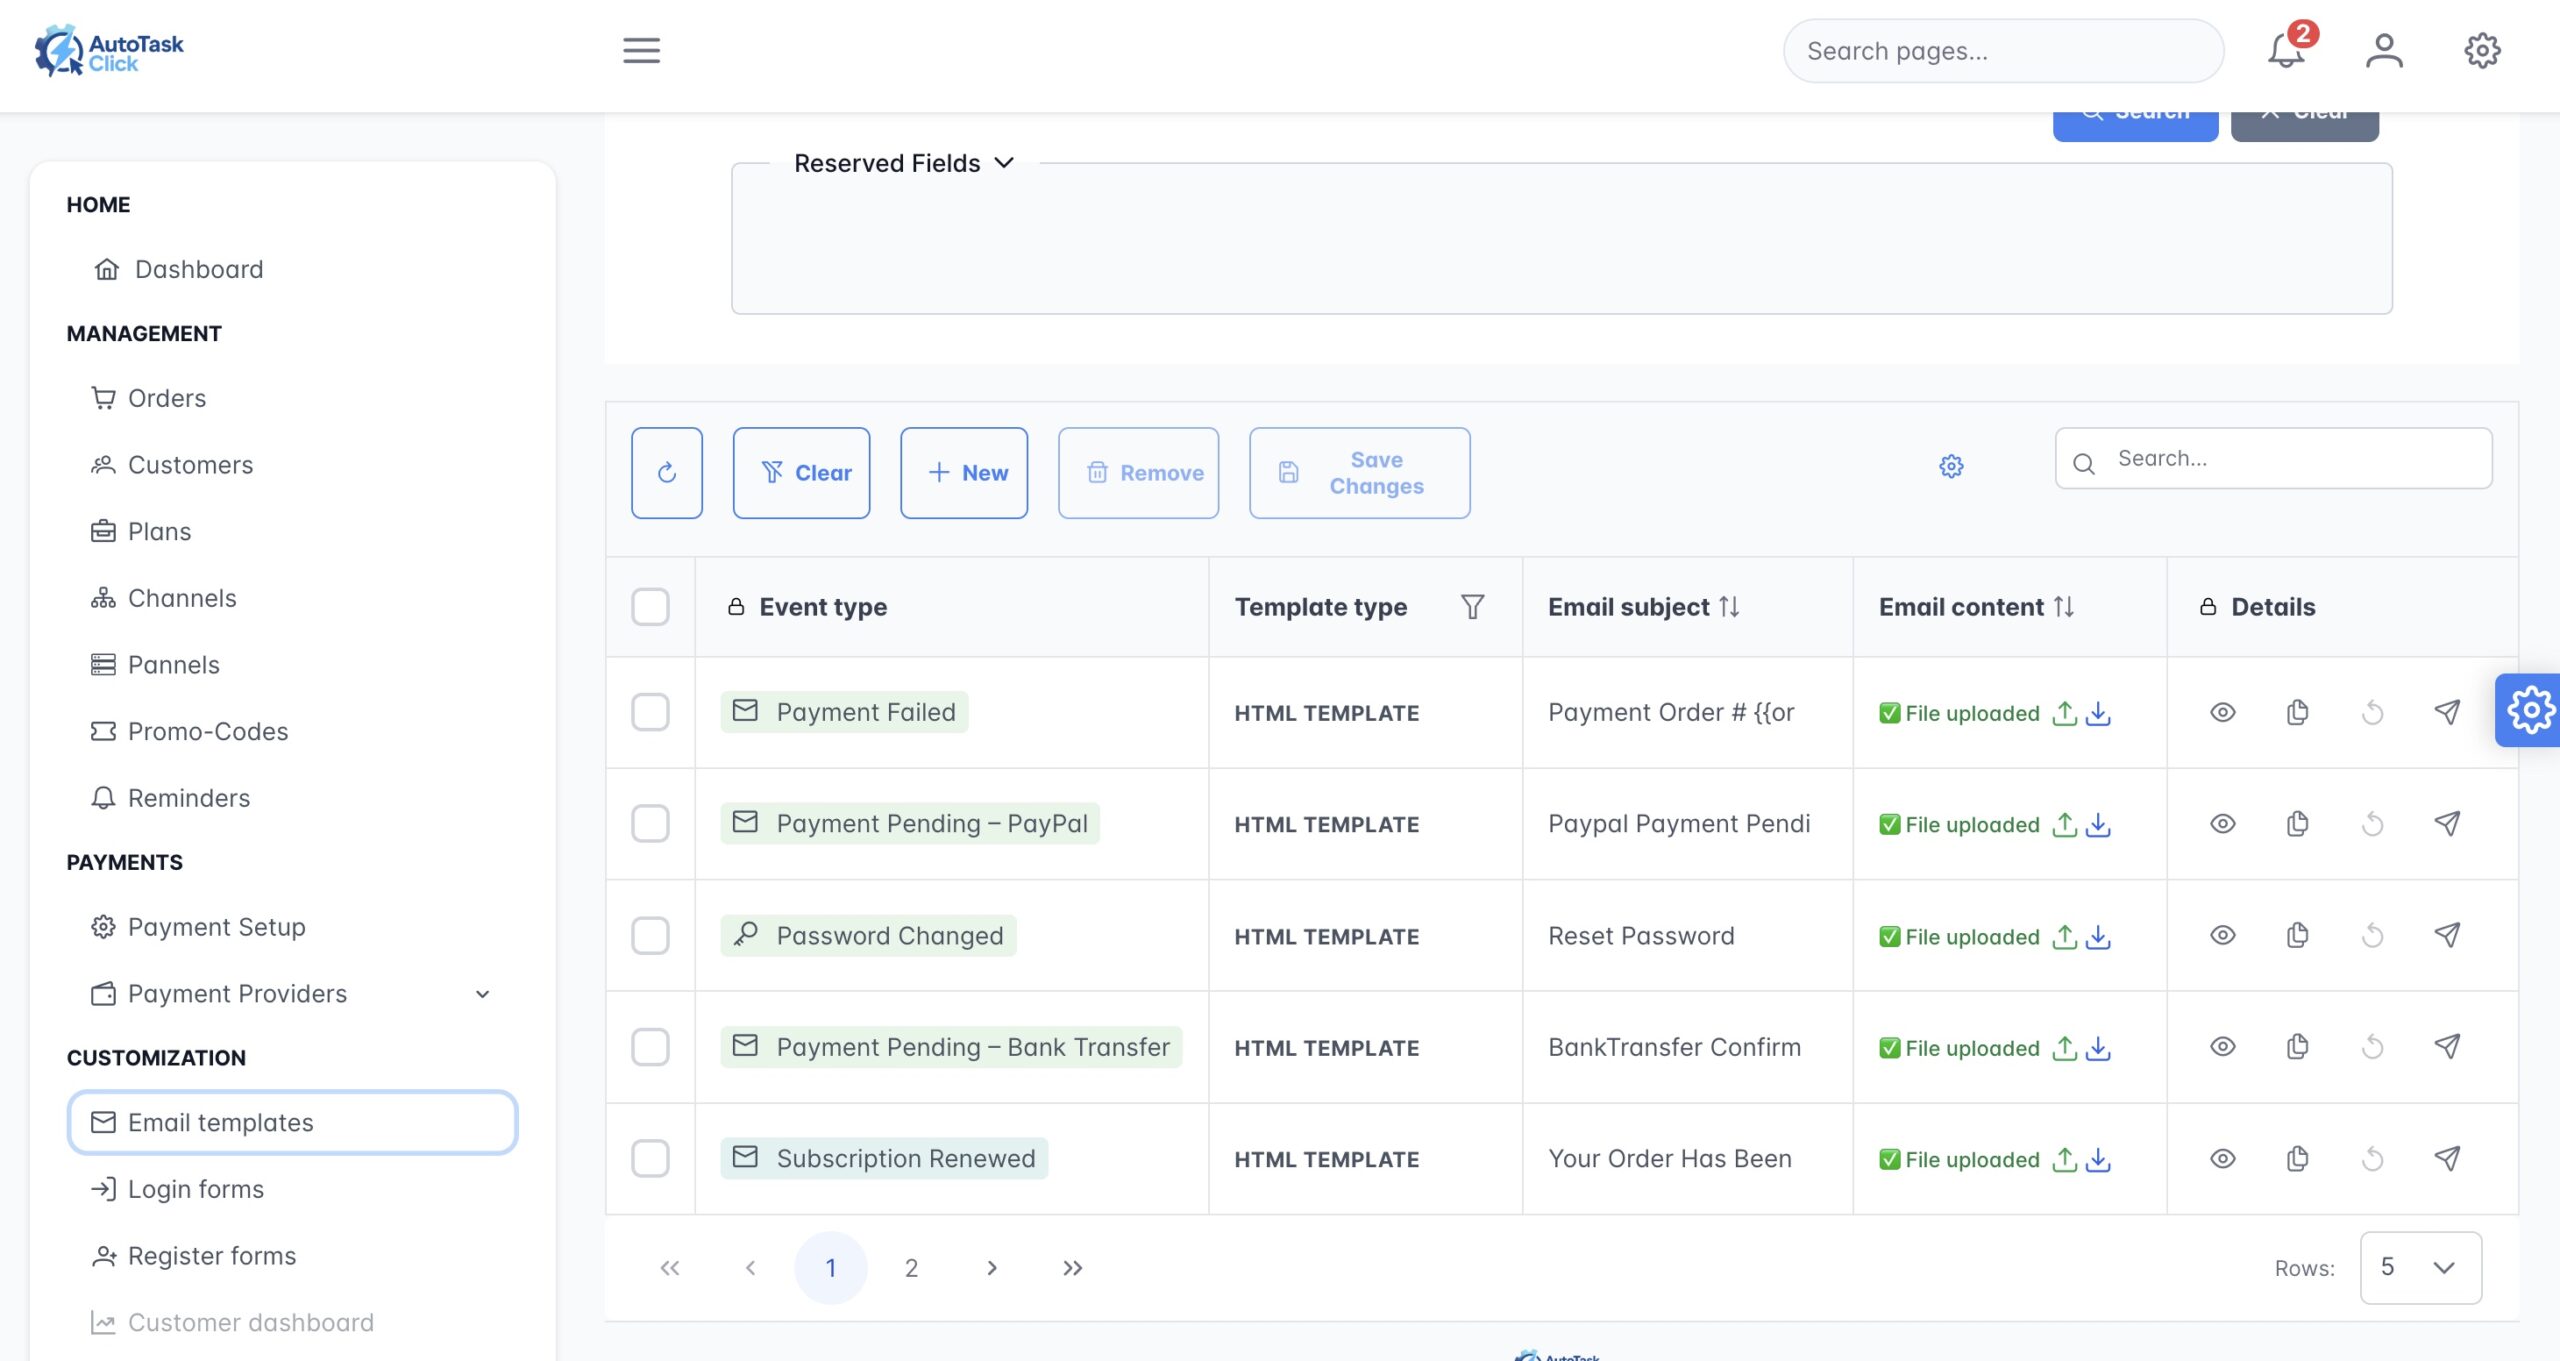
- Email Templates: Customize order activation, renewal, and pending payment messages
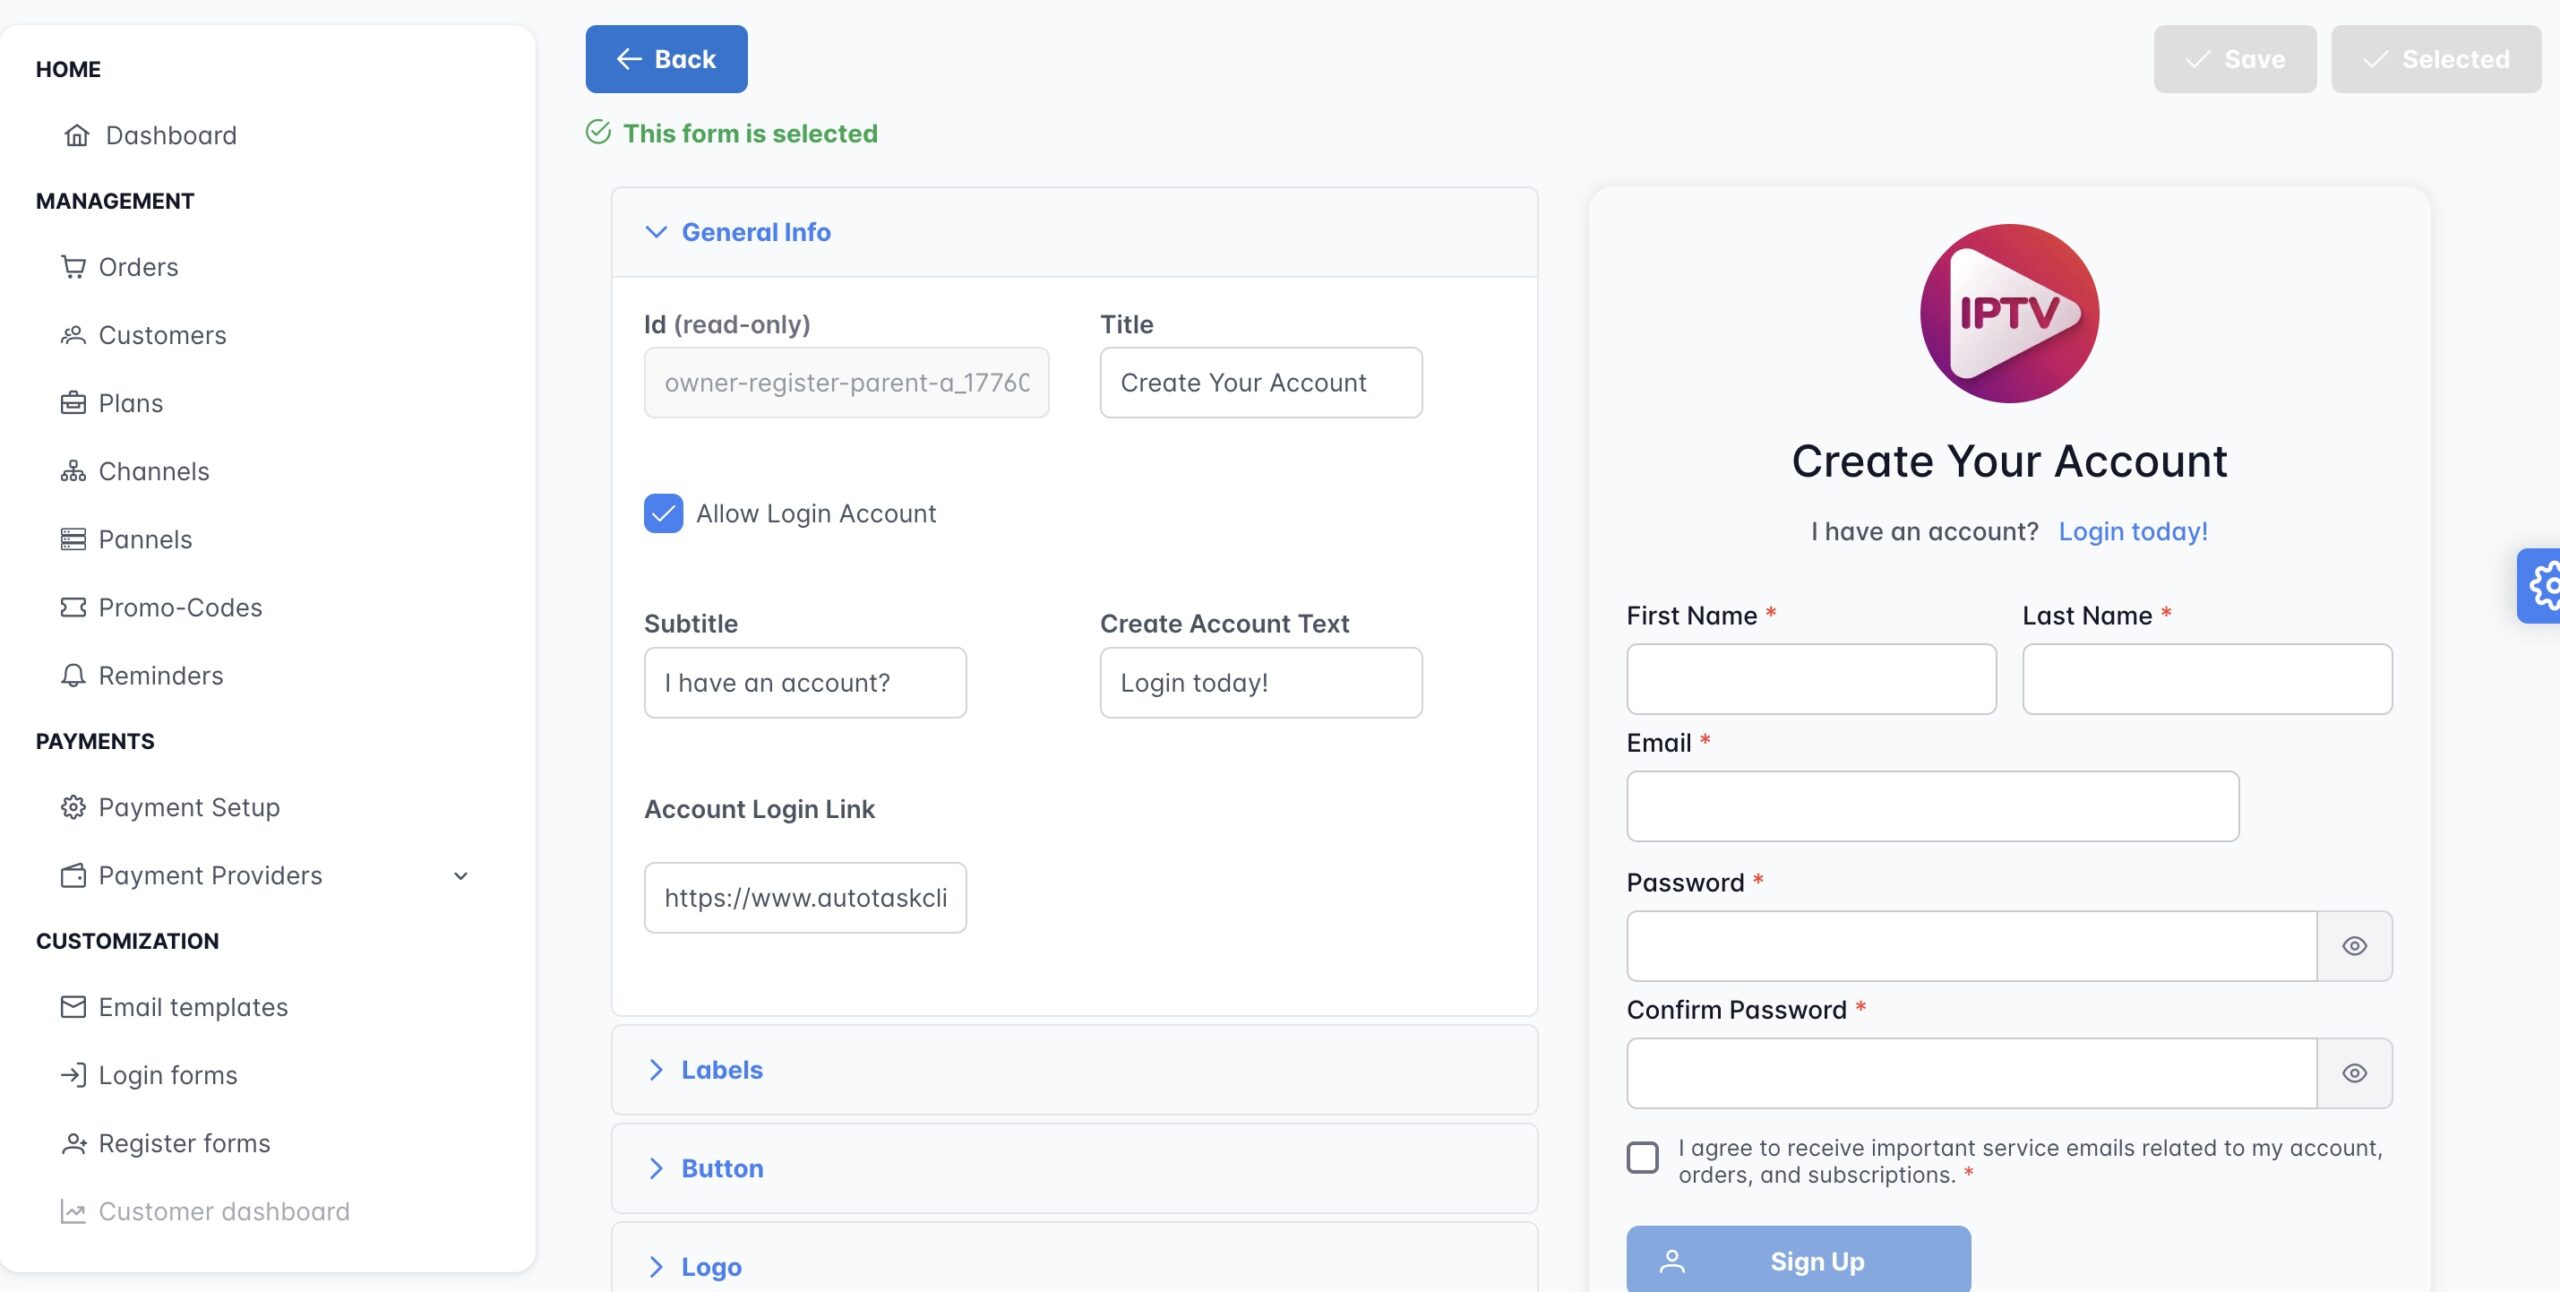
- Login/Signup Forms: Clone and customize with your logo, colors, and CSS
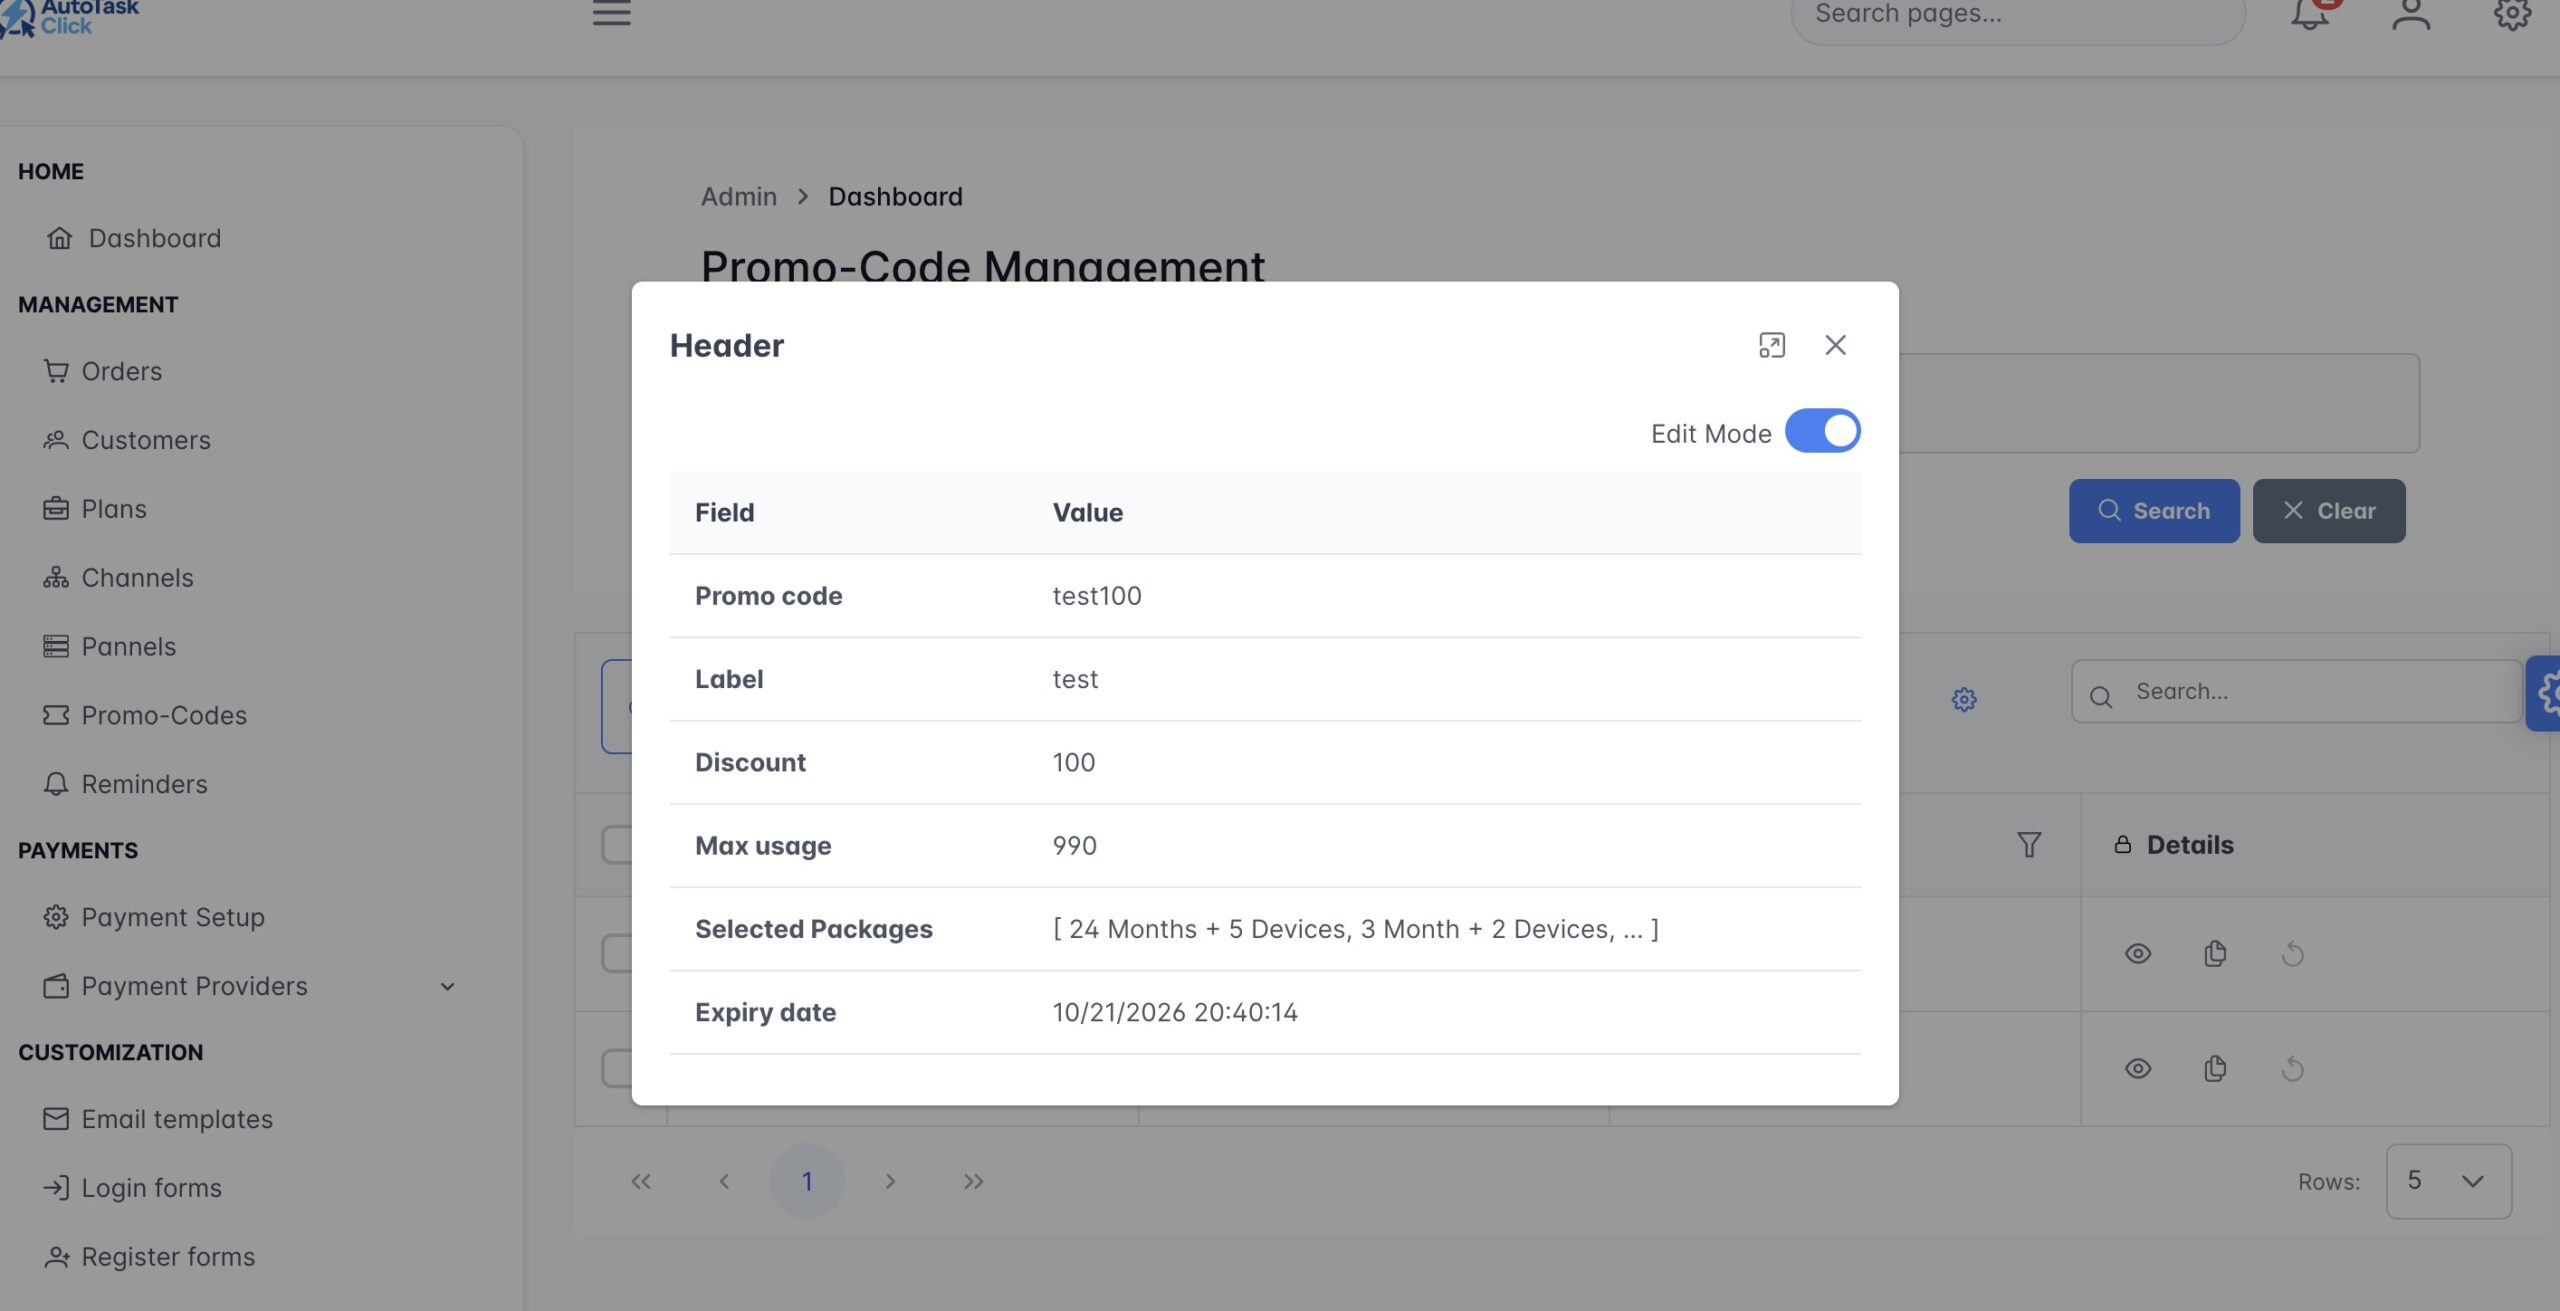
- Promo Codes: Create discount codes with usage limits
- Channels Editor: Modify channel lineup without touching your panel
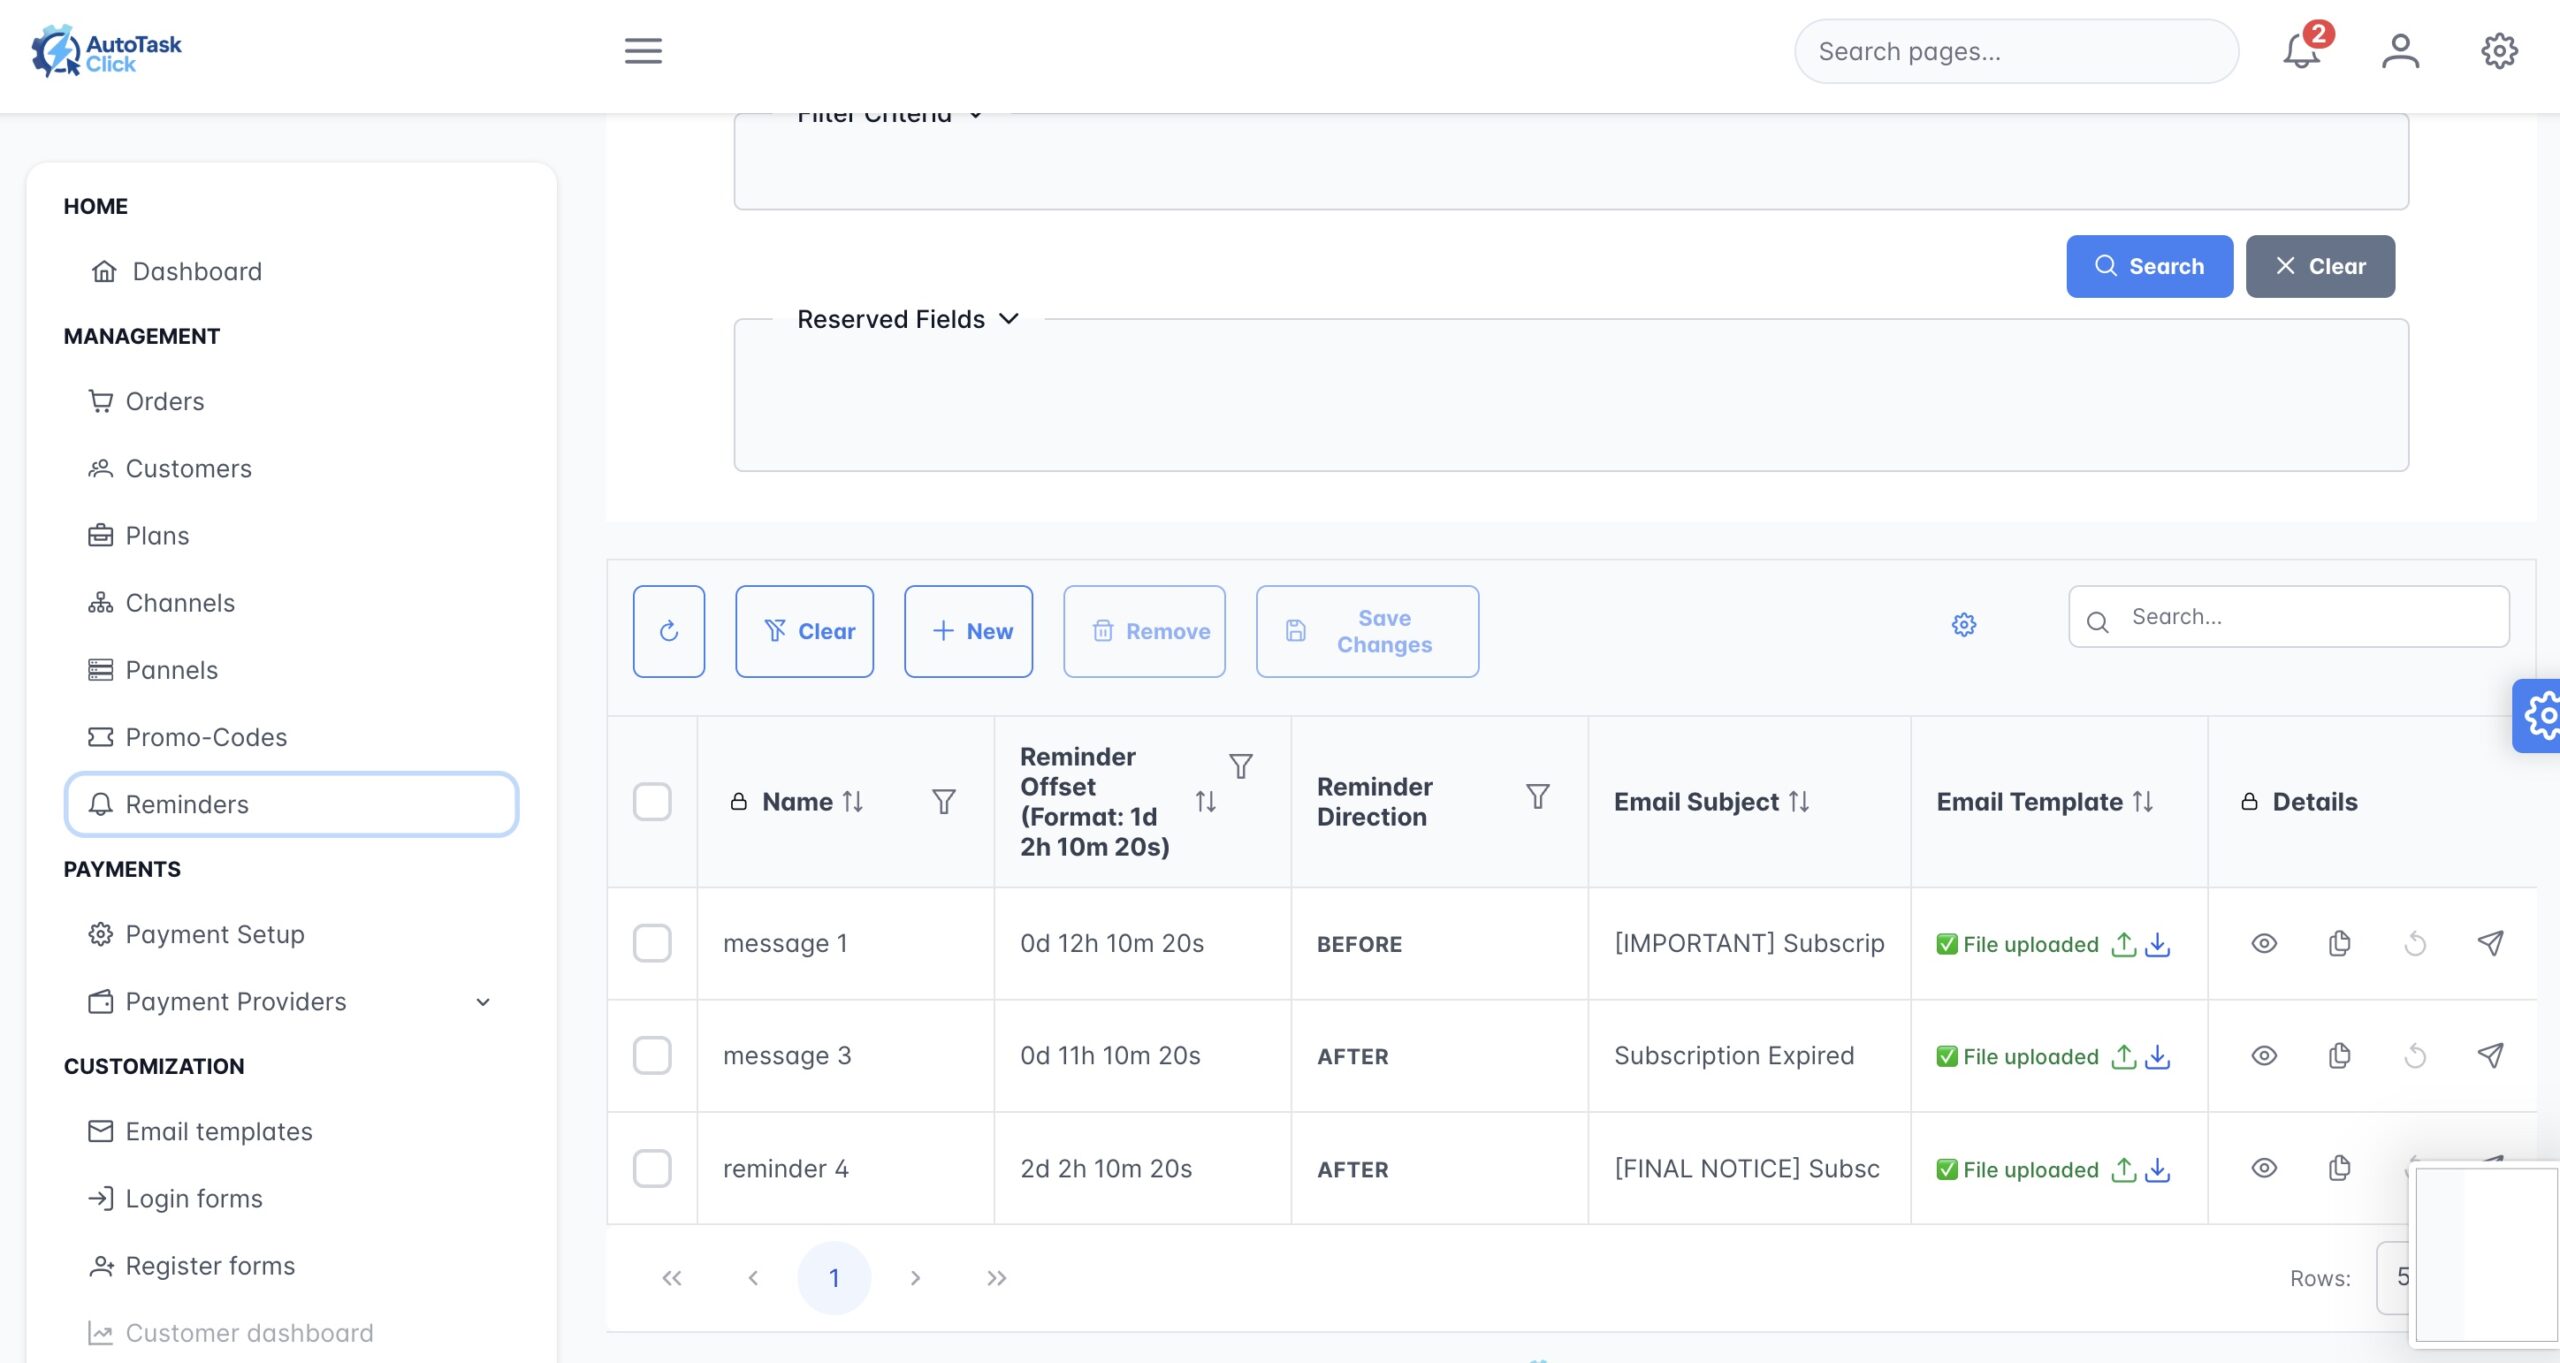
- Reminders: Configure automatic email reminders for expiring subscriptions
⚠️ Troubleshooting
- Make sure the plugin is activated
- Verify you're using the exact shortcode:
[your checkout form] - Check that you're logged into the plugin (Earth icon)
- Ensure all previous setup steps (panels, payments) are completed
- Go to Plans & Pricing and make sure you have created at least one plan
- Verify that each plan is assigned to a panel in Panels Linking
- Check that payment methods are assigned to the plans
- Make sure you copied the entire script code (including the <script> tags)
- Check if your website allows JavaScript embeds
- Verify your Embed Token is still valid (regenerate if needed)
- Test on a different page to isolate the issue